This article gives an introduction of  Concurrent Processing in Oracle Application.
Concurrent Program:
An instance of an execution file, along with parameter definitions and incompatibilities. Several concurrent programs may use the same execution file to perform their specific tasks, each having different parameter defaults and incompatibilities.
Concurrent Program Executable:
An executable file that performs a specific task. The file may be a program written in a standard language, a reporting tool or an operating system language.
An execution method can be a PL/SQL Stored Procedure, an Oracle Tool such as Oracle Reports or SQL*Plus, a spawned process, or an operating system host language.
Concurrent Request:
A request to run a concurrent program as a concurrent process.
Concurrent Process:
An instance of a running concurrent program that runs simultaneously with other concurrent processes.
Concurrent Manager:
A program that processes user’s requests and runs concurrent programs. System Administrators define concurrent managers to run different kinds of requests.
There are many concurrent managers each monitoring the flow within each apps area.
But there are 3 MASTER CONCURRENT MANAGERS:
1. Internal Concurrent Manager (ICM): This is the one which monitors all other CMs
2. Standard Manager (SM) : This takes care of report running and batch jobs
3. Conflict Resolution Manager (CRM): checks concurrent program definitions for incompatibility checks.
We cannot delete a concurrent manager… but we can disable it… but it’s not recommended.

Concurrent Queue:
List of concurrent requests awaiting to be processed by a concurrent manager.
Phases and Statuses through which a concurrent request runs:
A concurrent request proceeds through three, possibly four, life cycle stages or phases: 

  • Pending                                       Request is waiting to be run
  • Running                                       Request is running
  • Completed                                   Request has finished
  • Inactive                                       Request cannot be run

Within each phase, a request’s condition or status may change.  Below appears a listing of each phase and the various states that a concurrent request can go through.
Concurrent Request Phase and Status 
Phase: PENDING      

  • Normal: Request is waiting for the next available manager.
  • Standby: Program to run request is incompatible with other program(s) currently running.
  • Scheduled: Request is scheduled to start at a future time or date.
  • Waiting: A child request is waiting for its Parent request to mark it ready to run.   

Phase:RUNNING       

  • Normal: Request is running normally.
  • Paused: Parent request pauses for all its child requests to complete. 
  • Resuming: All requests submitted by the same parent request have completed running.  The  Parent   request is waiting to be restarted.
  • Terminating: Running request is terminated, by selecting Terminate in the Status field of the Request Details zone.

Phase:COMPLETED    

  • Normal: Request completes normally.
  • Error: Request failed to complete successfully.
  • Warning: Request completes with warnings.  For example, a report is generated successfully but fails to print.
  • Cancelled: Pending or Inactive request is cancelled, by selecting Cancel in the Status field of the Request Details zone.
  • Terminated: Running request is terminated, by selecting Terminate in the Status field of the Request Details zone.

 Phase:INACTIVE          

  • Disabled: Program to run request is not enabled.  Contact your system administrator.
  • On Hold: Pending request is placed on hold, by selecting Hold in the Status field of the Request Details zone.
  • No Manager: No manager is defined to run the request.  Check with your system administrator.

 Different execution methods of executabls:

  • FlexRpt                             The execution file is written using the FlexReport API.
  • FlexSql                             The execution file is written using the FlexSql API.
  • Host                                 The execution file is a host script.
  • Oracle Reports                  The execution file is an Oracle Reports file.
  • PL/SQL Stored Procedure   The execution file is a stored procedure.
  • SQL*Loader                      The execution file is a SQL script.
  • SQL*Plus                          The execution file is a SQL*Plus script.
  • SQL*Report                      The execution file is a SQL*Report script.
  • Spawned                          The execution file is a C or Pro*C program.
  • Immediate                       The execution file is a program written to run as a subroutine of the concurrent manager.

 Output formats of a concurrent program:

  • HTML
  • PDF
  • TEXT
  • PS (Post Script)
  • PCL(HP’s Printer Control Language)

Here are the steps to create a simple search page in OA Framwork. I have used OAF Version 12.1.1 for this exercise. There are many ways to do this and here I have followed one of these.
Step 1: Create a Package
All BC4J model components must belong to a Business Components (BC4J) package. So create a package with a name like xxhci.oracle.apps.custom.LabExamples.server.
Step2: Create an Entity Object (EO)
Entity objects encapsulate business logic and DML operations for application tables.
To create a new entity object in the above defined Business Components (BC4J) package:
1. In the JDeveloper Navigator, select the BC4J package where you want to create your entity object.
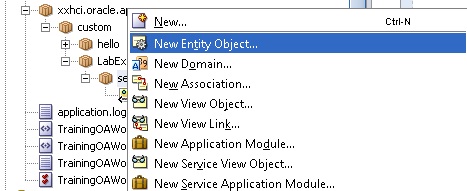
2. Right click and select ‘New Entity Object’
3. Do the following steps to create an EO.
2.1 Specify a Schema Object (the exact name of the table for the entity object)

2.2 In the Attributes page (Step 2 of 5), you should see all the columns in the table that you specified in the Name page.
Select New… to create a transient attribute that is used in the business logic, such as a calculated OrderTotal in a purchase order that is used for approval checking.
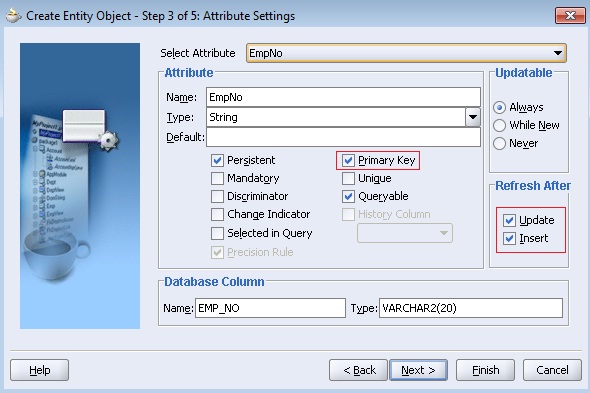
2.3 In the Attribute Settings page (Step 3 of 5), verify or set the following information for each of the entity object’s attributes:
The Attribute and Database Column Name and Type properties default correctly from the table definition. For primary key columns, ensure that the Primary Key and Mandatory checkboxes are selected. For columns that are never updateable, or updateable only when new, select the appropriate Updateable radio button. For columns whose values change after database triggers execute, select the Refresh After update or insert as appropriate.
2.4 In the Java page (Step 4 of 5) page:
  • Check the option for generating an Entity Object Class. In the Generate Methods box, opt to generateAccessors, a Create Method and a Remove Method.
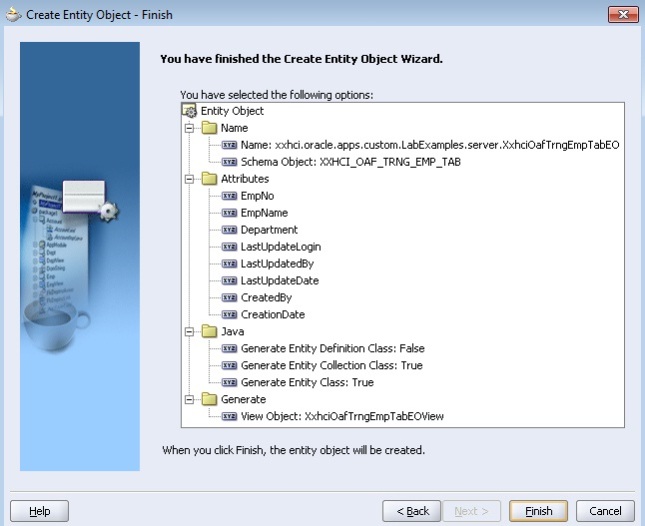
2.5 Click on ‘Generate default view object’ to create a VO. Select Finish to save your entity object definition and implementation. BC4J will create an XML definition file and a Java implementation file for your entity object.
Step3: Create an View Object (VO)
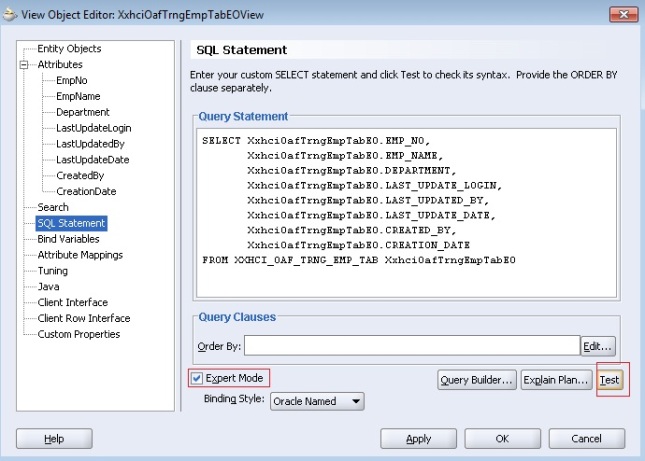
If you click ‘Generate default view object’ tab as mentioned above, you don’t have to create a VO separately. If you forgot this, you have to create a VO. Click on the VO to test the SQL Statement generated by the EO and check in the ‘Expert Mode’.
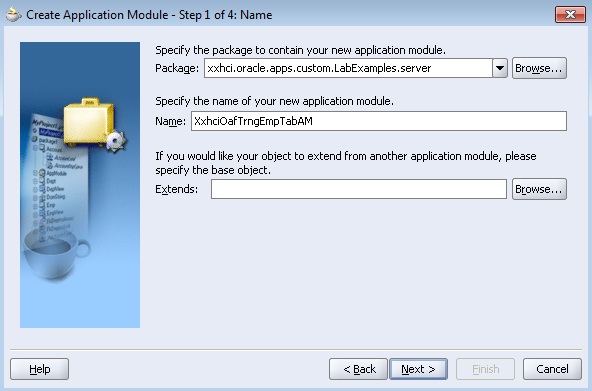
Step4: Create a New Application Module (AM)
To create a new application module in a Business Components (BC4J) package:
1. In the JDeveloper Navigator, select the BC4J package where you want to create your application module.
2. From the main menu, choose File > New to open the New Object Gallery.
Select the view object.
In the Java page (Step 4 of 5), deselect the Generate Java File(s) checkbox ONLY if you are certain that you won’t be writing any code for your application module (you can always delete the class later if you find that you don’t need it, so it’s probably best to simply generate it at this point unless you are creating a simple container for LOV view objects).
Select Finish to create your application module. BC4J will create an XML definition and implementation file.
Step5: Create a Page (EmpSearchPG)
Create the EmpSearchPG page as follows
  • Right click on project à New à Web Tier à OA Components à Page
  • Give the Page Name as EmpSearchPG and package as “xxhci.oracle.apps.custom.LabExamples.webui”
  • Select region1 page from Structure Window and change its properties as
    ID à PageLayoutRN
  • Select the AM Definition as ‘xxhci.oracle.apps.custom.LabExamples.server.XxhciOafTrngEmpTabAM’
  • Give a Window Title as ‘Employees Search Window’
  • Give a Title as ‘Employees’
Step6: Add a Query region and Results table
  • Right click on PageLayoutRN à New à Region. Set the properties of the new region as
    ID à QueryRN
  • Select the Region Style as ‘query’ and Construction Mode as ‘resultBasedSearch’.
  • Right click on QueryRN region on structure navigator à New à Region using wizard.
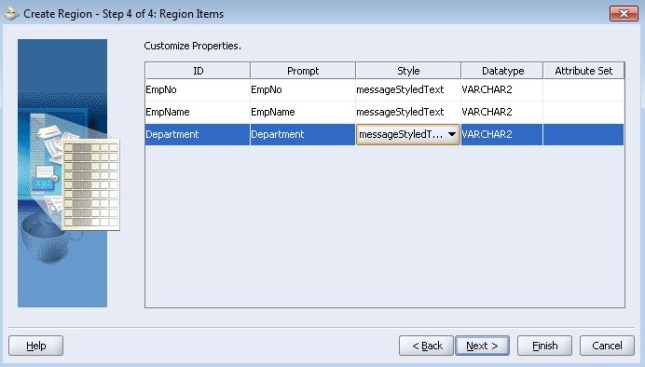
  • Select the AM and VO which we have created in earlier steps as shown in below figure.
Set the Region Style as Table
Change the Prompt and Style for all three items.
Step7: Changes the Item Properties
Go to EmpNo item and set the Search Allowed property to true. Similarly do the steps for EmpName and Department also.
Step8: Save all changes (Save All).
Step9: Run the Page (EmpSearchPG)
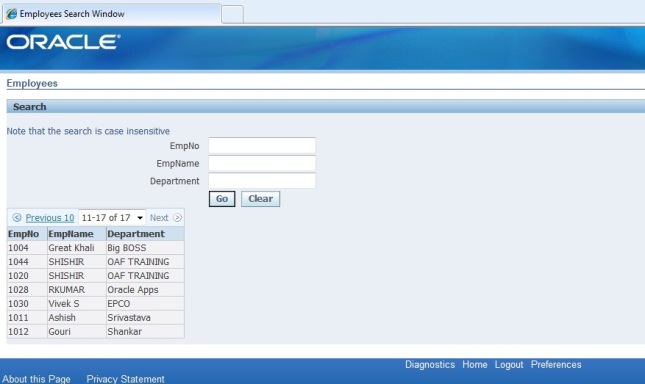
Creation of search page is complete. Run the EmpSearchPG to test the page. If everything works fine for you, you should able to view an output like below:
Few Note:
Understanding Query Regions
When you add a query region to a pageLayout region, OA Framework automatically generates an oracle.apps.fnd.framework.webui.beans.layout.OAQueryBean which, depending on its configuration, works in concert with a child table, advanced table or HGrid to implement any combination of simple search, advanced search and view panels. OA Framework automatically generates buttons as appropriate for toggling between the applicable regions.
Construction Modes:
There are three construction modes available. In the above example we have used ‘resultBasedSearch’construction mode. Here is a brief comparison of the three modes.
1] resultsBasedSearch:
  • OA Framework automatically renders both the Simple and Advanced search regions based on the designated queryable items in the associated table.
  • The search regions automatically include both a Go and a Clear button.
  • OA Framework automatically executes the underlying search when the user selects the Go button.
2] autoCustomizationCriteria:
  • OA Framework automatically renders both the Simple and Advanced search regions based on the corresponding Simple search and Advanced search regions that you define and specify as named children of the query region.
  • The search regions automatically include a Go button. In addition, the Advanced search region includes a Clear button.
  • OA Framework automatically executes the underlying search when the user selects the Go button. However, developers must explicitly define mappings between items in the Search panel and items in the table region.
3] none
  • The Search regions are rendered based on the Simple Search and Advanced Search regions that you define and specify as named children of the query region.
  • You must implement your own Go button in this mode.
  • The underlying search must be executed by the developer.

In Oracle EBS development, the terms Personalization, Customizations & Extensions are often used interchangeably. It often creates confusion among developers regarding the meaning of these terms. These terms are critically important terms that developers must understand and use properly. Let’s discuss them briefly here to simply understand what they are.
What is Personalization?
Personalization is the process of making changes to the User Interface (UI) from within an Oracle E-Business Suite Form/Page. It is possible to make personalization to both Form-based and OA Framework based pages.
What is Extension?
Extension is the process of making changes to the programmatic (i.e., PL/SQL or Java) elements of an E-Business Suite form/page. It is possible to extend both Forms based and OA Framework-based pages.
What is Customization?
Customization is the process of creating new forms/pages. While Oracle does provide tools to do this (i.e., Oracle Forms and JDeveloper 10g with OA Extension), this is the least supported option.

With the emergence of next generation Fusion technology middleware stack there is confusion between the technologies OA framework and ADF among Oracle developers especially for the people who are developing extensions for Oracle Applications 11i/R12. Both are Oracle technologies for developing web based User Interface with Jdeveloper. Here is a detailed overview of OA framework and ADF.

OA Framework:

OAF (Oracle Applications Framework) is used to create the web based Oracle Application extensions and it is the default web technology for 11i and R12 development. It is closely integrated with Oracle Apps hence it is meaningless outside apps context. OAF is a model-view-controller technology stack which comprised of OA framework View (regions and pages) and BC4j respectively as view and model layers.
OAF and Oracle Applications 11i/R12
  • OAF includes AOL which provides e-business functionality like functions, menus, responsibility, functional security, data security, messages, profiles, flexfields, and concurrent programs.
  • List of Values – validation, auto complete, auto clear is available in OAF.
  • Transactional Search – Query Bean is available in OAF.
  • Data export, Configurable pages and Rich text editor is available in OAF.
  • OAF supports translatable table (TL tables).
  • Who columns like created by, modified by, creation date, modified date are supported in OAF.
  • Since OAF is tightly integrated with E-Business session management is done automatically.
  • Menu that appears at the top of the page is integrated with AOL menus. Hence the menus can be configured dynamically by manipulating AOL menus and no coding is required.
  • Functional security is available in OAF which allows you to configure the responsibility dynamically for the user.
  • User authentication is done from SSO. So no need to configure or write any code.
  • Data security is available.
  • Secured against cross site scripting attack.
  • OAF page access can be tracked.
  • Standards and guidelines are available for developing extensions in OAF which is the most important thing.
  • Reusable regions are available in OAF.
  • UI cannot be migrated to ADF 11g (may be in the future Oracle will come up with migration utility for UI but even then only declarative pages would be migrated and the UI pages should have followed the coding standards strictly).
  • BC4J can be migrated with minimal code change.
  • Controller cannot be migrated hence you have to rewrite all the logics in the controller if you want to migrate it to ADF 11g.

ADF 10g

ADF 10g (Application Development Framework) is the core technology for Fusion Applications and uses lot of open standards and technologies. ADF can also be used for common J2EE applications because ADF technology stack allows you choose between various options. ADF is primarily comprised of ADF Faces, ADF model and ADFbc (which is previously known as bc4j in OAF)
ADF 10g and Oracle Applications 11i/R12
  • ADF 10g does not include any support for AOL
  • List of Values and its associated features like validation, auto complete and clear does not exists in ADF.
  • No Transactional search, Data Export, Configurable pages or Rich text editor.
  • No support of Translatable Table and who columns.
  • No support for E-business suite session management.
  • No support for integration with Oracle Workflow.
  • E-business security features are totally unavailable in ADF 10g. (security features include Data security, functionally security, SSO etc)
  • Page access cannot be tracked in ADF 10g.
  • No support of for menus in ADF.
  • Reusable regions cannot be created in ADF 10g.
  • ADF 10g can be easily migrated to ADF 11g.
  • And most of all you cannot extend or personalize the existing page with the help of ADF.
And the advantage of ADF 10g over OA framework is that your investments would be protected when you want to migrate to ADF 11g.
ADF has many advantages starting from the underlying architecture, the level of support for Web Services and SOA development and going all the way to the actual development experience of UIs using visual editor and drag and drop binding. 

Conclusion

Consider following points when choosing technology.
  • If you want to build few pages with close integration of e-business suite then opt for OA framework. Remember if you want to migrate your code to ADF 11g in the future, you have to follow the coding standards strictly and code all the business logic in bc4j rather than handling the logic in controller.
  • If you don’t want a close integration e-business suite or your building entirely new application then go for ADF 10g. 
Source: prasanna-adf.blogspot.com

This tutorial will tell you the basic steps to create a Hello Word Page in OA Framework.
Earlier Posts:

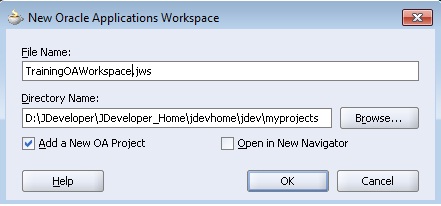
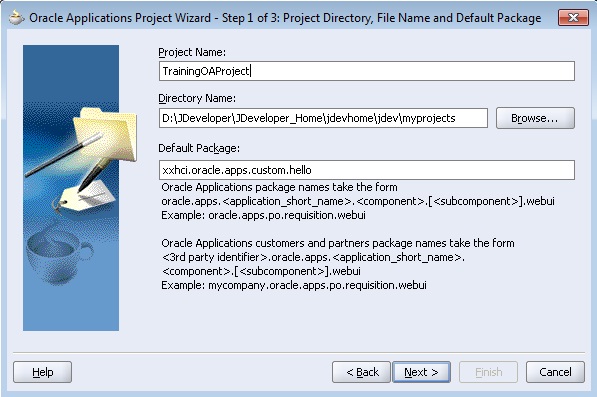
Step 1: Start JDeveloper. Create a New OA Workspace and Empty OA Project with the New…Dialog

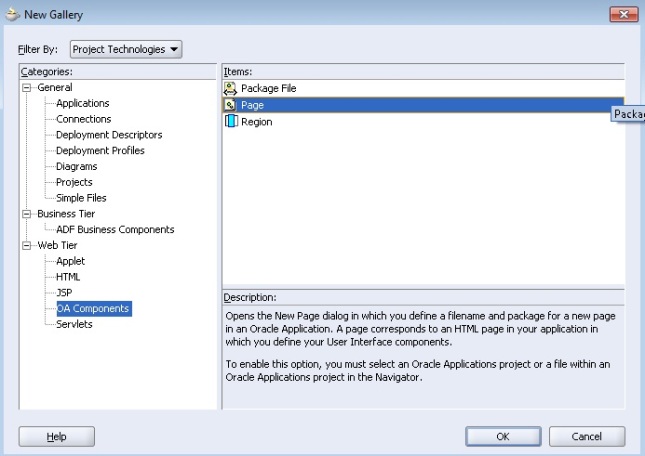
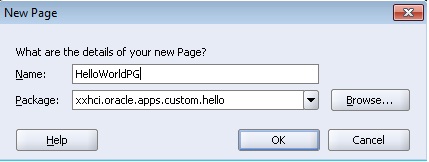
Step 2: Create the OA Component Page

JDeveloper creates your top-level page layout region for you automatically when you create your page.

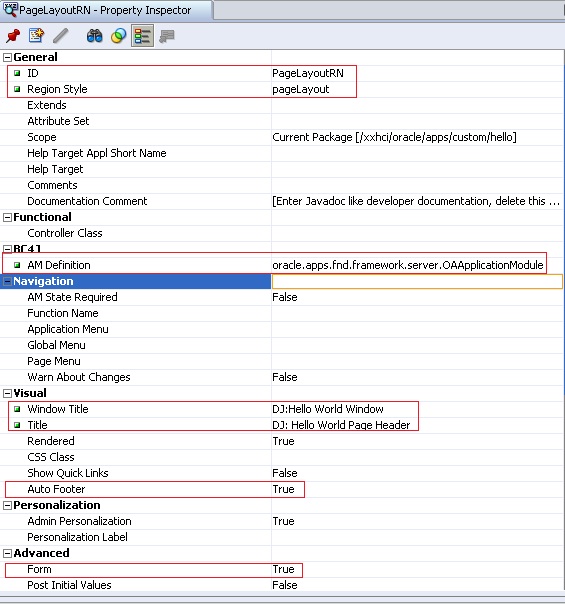
Step 3: Modify the Page Layout (Top-level) Region

  • Set the ID property to PageLayoutRN.
  • Verify that the Region Style property is set to pageLayout.
  • Verify that the Form property is set to True.
  • Verify that the Auto Footer property is set to True.
  • Set the Window Title property to <your name>: Hello World Window Title. This becomes the window title for the page.
  • Set the Title property to <your name>: Hello World Page Header.
  • Set the AM Definition property to oracle.apps.fnd.framework.server.OAApplicationModule (you will have to type in the value). This is a generic application module supplied by the OA Framework.

Step 4: Create the Second Region (Main Content Region)

Create your second region under the page layout region by selecting the page layout region in the Structure window and choosing New > Region from the context menu.
  • Replace the default value in the ID property with MainRN.
  • Set the Region Style property to messageComponentLayout (this provides an indented single- or multiple-column layout for the child items of the region).

Step 5: Create the First Item (Empty Field)

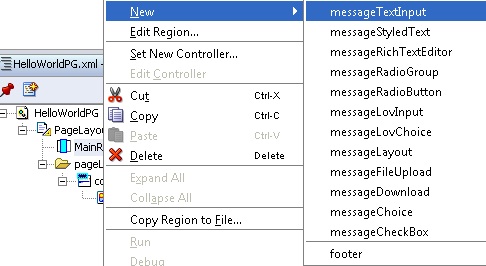
Create your first item under the second region (main content region) by selecting the second region in the Structure window and choosing New > messageTextInput from the context menu. This item will take any name as parameter.
  • Set the ID property to HelloName.
  • Verify that your Item Style property is set to messageTextInput (this style provides a text label and an input field).
  • Set the Prompt property to Name.
  • Set the Visual Length to 20.
  • Set the Data Maximum Length to 50.

Step 6: Create a Container Region for the Go Button

To add a non-message-type bean such as a submitButton to a messageComponentLayout region, you must first add the bean to a messageLayout region.
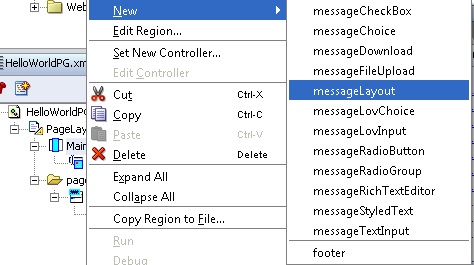
Select the messageComponentLayout region and select New > messageLayout.
Name this region ButtonLayout.

Step 7: Create the Second Item (Go Button)

Create your Go button item by selecting the messageLayout region, ButtonLayout, in the Structure window and choosing New > Item from the context menu.
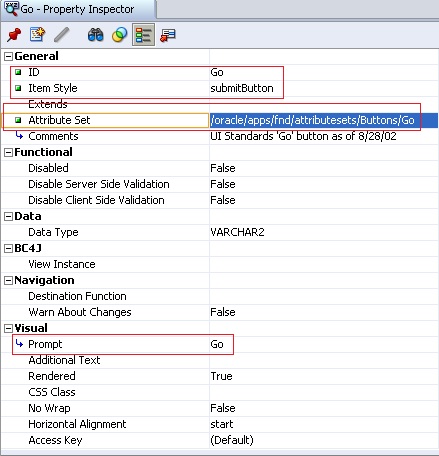
Set the following properties for your button item:
  • Set the value of the ID property to Go.
  • Set the Item Style property to submitButton.
  • Set the Attribute Set property to /oracle/apps/fnd/attributesets/Buttons/Go.

Step 8: Save Your Work (Save-All)

Step 9: Run Your Page Using the Run Option

You can try out your page using the Run option on the context menu. If you are using a database other than what you already have in your project settings, you will need to modify the Runtime Connection project settings by selection your project file and choosing Project Properties… from the main menu. Specifically, you must use a combination of Username, Password, (Responsibility) Application Short Name and Responsibility Key that is valid for your database to enable your session to log in.
The output will be like:
Here the Go Button has no functionality. Now to add some functionality to this Button, we need to add a Controller.

Step 10: Add a Controller

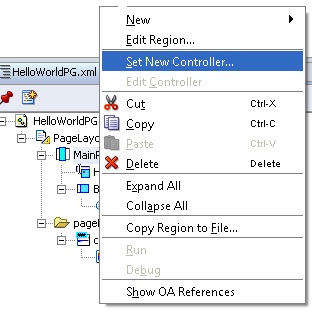
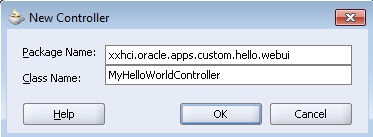
Add a controller to display a message when the user clicks on the Go button. Select your second region (MainRN) and choose Set New Controller… from the context menu.

Step 11: Edit Your Controller

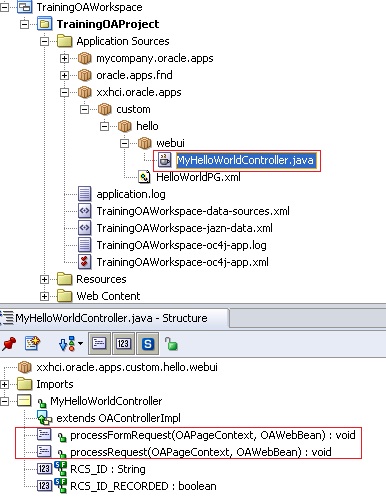
When you create a controller .java file will be automatically created and it will contain below 2 methods.
  • public void processRequest(OAPageContext pageContext, OAWebBean webBean) { }
  • public void processFormRequest(OAPageContext pageContext, OAWebBean webBean) { }
Now you need to add the below code in the java file to add the required functionality.
  • Add the following line as the last line of the import section to make the OA Framework OAException routines available:
import oracle.apps.fnd.framework.OAException;

  • Add the below code in processFormRequest method

if (pageContext.getParameter("Go") != null)
{
String userContent = pageContext.getParameter("HelloName");
String message = "Hello, " + userContent + "!";
throw new OAException(message, OAException.INFORMATION);
}

Step 12: Build Your Controller

Build your controller by selecting Rebuild from the context menu within the code editor window.

Step 13: Test Your Work Using the Run Option

Save your work, and then test it using the Run option. Type something into your field and then click the Go button. You should see the page with an informational message that contains what you typed into the field, as shown:
Congratulations…! You have created your first OA Page. I will try to put articles on how to create search, create and update page in OAF in future.