In Oracle EBS development, the terms Personalization, Customizations & Extensions are often used interchangeably. It often creates confusion among developers regarding the meaning of these terms. These terms are critically important terms that developers must understand and use properly. Let’s discuss them briefly here to simply understand what they are.
What is Personalization?
Personalization is the process of making changes to the User Interface (UI) from within an Oracle E-Business Suite Form/Page. It is possible to make personalization to both Form-based and OA Framework based pages.
What is Extension?
Extension is the process of making changes to the programmatic (i.e., PL/SQL or Java) elements of an E-Business Suite form/page. It is possible to extend both Forms based and OA Framework-based pages.
What is Customization?
Customization is the process of creating new forms/pages. While Oracle does provide tools to do this (i.e., Oracle Forms and JDeveloper 10g with OA Extension), this is the least supported option.
With the emergence of next generation Fusion technology middleware stack there is confusion between the technologies OA framework and ADF among Oracle developers especially for the people who are developing extensions for Oracle Applications 11i/R12. Both are Oracle technologies for developing web based User Interface with Jdeveloper. Here is a detailed overview of OA framework and ADF.
OA Framework:
OAF (Oracle Applications Framework) is used to create the web based Oracle Application extensions and it is the default web technology for 11i and R12 development. It is closely integrated with Oracle Apps hence it is meaningless outside apps context. OAF is a model-view-controller technology stack which comprised of OA framework View (regions and pages) and BC4j respectively as view and model layers.
OAF and Oracle Applications 11i/R12
- OAF includes AOL which provides e-business functionality like functions, menus, responsibility, functional security, data security, messages, profiles, flexfields, and concurrent programs.
- List of Values – validation, auto complete, auto clear is available in OAF.
- Transactional Search – Query Bean is available in OAF.
- Data export, Configurable pages and Rich text editor is available in OAF.
- OAF supports translatable table (TL tables).
- Who columns like created by, modified by, creation date, modified date are supported in OAF.
- Since OAF is tightly integrated with E-Business session management is done automatically.
- Menu that appears at the top of the page is integrated with AOL menus. Hence the menus can be configured dynamically by manipulating AOL menus and no coding is required.
- Functional security is available in OAF which allows you to configure the responsibility dynamically for the user.
- User authentication is done from SSO. So no need to configure or write any code.
- Data security is available.
- Secured against cross site scripting attack.
- OAF page access can be tracked.
- Standards and guidelines are available for developing extensions in OAF which is the most important thing.
- Reusable regions are available in OAF.
- UI cannot be migrated to ADF 11g (may be in the future Oracle will come up with migration utility for UI but even then only declarative pages would be migrated and the UI pages should have followed the coding standards strictly).
- BC4J can be migrated with minimal code change.
- Controller cannot be migrated hence you have to rewrite all the logics in the controller if you want to migrate it to ADF 11g.
ADF 10g
ADF 10g (Application Development Framework) is the core technology for Fusion Applications and uses lot of open standards and technologies. ADF can also be used for common J2EE applications because ADF technology stack allows you choose between various options. ADF is primarily comprised of ADF Faces, ADF model and ADFbc (which is previously known as bc4j in OAF)
ADF 10g and Oracle Applications 11i/R12
- ADF 10g does not include any support for AOL
- List of Values and its associated features like validation, auto complete and clear does not exists in ADF.
- No Transactional search, Data Export, Configurable pages or Rich text editor.
- No support of Translatable Table and who columns.
- No support for E-business suite session management.
- No support for integration with Oracle Workflow.
- E-business security features are totally unavailable in ADF 10g. (security features include Data security, functionally security, SSO etc)
- Page access cannot be tracked in ADF 10g.
- No support of for menus in ADF.
- Reusable regions cannot be created in ADF 10g.
- ADF 10g can be easily migrated to ADF 11g.
- And most of all you cannot extend or personalize the existing page with the help of ADF.
And the advantage of ADF 10g over OA framework is that your investments would be protected when you want to migrate to ADF 11g.
ADF has many advantages starting from the underlying architecture, the level of support for Web Services and SOA development and going all the way to the actual development experience of UIs using visual editor and drag and drop binding.
Conclusion
Consider following points when choosing technology.
- If you want to build few pages with close integration of e-business suite then opt for OA framework. Remember if you want to migrate your code to ADF 11g in the future, you have to follow the coding standards strictly and code all the business logic in bc4j rather than handling the logic in controller.
- If you don’t want a close integration e-business suite or your building entirely new application then go for ADF 10g.
Source: prasanna-adf.blogspot.com
This tutorial will tell you the basic steps to create a Hello Word Page in OA Framework.
Earlier Posts:
Step 1: Start JDeveloper. Create a New OA Workspace and Empty OA Project with the New…Dialog
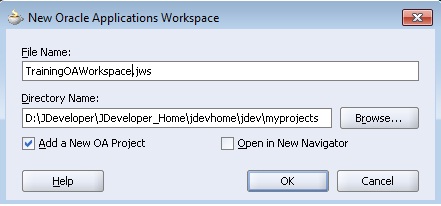
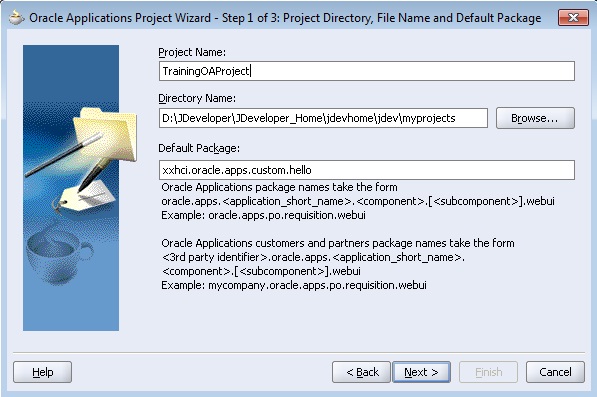
Step 2: Create the OA Component Page
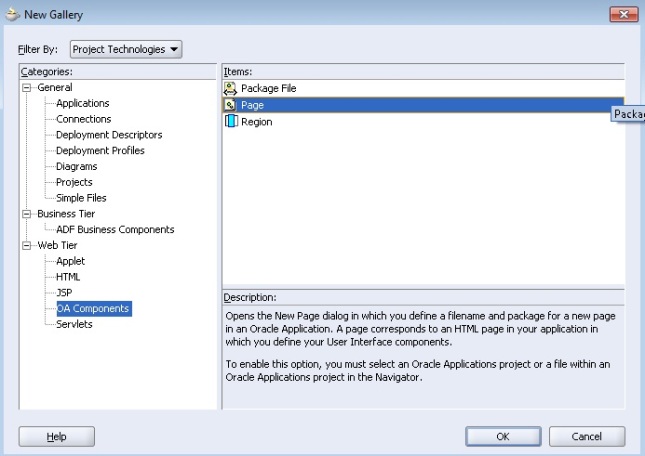
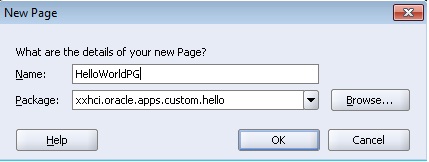
JDeveloper creates your top-level page layout region for you automatically when you create your page.
Step 3: Modify the Page Layout (Top-level) Region
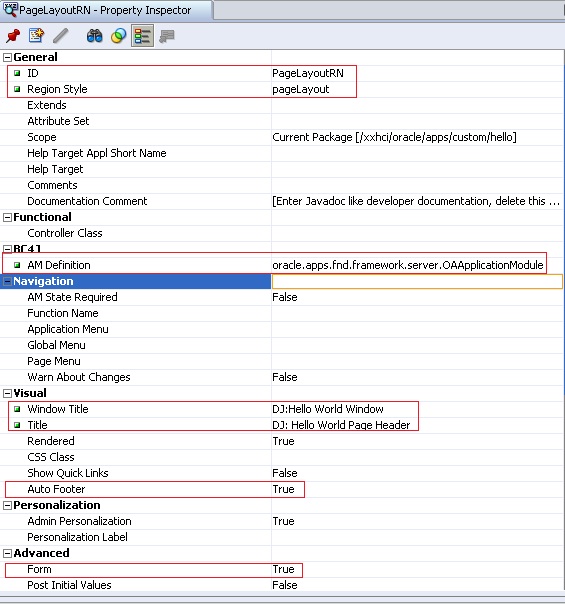
- Set the ID property to PageLayoutRN.
- Verify that the Region Style property is set to pageLayout.
- Verify that the Form property is set to True.
- Verify that the Auto Footer property is set to True.
- Set the Window Title property to <your name>: Hello World Window Title. This becomes the window title for the page.
- Set the Title property to <your name>: Hello World Page Header.
- Set the AM Definition property to oracle.apps.fnd.framework.server.OAApplicationModule (you will have to type in the value). This is a generic application module supplied by the OA Framework.
Step 4: Create the Second Region (Main Content Region)
Create your second region under the page layout region by selecting the page layout region in the Structure window and choosing New > Region from the context menu.
- Replace the default value in the ID property with MainRN.
- Set the Region Style property to messageComponentLayout (this provides an indented single- or multiple-column layout for the child items of the region).
Step 5: Create the First Item (Empty Field)
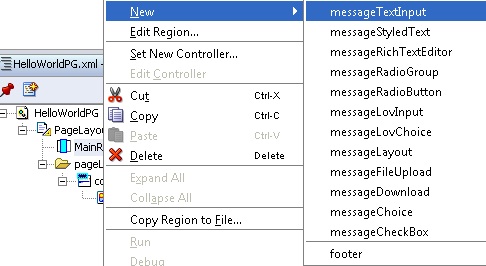
Create your first item under the second region (main content region) by selecting the second region in the Structure window and choosing New > messageTextInput from the context menu. This item will take any name as parameter.

- Set the ID property to HelloName.
- Verify that your Item Style property is set to messageTextInput (this style provides a text label and an input field).
- Set the Prompt property to Name.
- Set the Visual Length to 20.
- Set the Data Maximum Length to 50.
Step 6: Create a Container Region for the Go Button
To add a non-message-type bean such as a submitButton to a messageComponentLayout region, you must first add the bean to a messageLayout region.
Select the messageComponentLayout region and select New > messageLayout.
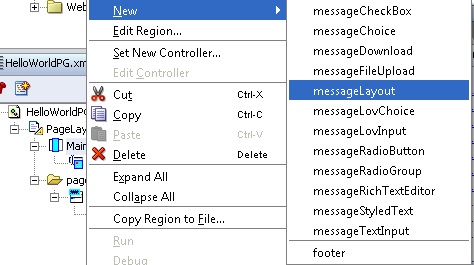
Name this region ButtonLayout.
Step 7: Create the Second Item (Go Button)
Create your Go button item by selecting the messageLayout region, ButtonLayout, in the Structure window and choosing New > Item from the context menu.
Set the following properties for your button item:
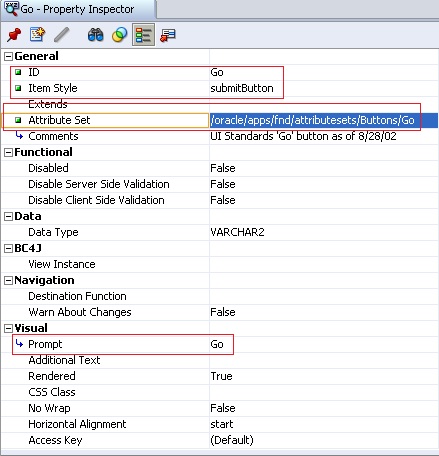
- Set the value of the ID property to Go.
- Set the Item Style property to submitButton.
- Set the Attribute Set property to /oracle/apps/fnd/attributesets/Buttons/Go.
Step 8: Save Your Work (Save-All)
Step 9: Run Your Page Using the Run Option
You can try out your page using the Run option on the context menu. If you are using a database other than what you already have in your project settings, you will need to modify the Runtime Connection project settings by selection your project file and choosing Project Properties… from the main menu. Specifically, you must use a combination of Username, Password, (Responsibility) Application Short Name and Responsibility Key that is valid for your database to enable your session to log in.
The output will be like:

Here the Go Button has no functionality. Now to add some functionality to this Button, we need to add a Controller.
Step 10: Add a Controller
Add a controller to display a message when the user clicks on the Go button. Select your second region (MainRN) and choose Set New Controller… from the context menu.
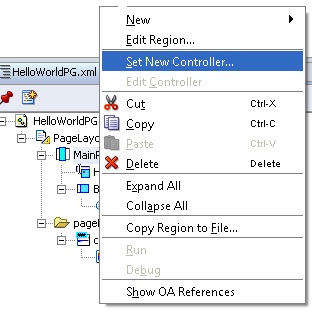
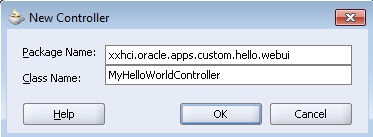
Step 11: Edit Your Controller
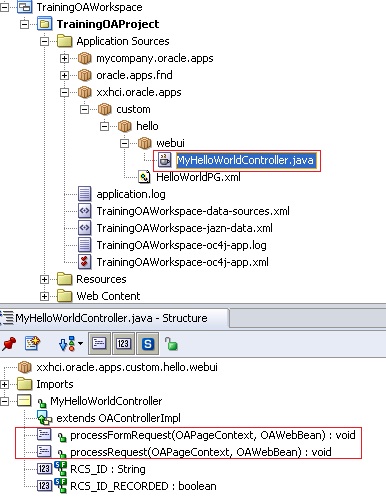
When you create a controller .java file will be automatically created and it will contain below 2 methods.
- public void processRequest(OAPageContext pageContext, OAWebBean webBean) { }
- public void processFormRequest(OAPageContext pageContext, OAWebBean webBean) { }
Now you need to add the below code in the java file to add the required functionality.
- Add the following line as the last line of the import section to make the OA Framework OAException routines available:
import oracle.apps.fnd.framework.OAException;
- Add the below code in processFormRequest method
if (pageContext.getParameter("Go") != null)
{
String userContent = pageContext.getParameter("HelloName");
String message = "Hello, " + userContent + "!";
throw new OAException(message, OAException.INFORMATION);
}Step 12: Build Your Controller
Build your controller by selecting Rebuild from the context menu within the code editor window.Step 13: Test Your Work Using the Run Option
Save your work, and then test it using the Run option. Type something into your field and then click the Go button. You should see the page with an informational message that contains what you typed into the field, as shown:Congratulations…! You have created your first OA Page. I will try to put articles on how to create search, create and update page in OAF in future.
If you are new to OAF Development and want to create a new Hello World Page, then this tutorial will help you. For that first you need to do a Setup to use JDeveloper to develop and run your OA Pages.
You can refer here for that.
After the Setup is completed, you are all set to run your first OA Page. Oracle itself has created the Hello World page for you! Just go through the below steps to run the page.
1] Open Oracle JDeveloper and go to File > Open. Open the “toolbox.jws” file from the location jdevhomejdevmyprojects.
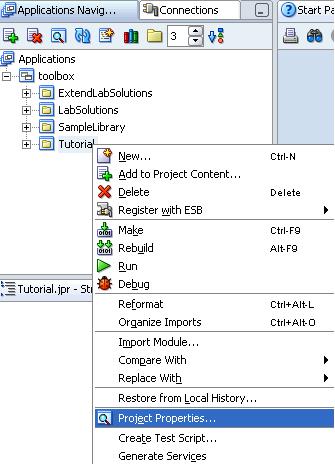
2] Right click on Tutorial and then click on Project properties.
3] Go to Oracle Applications > Database Connections tab
4] Click on New to create a new database connection. Choose the Connection Type as Oracle (JDBC).
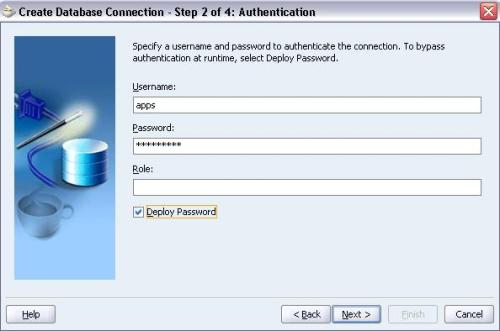
5] Give your Oracle Apps database username and password.
6] Choose the thin driver and give Host Name, Port and SID details of your Oracle Application Database Server. You can get the details in your tnsnames.ora file.
7] After that click on Test Connection button to check if the JDeveloper can connect to the specified database or not. If the status is success then go ahead or check the above settings if you get different status.
8] Go to Run Options and select OADiagnostic and OADeveloperMode.
9] In the Runtime Connection tab, add the path of your DBC file name and give your Oracle Apps username and password. Click Ok. Also add Application Short Name as AK and Responsibility Key as FWK_TBX_TUTORIAL.
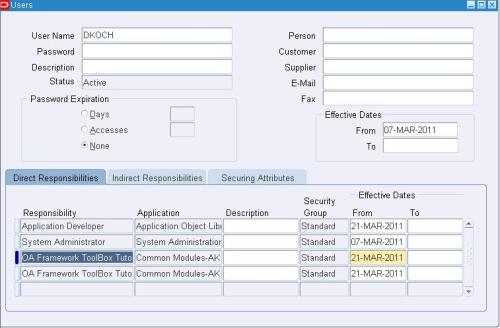
10] Go to Oracle Application Front end and add the responsibilities “OA Framework ToolBox Tutorial” & “OA Framework ToolBox Tutorial Labs” to the user that you have added on the Runtime Connection tab above.
11] Now right click on Tutorial and Rebuild the project. You should get zero errors. If you get few warnings it is ok.
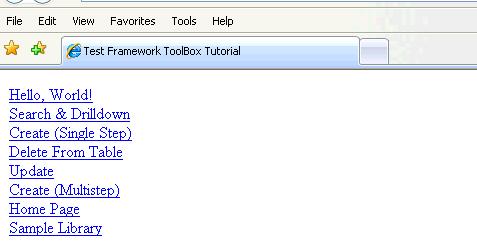
12] Now go to toolbox > Tutorial > Web Content and Run the test_fwktutorial.jsp page.
13] Click on Hello, World!
14] Here is your Hello World page.
You might get errors while running the project. Here I have listed such few errors and their solutions.
Error: oracle.apps.fnd.framework.OAException: Application: ICX, Message Name: Could not find the specified responsibility.
Solution :
1 . Check that the user name and password are correct in the project settings.(Make sure to give Application username and password.)
2. Check the Responsibility key and Application short name.
3. Check whether the user name given in point #1 is attached to the responsibility mentioned in the point #2.
4. Check your dbc file for correct settings.
Error: oracle.apps.fnd.framework.OAException: Application: FND, Message Name: FND_GENERIC_MESSAGE. Tokens: MESSAGE = java.lang.NullPointerException;
Solution :
Set profile “Sign-On:Notification” to “No” at site level.
Fan Trap is a situation while running discoverer reports that return unexpected results due to a group of joined database tables. The most common manifestation of a fan trap occurs when a master table is joined to two or more detail tables independently.
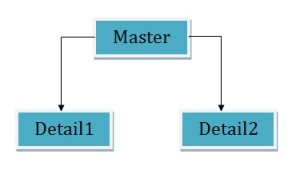
If you use a straightforward SQL statement to aggregate data points here, you may get incorrect results due to fan trap. Now, if you enable fan trap detection in Discoverer and if you use Discoverer to aggregate the data points, Discoverer will never return incorrect results.
Example of Fan Trap:
Consider an example fan trap schema that includes a master folder (ACCOUNT) and two detail folders (SALES and BUDGET), as shown below:
Now let’s say we need to answer the question, “What is the total sales and total budget by account?
Straightforward SQL statement approach:
SELECT Account.Name,
       SUM(sales),
       SUM(budget)
FROM
      Account,
      Sales,
      Budget
Where
      Account.id=Sales.accid
      AND Account.id=Budget.accid
GROUP BY Account.Name;
Account Sales Budget
Account 1 800 1200
Account 2 130 200
Account 3 600 750
Account 4 600 600
The above results are incorrect, because they are based on a single query in which the tables are first joined together in a temporary table, and then the aggregation is performed. However, this approach causes the aggregates to be summed (incorrectly) multiple times.
Discoverer Approach:
If we run the query in Discoverer interrogates the query, detects a fan trap, and rewrites the query to ensure the aggregation is done at the correct level. Discoverer rewrites the query using inline views, one for each master-detail aggregation, and then combines the results of the outer query.
Here are the results from discoverer which is correct:
Account Sales Budget
Account 1 400 400
Account 2 130 100
Account 3 200 750
Account 4 300 200
How to enable fan trap in discoverer?
By default, fan trap detection is always enabled for you. If you want to disable it (however not recommended), you can logon to Discoverer Plus, go to Tools > Options >Advanced Tab and click on ‘Disable fan trap detection’.
How Discoverer handles fan trap?
If a fan trap is detected, Discoverer can usually rewrite the query using inline views to ensure the aggregation is done at the correct level. Discoverer creates an inline view for each master-detail aggregation, and then combines the results of the outer query.
In some circumstances, Discoverer will detect a query that involves an unresolvable fan trap schema, as follows:
- If the detail folders use different keys from the master for the join
- If there is a direct join relationship between the detail folders (thereby creating an ambiguous circular relationship)
- If non-aggregated values are chosen from more than one of the detail folders
- If more than one detail folder has a separate join relationship to a different master folder
In the above circumstances, Discoverer disallows the query and displays an error message.
Latest Posts
- R12 – How to Handle NULL for :$FLEX$.VALUE_SET_NAME In Oracle ERPAugust 25, 2023 - 1:20 pm
- R12 – How to Delete Oracle AR TransactionsMarch 22, 2019 - 8:37 pm
- How to Define Custom Key Flexfield (KFF) in R12January 19, 2018 - 5:43 pm
- AutoLock Box Concepts In R12November 10, 2017 - 8:30 am
- R12 – java.sql.SQLException: Invalid column type in OAFSeptember 15, 2017 - 9:39 am










Recent Comments