- jdevbin – Includes an extended version of the Oracle JDeveloper 10g executable and OA Framework class libraries.
- jdevhome – Includes the OA Framework Toolbox Tutorial source and developer working area.
- jdevdoc – Contains documentation.
If you want to do some OAF Development in JDeveloper for the first time, you will need to do the following things.
1] Download JDeveloper Patch
Based on your instance release level, check out the version of JDeveloper to use using below link.
You can identify the OA Framework version in your instance by activating diagnostics and click the “About This Page” from any OAF page. Click the “Technology Components” tab. The OA Framework version in the top row of the table can then be matched to the JDeveloper Patch.
Download the JDeveloper Patch.
2] Extract the JDeveloper patch in a directory say D:DevSuiteHome_1jdev
The patch actually contains below three directories
3] Define an environment variable
Define an environment variable JDEV_USER_HOME for your local machine. This has to be set to jdevhomejdev directory. In above example it has to be D:DevSuiteHome_1jdevjdevhomejdev.
My Computer – Properties – Advanced tab – Environment Variables – New
Variable: JDEV_USER_HOME
Value: D:DevSuiteHome_1jdevjdevhomejdev
4] Extract Tutorial.zip
Extract D:DevSuiteHome_1jdev jdevbinTutorial.zip into D:DevSuiteHome_1jdev jdevhome.
It will create following directories
D:DevSuiteHome_1jdev jdevhomejdevmyhtml
D:DevSuiteHome_1jdev jdevhomejdevmyprojects
5] Get the DBC file
Obtain the FND database connection (.dbc) file from the system administrator who installed the OA Framework database where you want to do your development.
For the instance to use, you can get the .dbc file from $FND_SECURE and put it in <JDEV_USER_HOME>dbc_filessecure i.e. D:DevSuiteHome_1jdevjdevhomejdev dbc_filessecure
6] Creating a Desktop Shortcut to JDeveloper
To facilitate launching JDeveloper, create a desktop shortcut to jdevbinjdevbinjdevw.exe.
7] Configuring the Environment Encoding of JDeveloper
Confirm the environment encoding of your JDeveloper if it is appropriately set.
Go to Tools – Preferences – Environment – Encoding
If Encoding is not set to “UTF-8″, set it to “UTF-8″.
The initial setup is now complete!….Now you are ready to develop your first OAF page. For more information you can refer OAF Developer’s Guide.
Although Discoverer provides many functions for calculation in reports, sometime we require to use custom PL/SQL functions to meet additional Discoverer end user requirements (for example, to provide a complicated calculation). For this we first need to create the functions in database through Toad or other PL/SQL editors.
To access custom PL/SQL functions using Discoverer, you must register the functions in the EUL. When you have registered a custom PL/SQL function, it appears in the list of database functions in the “Edit Calculation dialog” and can be used in the same way as the standard Oracle functions.
Note: To register a PL/SQL function you must have EXECUTE privilege on that function.
You can register custom PL/SQL functions in two ways:
- Import automatically, by importing the functions (recommended)
- Manually
How to register custom PL/SQL functions automatically:
To register PL/SQL functions automatically you must import them in the following way:
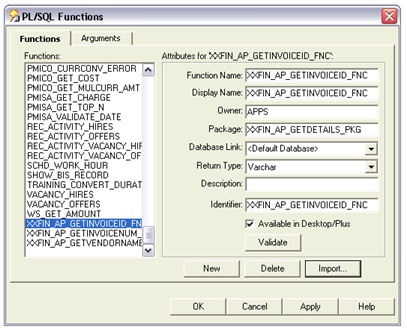
1. Choose Tools | Register PL/SQL Functions to display the “PL/SQL Functions dialog: Functions tab”.
2. Click Import to display the “Import PL/SQL Functions dialog”. This dialog enables you to select the PL/SQL functions that you want to import.
3. Select the functions that you want to import. You can select more than one function at a time by holding down the Ctrl key and clicking another function.
4. Click OK.
Discoverer imports the selected functions and displays the function details in the “PL/SQL Functions dialog: Functions tab”. Information about the selected functions is imported automatically. In other words, you do not have to manually enter information or validate the information.
5. Click OK.
The PL/SQL function is now registered for use in Discoverer.
How to register custom PL/SQL functions manually:
To manually register a PL/SQL function for use in Discoverer:
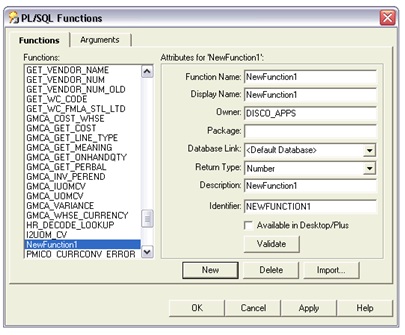
1. Choose Tools | Register PL/SQL Functions to display the “PL/SQL Functions dialog: Functions tab”.
2. Click New and specify the function attributes.
3. Click Validate to check the validity and accuracy of the information you have entered.
4. If the function is invalid, correct the attributes and click Validate again.
5. (Optional) if the function accepts arguments:
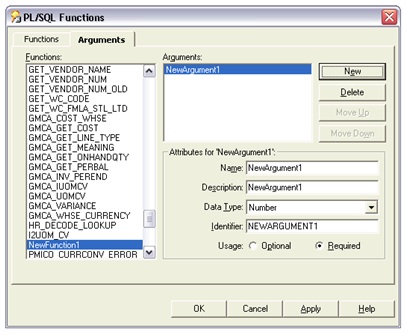
a. Display the “PL/SQL Functions dialog: Arguments tab”.
b. On the Arguments tab, click New and specify the argument attributes.
6. Click OK when you have finished defining the function.
The custom PL/SQL function is now registered for use in Discoverer.
It is always recommended to register PL/SQL functions by importing automatically (especially if you have many functions to register), because it is easy to make mistakes when manually entering information about functions. When you import functions, all of the information about each function (for example, names, database links, return types, lists of arguments) is imported.
Oracle Business Intelligence 10g Release 2, a key component of Oracle Application Server 10g Release 2, is an integrated business intelligence solution supporting intuitive ad hoc query, reporting, analysis, and web publishing. Discoverer 10.1.2 is tightly integrated with Oracle E-Business Suite Release 12. Release 12 users can use Discoverer to analyze data from selected business areas in Financials, Operations, and Human Resources etc.
The following are the Discoverer 10g Installation steps for Oracle R12 environment.
1] Install Oracle Business Intelligence Tools 10g (10.1.2.0.2) using below link
First right click on the zip file (as_windows_x86_bi_tools_101202). Extract all to a directory on your PC. Click on the Extracted folder which has the same name (as_windows_x86_bi_tools_101202). Click on the 10g set up icon and follow only the default settings. This installation creates a home “BIToolsHome_1” (If Default location is selected during install).
2] Apply the latest certified Discoverer Plus and Viewer Patches
To upgrade to Oracle Discoverer 10.1.2.2 – Apply the patch: 4960210
To upgrade to Oracle Discoverer 10.1.2.3 – Apply the patch: 5983622
Follow the installation instructions provided in the patch README to install the patch on your Discoverer 10g Server and to check supported operating systems.
3] Copy Database Connection file
Discoverer needs access to the Database Connection (dbc) file for the database you wish to connect to. A dbc file is a text file which stores all the information required to connect to a particular database.
First identify the Oracle Home for Discoverer. For example: If you could find dis51usr.exe under the directory D:oracleBIToolsHome_1bin. Then the Oracle Home is D:oracleBIToolsHome_1
Create a folder named “secure” in the ORACLE_HOME directory (i.e. D:oracleBIToolsHome_1Secure).
Then copy the dbc file from the $FND_SECURE directory of the E-Business Suite Release 12 instance you are setting up Discoverer with to the Discoverer 10.1.2 “ORACLE_HOMEsecure” directory you just created.
Save the dbc file in lowercase.
4] Update tnsnames.ora file
On your standalone Oracle Business Intelligence Server 10g Release 2 node, update the file ORACLE_HOME/network/admin/tnsnames.ora and include the tnsnames entry to connect to your Oracle E-Business Suite Release 12 database. Use the same entry as exists in the tnsnames.ora file on your Oracle E-Business Suite Release 12 application tier server node.
5] Set the Environment
Discoverer requires Windows Environment variables to dynamically retrieve the location of the .dbc file on the PC.
Open Windows Control Panel and double click on the System icon. Select the Environment tab and create two new System Variables.
FND_SECURE = ORACLE_HOMESecure
FND_TOP= ORACLE_HOME
FND_TOP= ORACLE_HOME
Note: The Oracle Home is the one identified in step 3.
6] Restart the PC and you should be able to connect to Discoverer in an Oracle Applications mode.
Note: When you are connecting to Discoverer for the first time, then Goto Tools > Options. Check the proper EUL in the Connection Tab.
For More Detailed Information Please refer the below metalink note:
Using Discoverer 10.1.2 with Oracle E-Business Suite Release 12 [ID 373634.1]
Login to Application Server on Unix Box for Compiling Forms
Command in 11i :
f60gen module=CUSTOM.pll userid=apps/(appspwd) module_type=LIBRARY batch=NO compile_all=special output_file=$AU_TOP/resource/CUSTOM.plx
f60gen module=XXPOCF.fmb userid=apps/(appspwd) module_type=form batch=no compile_all=special output_file=$XXPO_TOP/forms/US/XXPOCF.fmx
Command in R12 :
$ORACLE_HOME/bin/frmcmp_batch module_type=LIBRARY module=$AU_TOP/resource/CUSTOM.pll userid=apps/(appspwd) output_file=$AU_TOP/resource/CUSTOM.plx compile_all=special
$ORACLE_HOME/bin/frmcmp_batch module=$XXFND_TOP/forms/US/XXFND_FHLOG.fmb userid=apps/(appspwd) output_file=$XXFND_TOP/forms/US/XXFND_FHLOG.fmx module_type=form compile_all=special
With the Oracle E-Business Suite release 11.5.10, the Oracle has introduced a mechanism which revolutionizes the way the forms can be customized to fulfill the customer needs. For many years, Oracle Applications has provided a custom library using which the look and behavior of the standard forms can be altered, but the custom library modifications require extensive work on SQL and PL/SQL. In the release 11.5.10, Oracle has provided a simple and easy feature to implement the customer specific requirements without modifying the underlying forms code or CUSTOM library. Although CUSTOM library still can be used for forms customization to implement the complex business logic, the personalization feature provided in the latest release is easy, faster and requires minimum development effort.
Why Forms Personalization?
- Oracle Supports personalization unlike customization.
- Personalizations are stored in tables rather than files.
- Will not have a bigger impact when you upgrade or apply patches to the environment.
- Can be moved easily through FNDLOAD from one instance to other.
- Can be restricted at site/responsibility/user level.
- Easy to disable/enable with click of a button.
- Personalization stores who columns with which we have the ability to track who created/modified it where as in CUSTOM.PLL we don’t have that ability.
- Can be applied to new responsibilities/users easily.
- Can be restricted to a function or form.
What can be implemented through Forms Personalization?
The below can be done using Personalization:
- Zoom from one form to another.
- Pass data from one form to another through global variables.
- Change LOV values dynamically.
- Enable/Disable/Hide fields dynamically
- Display user friendly messages when required
- Launch URL directly from oracle form
- Execute PL/SQL programs through FORM_DDL package
- Call custom libraries dynamically
Personalization Tables:
FND_FORM_CUSTOM_RULES
FND_FORM_CUSTOM_ACTIONS
FND_FORM_CUSTOM_SCOPES
FND_FORM_CUSTOM_PARAMS
FND_FORM_CUSTOM_PROP_LIST
FND_FORM_CUSTOM_PROP_VALUES
Invoking the Personalization screen:
The personalization form should be used to implement the custom rules on a specific form. The specific form refers to the desired form on which you want to apply the custom business logic or modify the form behavior.
The personalization form is invoked by…
Menu Navigation: Help > Diagnostics > Custom Code > Personalize
Disable the personalization feature:
It is possible that a change you make completely breaks a form, to the point that it will not even run! Here’s how to recover:
- On the pulldown menu, choose Help > Diagnostics > Custom Code > Off
- This will disable all callouts to Forms Personalization
- Run the form of interest
- It should run now, because your changes were skipped
- Invoke the Personalization screen and correct the problem
- On the pulldown menu, choose Help > Diagnostics > Custom Code > Normal to re-enable processing of Personalizations
Limitations:
Although it is faster than a speeding bullet, it is not able to leap over tall buildings:
- You can only change what Forms allows at runtime:
- Cannot create new items
- Cannot move items between canvases
- Cannot display an item which is not on a canvas
- Cannot set certain properties
- Cannot change frames, graphics, boilerplate
- You can only respond to certain Trigger Events:
- WHEN-NEW-FORM-INSTANCE, WHEN-NEW-BLOCK-INSTANCE, WHEN-NEW-RECORD-INSTANCE, WHEN-NEW-ITEM-INSTANCE
- WHEN-VALIDATE-RECORD (not in all forms)
- Product-specific events
- May interfere with, or be overridden by, base product code
- Expected user is an Admin/Developer
- Knowledge of Oracle Developer is extremely desirable
- Knowledge of PL/SQL, Coding Standards and/or APIs required in some cases
- Normal rules for customizations apply
- Extensive testing in a Test environment is required!
Relationship with CUSTOM library:
- CUSTOM is a stub library Oracle ships that receives Trigger Events. Customers are free to add any code they like to it.
- CUSTOM and Form Personalizations drive off the same Trigger Events.
- Form Personalizations are processed first, then the event is sent to CUSTOM
- CUSTOM can do more because it has complete access to all PL/SQL and SQL.
- But for most changes, Form Personalizations is adequate and is significantly simpler.
Latest Posts
- R12 – How to Handle NULL for :$FLEX$.VALUE_SET_NAME In Oracle ERPAugust 25, 2023 - 1:20 pm
- R12 – How to Delete Oracle AR TransactionsMarch 22, 2019 - 8:37 pm
- How to Define Custom Key Flexfield (KFF) in R12January 19, 2018 - 5:43 pm
- AutoLock Box Concepts In R12November 10, 2017 - 8:30 am
- R12 – java.sql.SQLException: Invalid column type in OAFSeptember 15, 2017 - 9:39 am
| S | M | T | W | T | F | S |
|---|---|---|---|---|---|---|
| 1 | 2 | 3 | 4 | 5 | 6 | 7 |
| 8 | 9 | 10 | 11 | 12 | 13 | 14 |
| 15 | 16 | 17 | 18 | 19 | 20 | 21 |
| 22 | 23 | 24 | 25 | 26 | 27 | 28 |


Recent Comments