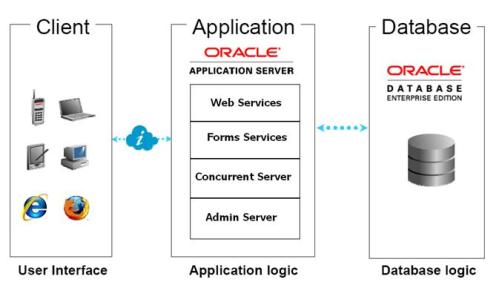
The Oracle E-Business Suite Release 12 Architecture is a framework for multi-tiered, distributed computing that supports Oracle Applications products.

Architecture-R11i vs R12

In EBS R12, various servers or services are distributed among the following three levels, or tiers.

  • The Desktop Tier
  • The Application Tier
  • The Database Tier
Oracle E-Business Suite Release 12 Architecture

1] The Desktop Tier
The client interface is provided through HTML for HTML-based applications, and via a Java applet in a Web browser for the traditional Forms-based applications.
In Oracle Applications Release 12, each user logs in to Oracle Applications through the E-Business Suite Home Page on a desktop client web browser. The E-Business Suite Home Page provides a single point of access to HTML-based applications, Forms-based applications, and Business Intelligence applications.
Oracle JInitiator will no longer be required to run Oracle Forms in E-Business Suite Release 12.  Oracle Forms in Release 12 will run directly in the native Sun Java2 Standard Edition plug-in.
The Forms client applet is a general-purpose presentation applet that supports all Oracle Applications Forms-based products, including those with customizations and extensions. The Forms client applet is packaged as a collection of Java Archive (JAR) files. The JAR files contain all Java classes required to run the presentation layer of Oracle Applications forms.
2] The Application Tier
The application tier has a dual role: hosting the various servers and service groups that process the business logic, and managing communication between the desktop tier and the database tier. This tier is sometimes referred to as the middle tier.
Four servers or service groups comprise the basic application tier for Oracle Applications:

  • Web services
  • Forms services
  • Concurrent Processing server
  • Admin server

3] The Database Tier
The database tier contains the Oracle database server, which stores all the data maintained by Oracle Applications. The database also stores the Oracle Applications online help information. More specifically, the database tier contains the Oracle data server files and Oracle Applications database executables that physically store the tables, indexes, and other database objects for your system. The database server does not communicate directly with the desktop clients, but rather with the servers on the application tier, which mediate the communications between the database server and the clients.

What is value set in Oracle application AOL?

  • Value set is primarily a container for your values, you define your value set such that it can control the types of values that are allowed into the value set (either predefined or nonvalidated). You can specify the format of your values.
  • Oracle Application Object Library uses value sets as important components of key flexfields, descriptive flexfields, and Standard Request Submission (value sets for report parameters for your reports that use the Standard Request Submission feature).

When to defining Values for Value Sets?

  • After you register your Flexfields & report parameters, if you are using independent or dependent value sets, you can enter values into each corresponding value set using the Segment Values form.
  • Values for the Value Sets, we are defining will be kept in the Oracle Application Object Library tables.

How many Format Types the value set have?

  • Char
  • Date
  • DateTime
  • Number
  • Standard Date
  • Standard Date Time
  • Time

You should take a note that Date and Date Time value set formats will be obsolete now and are provided for backward compatibility only. For new value sets, use the format types Standard Date and Standard Date Time.
What is Security type in value set?

  • By Security Rules window, we can define value security rules for ranges of flexfield and report parameter values.

There are two levels where you must activate Security, the one at value set level and other at individual segment or parameter level. You make Flex field Value Security available for your value set by choosing Hierarchical Security or Non-Hierarchical Security for the Security Type. When you make security available for a value set, all segments and report parameters that use that value set can use security. You then enable security for a particular segment or parameter.

  • Choose Hierarchical Security, If you want Security on a parent value to Cascade down to its child value or else you can choose Non-Hierarchical Security.

How many Character Formatting Options have for value set?

  • Numbers Only (0 – 9)
    • We cannot prevent users from entering a value that contains the radix character.
    • Cannot be used in Translatable Independent and Translatable Dependent value sets.
  • Uppercase Only(A-Z)
    • Here also we cannot use in Translatable Independent and Translatable Dependent value sets.
  • Right justify and Zero fill Numbers(001)
    • If you have selected Numbers Only (0-9) flag, then it wont allow you to affect this flag.
    • We are recommended to use this in Accounting Flex fields.
  • Minimum and Maximum Value Range
    • Your Minimum/maximum value may not be longer than the maximum size you specify for this value set.
    • Once you specify a range of values, you cannot define a new valid value that falls outside this range.
    • The Minimum Value and Maximum Value fields can therefore allow you to create a value set with a validation type of None.

How many validation Type does value set have?
There are several validation types that affect the way users enter and use segment or parameter values:

  • None (not validated at all)
    • Allow users to enter any value.
    • Only Format Validations will be done.
  • Independent
    • Provides a predefined list of values.
    • Independent values are stored in an Oracle Application Object Library table.
  • Dependent
    • Same like Independent Value Set, except the List of Values shown to you will depends on which the Independent value you have selected in the Prior Segment.
    • Must define your independent value set before you define the dependent value set that depends on it.
    • Advisable to create your independent values first.
    • Must create at least one dependent value for each independent value, or else it wont allow you to enter into that segment or field.
  • Table
    • It use your own application tables as value sets for flex field segments and report parameters instead of the special values tables which Oracle Applications provides.
    • You can also use validation tables with other special arguments to make your segments depend on profile options or field values.
    • You can use any existing application table, view, or synonym as a validation table.
    • If we are using non registered table for your value set, then we have to Create the necessary grants and synonyms to APPS Schema.
    • The value column and the defined ID column in the table must return a unique row for a given value or ID.
    • If the Hidden Id column is provided the value passed to the report will be Hidden and not the Value column.
    • Similarly, when you specify :$FLEX$.Value_Set_Name, your flex field segment or report parameter defaults to always use the hidden ID column to compare with your WHERE clause .
    • We can use Special BIND variable such as :$PROFILES$.Option_name, :$FLEX$.Value_set_name, :block.field in the WHERE clause.
  • Special
    • Special validation value sets allow you to call key flex field user exits to validate a flex field segment or report parameter using a flex field within a flex field mechanism. You can call flex field routines and use a complete flex field as the value passed by this value set.
  • Pair
    • Pair validation value set allows user to pass a range of concatenated Flex field segments as parameters to a report.
  • Translatable Independent & Translatable Dependent
    • These value sets are similar to Independent and Dependent value sets except that translated values can be displayed to the user. Translatable Independent and Translatable Dependent value sets allow you to use hidden values and displayed (translated) values in your value sets. In this way your users can see a value in their preferred languages, yet the values will be validated against a hidden value that is not translated.
    • We can convert the Independent value set to a Translatable Independent value set, or a Dependent value set to a Translatable Dependent value set. These are the only types of conversions allowed.

Which Oracle table store Value sets and underline information?

  • FND_FLEX_VALUE_HIERARCHIES
  • FND_FLEX_VALUE_SETS
  • FND_ID_FLEX_SEGMENTS
  • FND_FLEX_VALUE_NORM_HIERARCHY
  • FND_FLEX_HIERARCHIES
  • FND_FLEX_VALUE
  • FND_FLEX_VALIDATION_EVENTS
  • FND_FLEX_VALUE_RULE_LINES
  • FND_FLEX_VALUE_RULE
  • FND_FLEX_VALUE_RULE_USAGE
  • FND_RESPONSIBLITY
  • FND_TABLES
  • FND_FLEX_VALIDATION_TABLES

Any method to upload flexfield value?
Yes, FNDLOAD is utility which can be used for moving value set across different environment.
Do we have any restriction on value set?
Yes, here are some listed one:

  • Table Validated Value Sets
    • We cannot use table-validated id value sets for any accounting flexfield or any other key flexfields.
    • We cannot use :$FLEX$, :$PROFILES$ in table name, value and id of table validated value sets.
    • We cannot use DISTINCT clause in any of the column fields or in the WHERE clause of a table validate value set.
    • In an id value set, the value can be non-unique but id should be unique. In a non-id value set, value should be unique.
    • We can only use columns selected for the table-validated value set must be of type NUMBER, DATE or VARCHAR2.
    • Support for SQL expression in columns of Table Validated value sets will be obsolete in future release.
  • Translatable Independent and Translatable Dependent Valuesets
    • The Numbers Only and Uppercase Only option cannot be used.
    • Must have “Char” format type.
  • Special/Pair valuesets
    • Special/Pair value sets are user-exit value sets . PL/SQL APIs will not be able to validate them.

Lets now define a simple value set in R12:
Step 1: Go to Application Developer, and select menu /Validation/Set
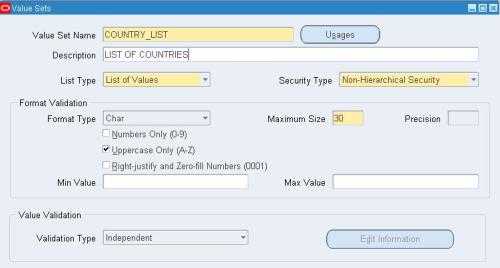
Create a value set name as COUNTRY_LIST which will contain a list of countries. Make it an independent value set. Format type is CHAR. Save the work.

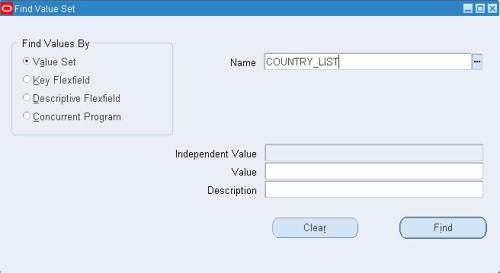
Step 2: Go to Application Developer, and select menu /Validation/Values
The below window will appear. Put the Search Name as COUNTRY_LIST and click Find.

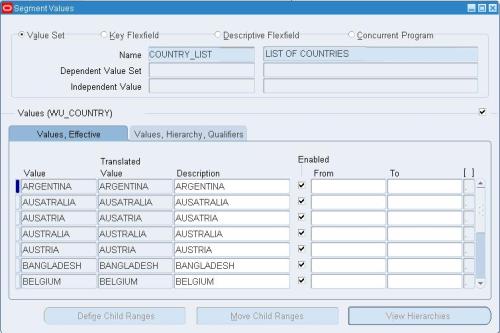
Step 3: Enter the country details in this window. Save the work.

Now the value set is ready to be used in any concurrent program.

Here are the steps to create a simple search page in OA Framwork. I have used OAF Version 12.1.1 for this exercise. There are many ways to do this and here I have followed one of these.
Step 1: Create a Package
All BC4J model components must belong to a Business Components (BC4J) package. So create a package with a name like xxhci.oracle.apps.custom.LabExamples.server.
Step2: Create an Entity Object (EO)
Entity objects encapsulate business logic and DML operations for application tables.
To create a new entity object in the above defined Business Components (BC4J) package:
1. In the JDeveloper Navigator, select the BC4J package where you want to create your entity object.
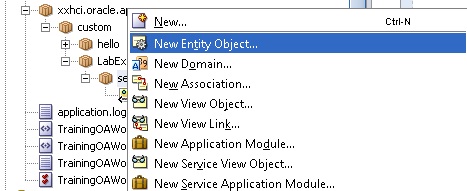
2. Right click and select ‘New Entity Object’
3. Do the following steps to create an EO.
2.1 Specify a Schema Object (the exact name of the table for the entity object)

2.2 In the Attributes page (Step 2 of 5), you should see all the columns in the table that you specified in the Name page.
Select New… to create a transient attribute that is used in the business logic, such as a calculated OrderTotal in a purchase order that is used for approval checking.
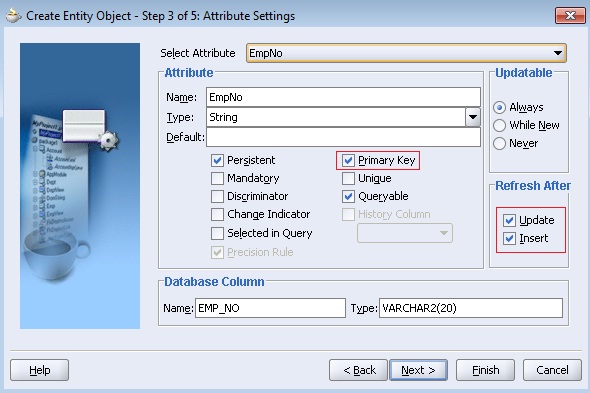
2.3 In the Attribute Settings page (Step 3 of 5), verify or set the following information for each of the entity object’s attributes:
The Attribute and Database Column Name and Type properties default correctly from the table definition. For primary key columns, ensure that the Primary Key and Mandatory checkboxes are selected. For columns that are never updateable, or updateable only when new, select the appropriate Updateable radio button. For columns whose values change after database triggers execute, select the Refresh After update or insert as appropriate.
2.4 In the Java page (Step 4 of 5) page:
  • Check the option for generating an Entity Object Class. In the Generate Methods box, opt to generateAccessors, a Create Method and a Remove Method.
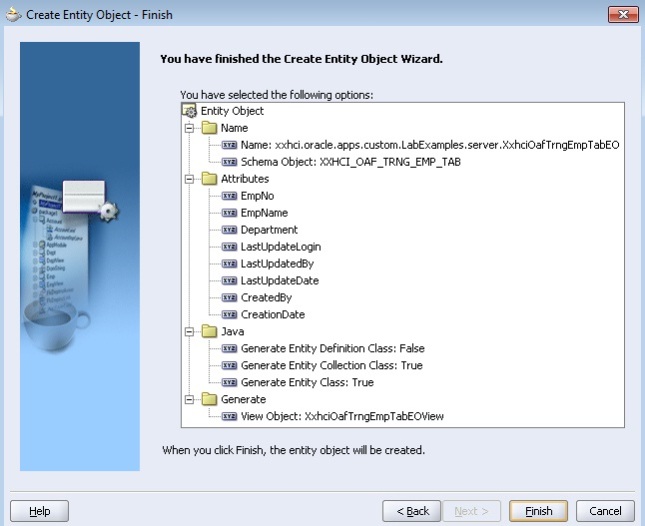
2.5 Click on ‘Generate default view object’ to create a VO. Select Finish to save your entity object definition and implementation. BC4J will create an XML definition file and a Java implementation file for your entity object.
Step3: Create an View Object (VO)
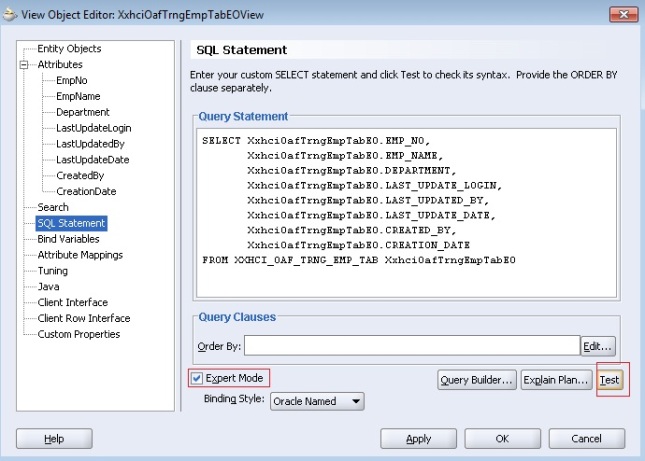
If you click ‘Generate default view object’ tab as mentioned above, you don’t have to create a VO separately. If you forgot this, you have to create a VO. Click on the VO to test the SQL Statement generated by the EO and check in the ‘Expert Mode’.
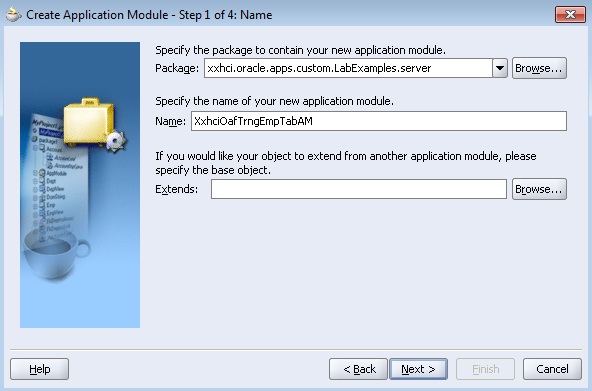
Step4: Create a New Application Module (AM)
To create a new application module in a Business Components (BC4J) package:
1. In the JDeveloper Navigator, select the BC4J package where you want to create your application module.
2. From the main menu, choose File > New to open the New Object Gallery.
Select the view object.
In the Java page (Step 4 of 5), deselect the Generate Java File(s) checkbox ONLY if you are certain that you won’t be writing any code for your application module (you can always delete the class later if you find that you don’t need it, so it’s probably best to simply generate it at this point unless you are creating a simple container for LOV view objects).
Select Finish to create your application module. BC4J will create an XML definition and implementation file.
Step5: Create a Page (EmpSearchPG)
Create the EmpSearchPG page as follows
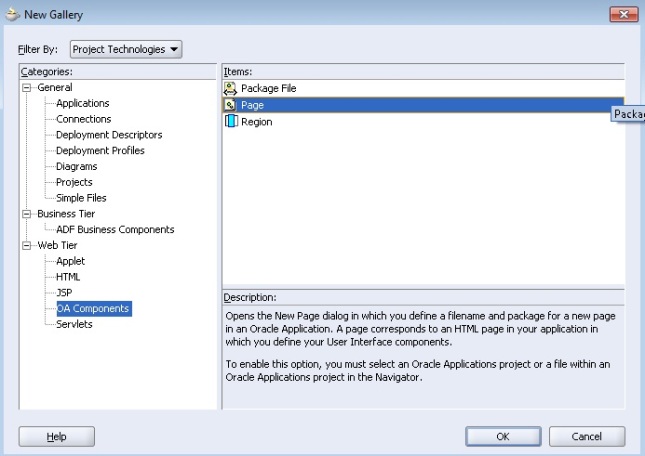
  • Right click on project à New à Web Tier à OA Components à Page
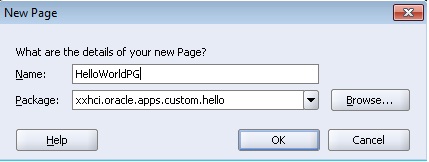
  • Give the Page Name as EmpSearchPG and package as “xxhci.oracle.apps.custom.LabExamples.webui”
  • Select region1 page from Structure Window and change its properties as
    ID à PageLayoutRN
  • Select the AM Definition as ‘xxhci.oracle.apps.custom.LabExamples.server.XxhciOafTrngEmpTabAM’
  • Give a Window Title as ‘Employees Search Window’
  • Give a Title as ‘Employees’
Step6: Add a Query region and Results table
  • Right click on PageLayoutRN à New à Region. Set the properties of the new region as
    ID à QueryRN
  • Select the Region Style as ‘query’ and Construction Mode as ‘resultBasedSearch’.
  • Right click on QueryRN region on structure navigator à New à Region using wizard.
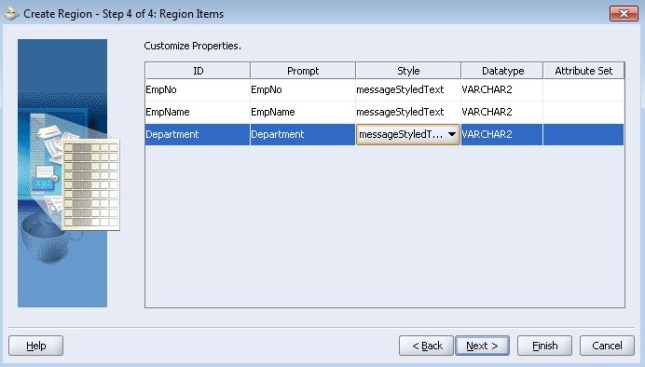
  • Select the AM and VO which we have created in earlier steps as shown in below figure.
Set the Region Style as Table
Change the Prompt and Style for all three items.
Step7: Changes the Item Properties
Go to EmpNo item and set the Search Allowed property to true. Similarly do the steps for EmpName and Department also.
Step8: Save all changes (Save All).
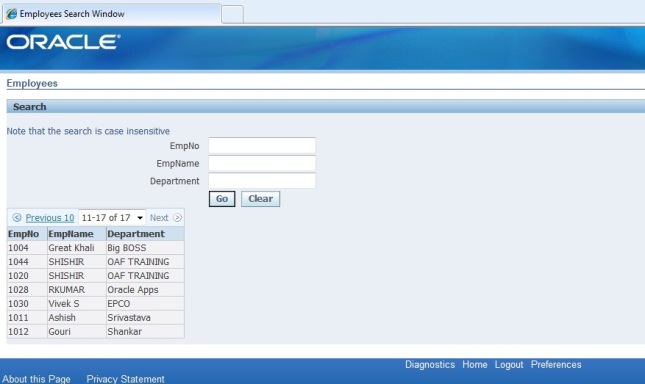
Step9: Run the Page (EmpSearchPG)
Creation of search page is complete. Run the EmpSearchPG to test the page. If everything works fine for you, you should able to view an output like below:
Few Note:
Understanding Query Regions
When you add a query region to a pageLayout region, OA Framework automatically generates an oracle.apps.fnd.framework.webui.beans.layout.OAQueryBean which, depending on its configuration, works in concert with a child table, advanced table or HGrid to implement any combination of simple search, advanced search and view panels. OA Framework automatically generates buttons as appropriate for toggling between the applicable regions.
Construction Modes:
There are three construction modes available. In the above example we have used ‘resultBasedSearch’construction mode. Here is a brief comparison of the three modes.
1] resultsBasedSearch:
  • OA Framework automatically renders both the Simple and Advanced search regions based on the designated queryable items in the associated table.
  • The search regions automatically include both a Go and a Clear button.
  • OA Framework automatically executes the underlying search when the user selects the Go button.
2] autoCustomizationCriteria:
  • OA Framework automatically renders both the Simple and Advanced search regions based on the corresponding Simple search and Advanced search regions that you define and specify as named children of the query region.
  • The search regions automatically include a Go button. In addition, the Advanced search region includes a Clear button.
  • OA Framework automatically executes the underlying search when the user selects the Go button. However, developers must explicitly define mappings between items in the Search panel and items in the table region.
3] none
  • The Search regions are rendered based on the Simple Search and Advanced Search regions that you define and specify as named children of the query region.
  • You must implement your own Go button in this mode.
  • The underlying search must be executed by the developer.

This tutorial will tell you the basic steps to create a Hello Word Page in OA Framework.
Earlier Posts:

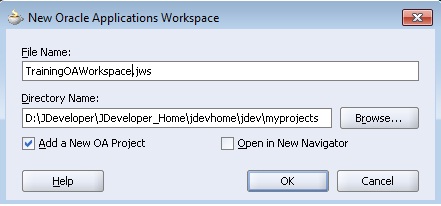
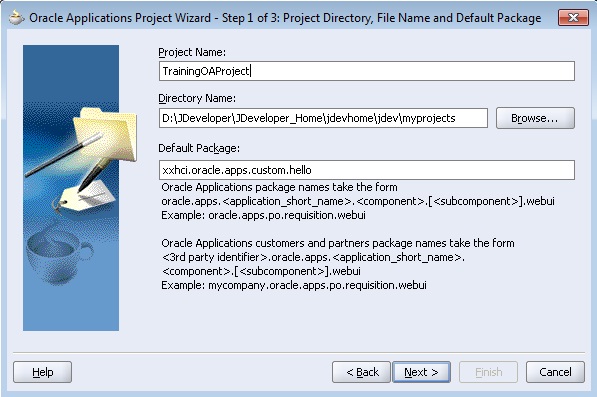
Step 1: Start JDeveloper. Create a New OA Workspace and Empty OA Project with the New…Dialog
Step 2: Create the OA Component Page

JDeveloper creates your top-level page layout region for you automatically when you create your page.

Step 3: Modify the Page Layout (Top-level) Region

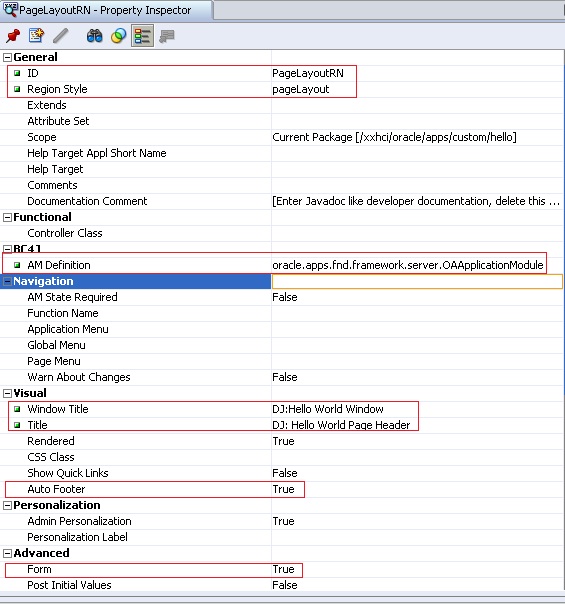
  • Set the ID property to PageLayoutRN.
  • Verify that the Region Style property is set to pageLayout.
  • Verify that the Form property is set to True.
  • Verify that the Auto Footer property is set to True.
  • Set the Window Title property to <your name>: Hello World Window Title. This becomes the window title for the page.
  • Set the Title property to <your name>: Hello World Page Header.
  • Set the AM Definition property to oracle.apps.fnd.framework.server.OAApplicationModule (you will have to type in the value). This is a generic application module supplied by the OA Framework.

Step 4: Create the Second Region (Main Content Region)

Create your second region under the page layout region by selecting the page layout region in the Structure window and choosing New > Region from the context menu.
  • Replace the default value in the ID property with MainRN.
  • Set the Region Style property to messageComponentLayout (this provides an indented single- or multiple-column layout for the child items of the region).

Step 5: Create the First Item (Empty Field)

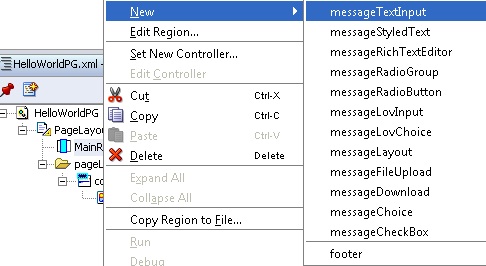
Create your first item under the second region (main content region) by selecting the second region in the Structure window and choosing New > messageTextInput from the context menu. This item will take any name as parameter.
  • Set the ID property to HelloName.
  • Verify that your Item Style property is set to messageTextInput (this style provides a text label and an input field).
  • Set the Prompt property to Name.
  • Set the Visual Length to 20.
  • Set the Data Maximum Length to 50.

Step 6: Create a Container Region for the Go Button

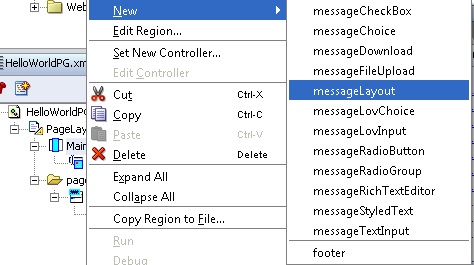
To add a non-message-type bean such as a submitButton to a messageComponentLayout region, you must first add the bean to a messageLayout region.
Select the messageComponentLayout region and select New > messageLayout.
Name this region ButtonLayout.

Step 7: Create the Second Item (Go Button)

Create your Go button item by selecting the messageLayout region, ButtonLayout, in the Structure window and choosing New > Item from the context menu.
Set the following properties for your button item:
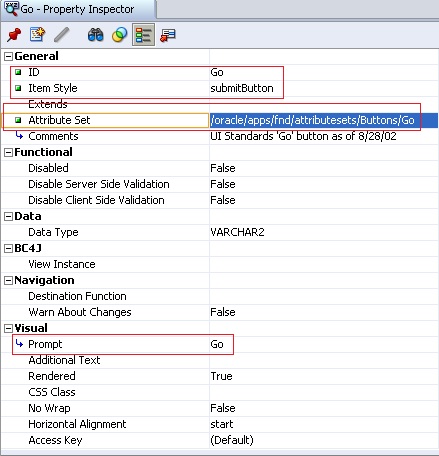
  • Set the value of the ID property to Go.
  • Set the Item Style property to submitButton.
  • Set the Attribute Set property to /oracle/apps/fnd/attributesets/Buttons/Go.

Step 8: Save Your Work (Save-All)

Step 9: Run Your Page Using the Run Option

You can try out your page using the Run option on the context menu. If you are using a database other than what you already have in your project settings, you will need to modify the Runtime Connection project settings by selection your project file and choosing Project Properties… from the main menu. Specifically, you must use a combination of Username, Password, (Responsibility) Application Short Name and Responsibility Key that is valid for your database to enable your session to log in.
The output will be like:
Here the Go Button has no functionality. Now to add some functionality to this Button, we need to add a Controller.

Step 10: Add a Controller

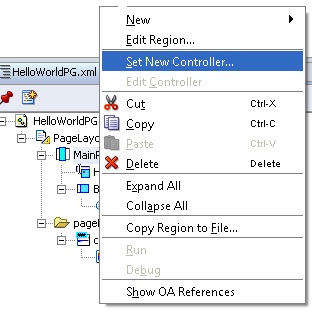
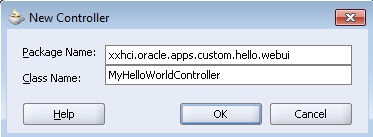
Add a controller to display a message when the user clicks on the Go button. Select your second region (MainRN) and choose Set New Controller… from the context menu.

Step 11: Edit Your Controller

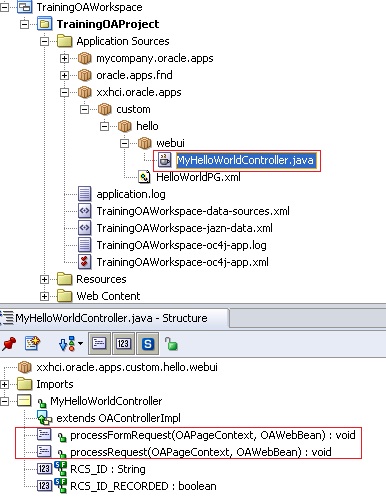
When you create a controller .java file will be automatically created and it will contain below 2 methods.
  • public void processRequest(OAPageContext pageContext, OAWebBean webBean) { }
  • public void processFormRequest(OAPageContext pageContext, OAWebBean webBean) { }
Now you need to add the below code in the java file to add the required functionality.
  • Add the following line as the last line of the import section to make the OA Framework OAException routines available:
import oracle.apps.fnd.framework.OAException;

  • Add the below code in processFormRequest method

if (pageContext.getParameter("Go") != null)
{
String userContent = pageContext.getParameter("HelloName");
String message = "Hello, " + userContent + "!";
throw new OAException(message, OAException.INFORMATION);
}

Step 12: Build Your Controller

Build your controller by selecting Rebuild from the context menu within the code editor window.

Step 13: Test Your Work Using the Run Option

Save your work, and then test it using the Run option. Type something into your field and then click the Go button. You should see the page with an informational message that contains what you typed into the field, as shown:
Congratulations…! You have created your first OA Page. I will try to put articles on how to create search, create and update page in OAF in future. 

If you are new to OAF Development and want to create a new Hello World Page, then this tutorial will help you. For that first you need to do a Setup to use JDeveloper to develop and run your OA Pages.

You can refer here for that.
After the Setup is completed, you are all set to run your first OA Page. Oracle itself has created the Hello World page for you! Just go through the below steps to run the page.
1] Open Oracle JDeveloper and go to File > Open. Open the “toolbox.jws” file from the location jdevhomejdevmyprojects.
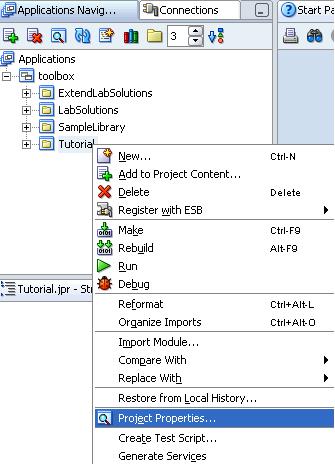
2] Right click on Tutorial and then click on Project properties.

3] Go to Oracle Applications > Database Connections tab
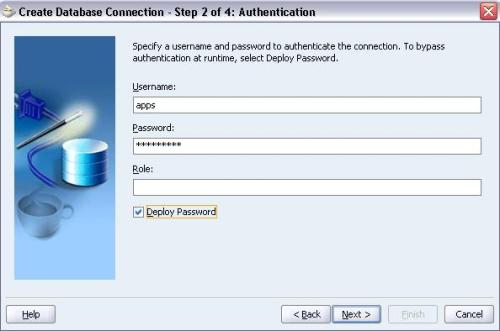
4] Click on New to create a new database connection. Choose the Connection Type as Oracle (JDBC).
5] Give your Oracle Apps database username and password.
6] Choose the thin driver and give Host Name, Port and SID details of your Oracle Application Database Server. You can get the details in your tnsnames.ora file.
7] After that click on Test Connection button to check if the JDeveloper can connect to the specified database or not. If the status is success then go ahead or check the above settings if you get different status.
8] Go to Run Options and select OADiagnostic and OADeveloperMode.
9] In the Runtime Connection tab, add the path of your DBC file name and give your Oracle Apps username and password. Click Ok. Also add Application Short Name as AK and Responsibility Key as FWK_TBX_TUTORIAL.
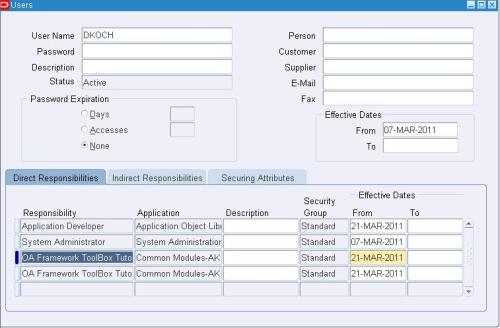
10] Go to Oracle Application Front end and add the responsibilities “OA Framework ToolBox Tutorial” & “OA Framework ToolBox Tutorial Labs” to the user that you have added on the Runtime Connection tab above.
11] Now right click on Tutorial and Rebuild the project. You should get zero errors. If you get few warnings it is ok.
12] Now go to toolbox > Tutorial > Web Content and Run the test_fwktutorial.jsp page.
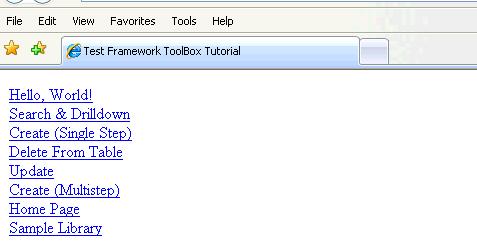
13] Click on Hello, World!
14] Here is your Hello World page.
You might get errors while running the project. Here I have listed such few errors and their solutions.
Error: oracle.apps.fnd.framework.OAException: Application: ICX, Message Name: Could not find the specified responsibility.
Solution :
1 . Check that the user name and password are correct in the project settings.(Make sure to give Application username and password.)
2. Check the Responsibility key and Application short name.
3. Check whether the user name given in point #1 is attached to the responsibility mentioned in the point #2.
4. Check your dbc file for correct settings.
Error: oracle.apps.fnd.framework.OAException: Application: FND, Message Name: FND_GENERIC_MESSAGE. Tokens: MESSAGE = java.lang.NullPointerException;
Solution :
Set profile “Sign-On:Notification” to “No” at site level.