See my blog how to define Operating unit in R12.
Define Inventory Organization:
Navigation: Inventory –> Setup –> Organizations –> Organizations.
Click on New.
Enter information in the required fields.
Save your work and click on othres.
click on Accounting information.
Enter the required information and save.
Click on Others and select the inventory information.
Under Inventory Parameters tab enter the following information.
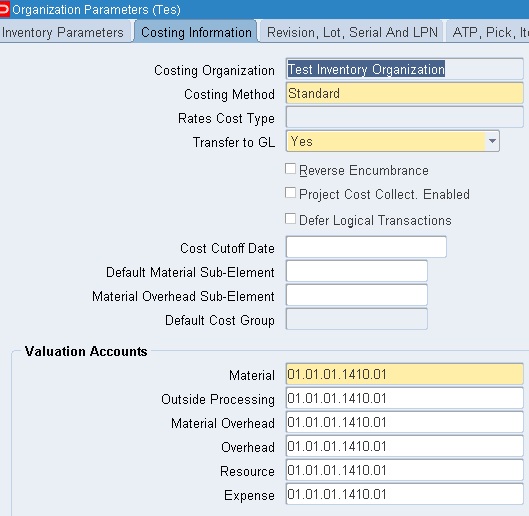
Under Costing Information tab enter the following information.
Under Revision and Lot Serial And LPN enter the required information.
Under the other accounts tab enter the required information.
Save your work.
Define Items:
Navigation: Inventory –> Items –> Master items.
Enter the name and description.
Go to Tolls and click on copy from.
Enter Finished good and then click on Apply and done button.
Receivable Setups:
- Define System Options
- Define Transaction Flexfield Structure
- Define Sales Tax Location Flexfield Structure
- Define AutoCash Rule Sets
- Define Receivables Lookups
- Define Invoice Line Ordering Rules
- Define Grouping Rules
- Define Application Rule Sets
- Define Payment Terms
- Define AutoAccounting
- Open or Close Accounting Periods
- Define Transaction Types
- Define Transaction Sources
- Define Collectors
- Define Approval Limits
- Define Remittance Banks
- Define Receivables Activities
- Define Receipt Classes
- Define Receipt Sources
- Define Payment Methods
- Define Statement Cycles
- Define System Profile Options
- Define Salespersons
- Define Customer Profile Classes
- Define Customers
- Define Remit–To Addresses
Define System Options:
Define your accounting, discount, tax, and invoice system options to control how Receivables works. System options determine your accounting method, set of books, accounting flexfields, whether you use header or line–level rounding, and control the default operation of the AutoInvoice and Automatic Receipt programs.
System options also control how Receivables calculates tax on your transactions. You must specify a tax method, choose a Location Flexfield Structure, indicate whether to compound tax, select the address validation to use, and define tax defaults and rounding options. As you can set up your system to calculate Sales Tax, Value Added Tax, or Canadian Tax, we recommend that you carefully review the appropriate implementing tax essay before defining your system options.
Navigation: Receivables –> Setups –> System –> System Options.
Enter the required information in respective fields.
Define Transaction Flexfield Structure:
Transaction flexfields are descriptive flexfields that AutoInvoice uses to identify transactions and transaction lines. Receivables lets you determine how you want to build your transaction flexfield structure and what information you want to capture.
There are four types of transaction flexfields:
• Line Transaction Flexfield
• Reference Transaction Flexfield
• Link–To Transaction Flexfield
• Invoice Transaction Flexfield
You must define the Line Transaction Flexfield if you use AutoInvoice. You can use the Line Transaction Flexfield to reference and link to other lines because the Line Transaction Flexfield is unique for each
transaction line. AutoInvoice always uses the Line Transaction Flexfield structure for both the Link–to and Reference information when importing invoices. You must explicitly define the Link–to, Reference,
and Invoice Transaction Flexfield structures only if this information is to be displayed on a custom window.
Receivables gives you the option of displaying Invoice Transaction Flexfield information in the reference column of invoice lists of values.
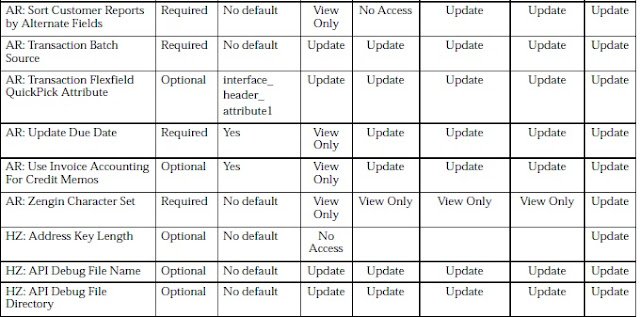
Use the System Profile Option AR: Transaction Flexfield QuickPick Attribute to select the Invoice Transaction Flexfield segment that you want to display. For example, if you want to be able to reference the
order number for imported invoices when using an invoice list of values, you must assign the transaction flexfield segment that holds the order number to the AR: Transaction Flexfield QuickPick Attribute
profile option. The order number will now display in the reference column of invoice lists of values.
Line Transaction Flexfield:
Use columns INTERFACE_LINE_ATTRIBUTE1–15 and INTERFACE_LINE_CONTEXT to define the Line Transaction Flexfield. Line Transaction Flexfields are unique for each record in the interface table and therefore can be used as record identifiers.
Reference Transaction Flexfield:
Reference Transaction Flexfields have the same structure as the Line Transaction Flexfields.
Transactions 4 – 235 Reference Transaction Flexfields are used to apply a credit memo to an invoice or associate an invoice to a specific commitment.
For example, to refer a credit memo to a specific invoice, use the REFERENCE_LINE_ATTRIBUTE1–15 and REFERENCE_LINE_CONTEXT columns of the credit memo to enter the Line Transaction Flexfield of the invoice. To refer an invoice to a specific commitment, use the REFERENCE_LINE_ATTRIBUTE1–15 and REFERENCE_LINE_CONTEXT columns of the invoice to enter the Line Transaction Flexfield of the commitment.
Link–To Transaction Flexfield:
Link–To Transaction Flexfields also have the same structure as the Line Transaction Flexfield. Use Link–To Transaction Flexfields to link transaction lines together in the interface table. For example, you might want to import tax and freight charges that are associated with specific transaction lines. If you want to associate a specific tax line with a specific transaction line, use the LINK_TO_LINE_ATTRIBUTE1–15 and LINK_TO_LINE_CONTEXT columns of the tax line to enter the Line Transaction Flexfield of the invoice.
Invoice Transaction Flexfields:
Create a new flexfield with a similar structure as the Line Transaction Flexfield, but only include header level segments. For example, if the Line Transaction Flexfield structure has four segments and the last two segments contain line level information, define your Invoice Transaction Flexfield using the first two segments only. Segments included in the Invoice Transaction Flexfield should be included in the AutoInvoice grouping rules.
Define Sales Tax Location Flexfield:
Receivables uses the customer shipping address to determine the sales tax rate on transactions for all customers in the country that you define in the Systems Option window as your home country. Proceed to the next step if you are not charging your customers tax based on their shipping address.
Following are the seeded Sales Tax Location Flexfield structures:
• Country
• State and City
• Province and City
• City
• Province
• State, County and City
Use the Key Flexfield Segments window to select the seeded Sales Tax Location Flexfield structure, or to set up a new structure, that you want Receivables to use to determine your sales tax rates and to validate
your customer addresses.
You can confirm that the required segments are enabled by navigating to the Segments Summary window. Navigate back to the Key Flexfield Segments window to freeze your flexfield structure by checking the
Freeze Flexfield Definition check box and then compiling the flexfield.
Note: When you define tax system options in the System Options window, use the list of values in the Location Flexfield Structure field to select the same Sales Tax Location Flexfield structure that you selected in the Key Flexfield Segments window.
Navigation: Receivables –> Setup –> Financials –> Flexfield –> Key –> Segments.
Query with Sales Tax Location Flexfield
Enter the required information in respective filelds.
Save your work.
Like wise we can define other sales tax location flexfields,
Define AutoCash Rule Sets:
If you are using AutoCash, define your AutoCash rule sets before defining system parameters or customer profiles classes. AutoCash rules determine the sequence of application methods Receivables uses when applying receipts imported using AutoLockbox to open debit items.
Navigation: Receivables –> Setup –> Receipts –> Autocash rule sets.
Define Receivables Lookups:
Receivables provides several default lookups which are used throughout the application to provide validated default values and list of values choices. You can add or update these to customize your list of values and speed data entry. For example, you can define additional reasons for creating credit memos or enter the names of each freight carrier used by your business.
Navigation: Receivables –> Setup –> System –> Quickcodes –> Receivables.
Define lookups as you like.
Define Invoice Line Ordering Rules:
If you are using AutoInvoice, define invoice line ordering rules to specify how you want to order and number transaction lines after AutoInvoice groups them into invoices, debit memos, and credit memos. Receivables provides many attributes that you can use to define your line ordering rules.
Navigation: Receivables –> Setup –> Transactions –> Autoinvoice –> Line Ordering rule.
Define Grouping Rules:
If you are using AutoInvoice, define grouping rules to indicate how you want to group transaction lines imported by AutoInvoice. For example, to include specific transaction lines on a single transaction, certain attributes must be identical. Receivables provides many attributes that you can use to define your grouping rules.
Navigation: Receivables –> Setup –> Transactions –> Autoinvoice –> Grouping Rule.
Define Application Rule Sets:
Define Application Rule Sets to control how Receivables reduces the balance due for your open debit items when you apply payments using either the Applications window or Post QuickCash. You can define your own application rule sets, assign them to transaction types, and specify a default rule set in the System Options window.
Navigation: Receivables –> Setup –> Receipts –> Application Rule sets.
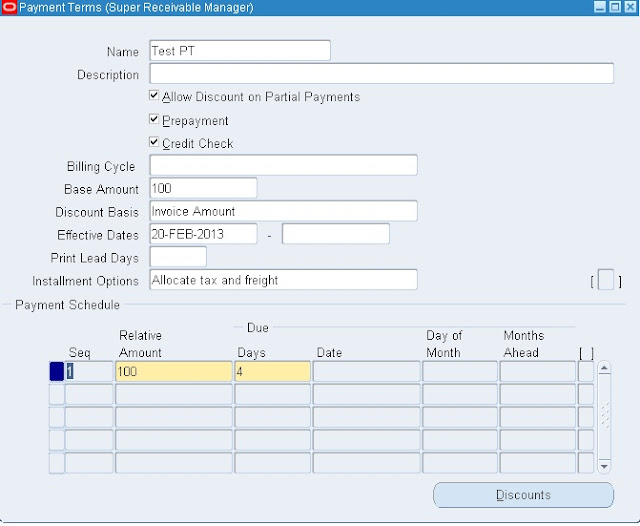
Define Payment Terms:
Define payment terms to determine the payment schedule and discount information for customer invoices, debit memos, and deposits. You can also define proxima payment terms to pay regular expenses such as telephone bills and credit card bills that occur on the same day each month and create split payment terms for invoice installments that have different due dates.
Navigation: Receivables –> Setup –> Transactions –> Payment terms.
Define AutoAccounting:
Define AutoAccounting to specify the general ledger accounts for transactions that you enter manually or import using AutoInvoice. AutoAccounting uses this information to create the default revenue, receivable, freight, tax, unearned revenue, unbilled receivable, finance charges, bills receivable accounts, and AutoInvoice clearing (suspense) accounts.
Navigation: Receivable –> Setup –> Transactions –> Auto Accounting.
Like wise we should also define reaming auto accounting types.
Open or Close Accounting Periods:
Navigation: Receivables –> Control –> Accounting –> Open/Close Periods.
Define Transaction Types:
Define the transaction types that you assign to invoices, debit memos, commitments, chargebacks, credit memos, on–account credits, and bills receivable. Receivables uses transaction types to default payment term,
account, tax, freight, creation sign, posting, and receivables information. Receivables provides two predefined transaction types: Invoice and Credit Memo.
Navigation: Receivables –> Setup –> Transaction –> Transaction Types.
Define Transaction Sources:
Define the transaction sources that you assign to invoices, debit memos, commitments, credit memos, on–account credits, and bills receivable. Receivables uses transaction sources to control your transaction and transaction batch numbering, provide default transaction types for transactions in batch, and to select validation options for imported transactions. Receivables provides the following predefined transaction sources: MANUAL–OTHER, DM Reversal, and Chargeback.
Navigation: Receivables –> Setup –> Transaction –> Sources.
Define Collectors:
Define collectors to assign to your customers through credit profile class assignments. Collectors can use the Collections windows and Receivables collection reports to keep apprised of a customer’s past due items. Receivables provides a predefined collector called DEFAULT.
Navigation: Receivables –> Setup –> Collections –> Collectors.

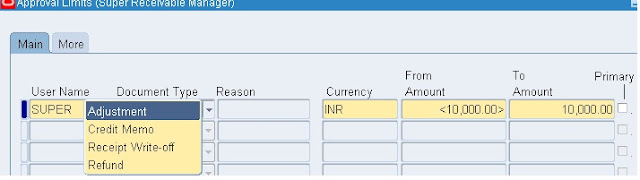
Define Approval Limits:
Define approval limits to determine whether a Receivables user can approve adjustments or credit memo requests. You define approval limits by document type, dollar amount, reason code, and currency.
Approval limits affect the Adjustments, Submit AutoAdjustments, and Approve Adjustments windows as well as the Credit Memo Request Workflow.
Navigation: Receivables –> Setup –> Transactions –> Approval Limits.
Define Remittance Banks:
Proceed to the next step if you already defined your remittance banks in Oracle Payables. Define all of the banks and bank accounts you use to remit your payments. You can define as many banks and bank accounts as you need and define multiple currency bank accounts to accept payments in more than one currency.
Define Receivables Activities
Define Receivables Activities to provide default accounting information when you create adjustments, discounts, finance charges, miscellaneous cash transactions, and bills receivable. Receivables also uses Receivables Activities to account for tax if you calculate tax on these activities.
Navigation: Receivables –> Setup –> Receipts –> Receivable Activities.
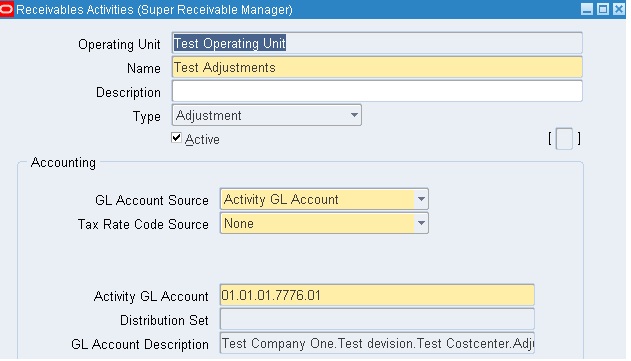
Like wise we should define reaming receivable actives also.
Define Receipt Classes:
Define receipt classes to specify whether receipts are created manually or automatically. For manual receipts, you can specify whether to automatically remit it to the bank and/or clear your accounts. For automatic receipts, you can specify a remittance and clearance method, and whether receipts using this class require confirmation.
Navigation: Receivables –> Setup –> Receipts –> Receipts Class.
Click on Bank accounts.
Enter information in respective fields.
Save your work.
Define Payment Method:
Define the payment methods to account for your receipt entries and applications and to determine a customer’s remittance bank information. When defining payment methods, you must enter a receipt class, remittance bank information, and the accounts associated with your payment receivables type. You can also specify accounts for confirmation, remittance, factoring, bank charges, and short–term debt.
Navigation: Receivables –> Setup –> Receipts –> Receipts Class.
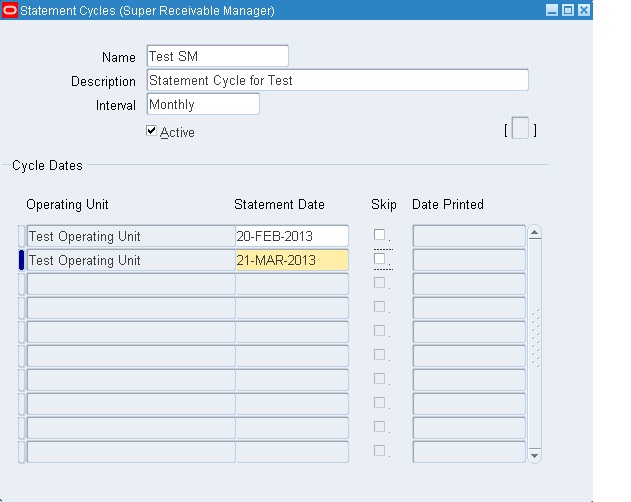
Define Statement Cycles:
Define statement cycles to control when you create customer statements. You assign statement cycles to customers in the Customer Profile Classes window.
Navigation: Receivables –> Setup –> Print –> Statement Cycle.
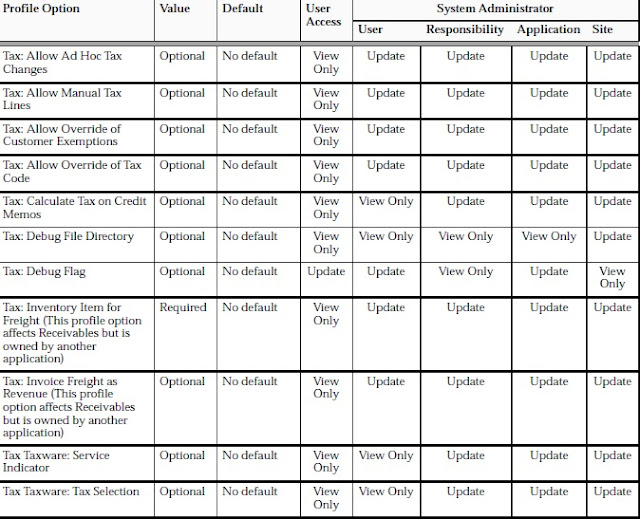
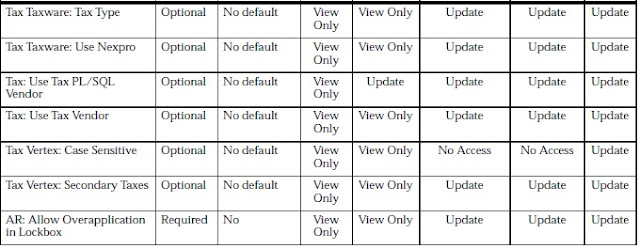
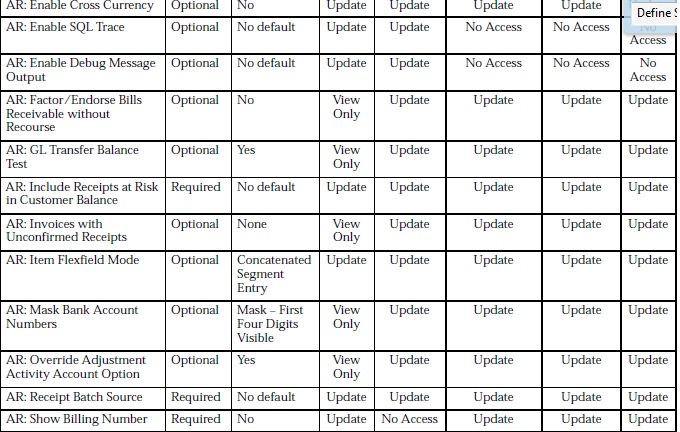
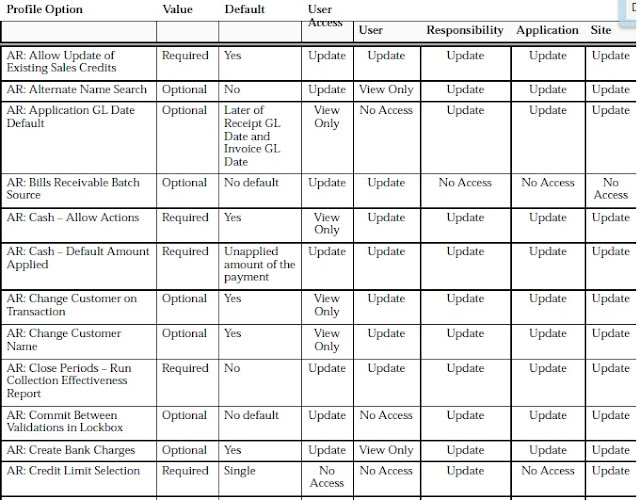
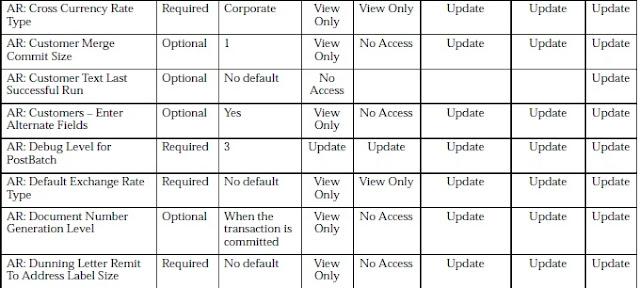
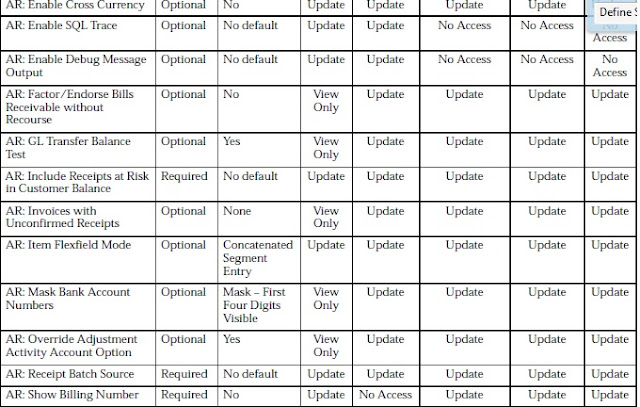
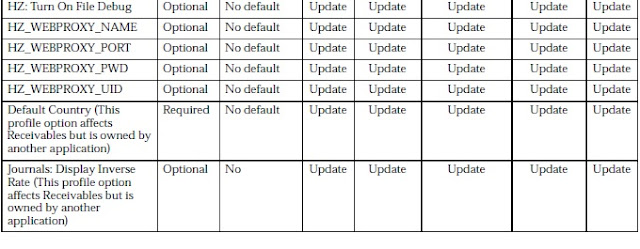
Define profile options:
Define profile options to provide default values for some Receivables operations, specify how Receivables processes data, and control which actions users can perform.
Navigation: Administrator –> Profile –> Systems.
During your implementation, you set a value for each Receivables user profile option to specify how Receivables controls access to and processes data. Receivables lets you govern the behavior of many of
the windows that use profile options.
Profile options can be set at the following levels:
• Site: This is the lowest profile level. Site level profile option values affect the way all applications run at a given site.
• Application: These profile option values affect the way a given application runs.
• Responsibility: These profile option values affect the way applications run for all users of a given responsibility.
• User: These profile option values affect the way applications run for a specific application user. The values you enter for options at the User level supersede the values that your system administrator has entered for you for these options.
Each of these user profile options affect the behavior of Receivables in different contexts. In Receivables, operations that profile options can affect include receipt application, the entry of adjustments, the creation
and remittance of automatic receipts and taxes, and posting to your general ledger.
You may also have additional user profile options on your system that are specific to applications other than Receivables.
To change profile options at the Site, Application, or Responsibility level, choose the System Administrator responsibility, then navigate to the Personal Profile Values window. Query the Profile Name field to
display the profile options with their current settings, make your changes, then save your work. You can change profile options at the user level in the Personal Profile Values window. To do this, navigate to the Personal Profile Values window, query the profile option to change, enter a new User Value, then save your work. Generally, your system administrator sets and updates profile values at each level.
Attention: For any changes that you make to profile options to take effect, you must either exit, and then reenter Receivables, or switch responsibilities.

Define Salespersons:
Define salespersons to allocate sales credits to invoices, debit memos, and commitments. If you do not want to assign sales credits for a transaction, you can enter No Sales Credit. If AutoAccounting depends on salesperson, Receivables uses the general ledger accounts that you enter for each salesperson along with your AutoAccounting rules to determine the default revenue, freight, and receivable accounts for transactions.
Define Customer Profile Classes:
Define customer profile classes to categorize customers based on credit, payment terms, statement cycle, automatic receipt, finance charge, dunning, and invoicing information. When you initially set up your customers, you assign each customer to a profile class. To customize the profile class for a specific customer, use the Customer Profile Classes window.
Navigation: Receivables –> Customers –> Profile Classes.
In Profile Class window enter the following information.
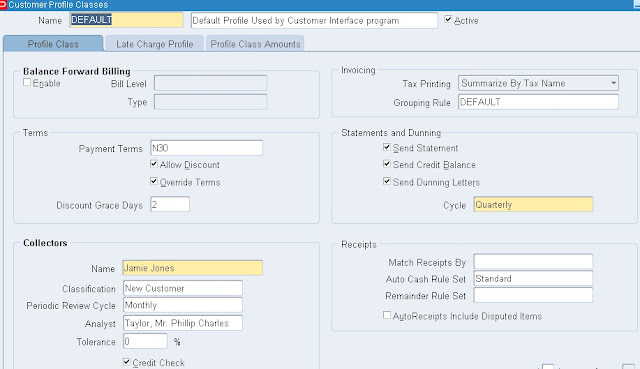
In Profile class Amount tab enter the following information.

Save your work.
Define Customers:
Define customers and customer site uses to enter transactions and receipts in Receivables. When you enter a new customer, you must enter the customer’s name, profile class and number (if automatic customer numbering is set to No). You can optionally enter customer addresses, contacts, site uses and telephone numbers. You must enter all the components of your chosen Sales Tax Location Flexfield when entering customer addresses in your home country.
Navigation: Receivables –> Customers –> Standard.
Define Remit–To Addresses:
Define remit–to addresses to inform your customers where to send payments. Associate each remit–to address with one or more state, country, and postal code combinations.
For example, if you want your customers in California and Nevada to send their payments to a specific address, enter the remit–to address and associate the states CA and NV with this address. Remit–to addresses are assigned based on the bill–to address on the transaction.
Navigation: Setup –> Print –> Remit-to-addresses.
Click on Create Remit to addresses.
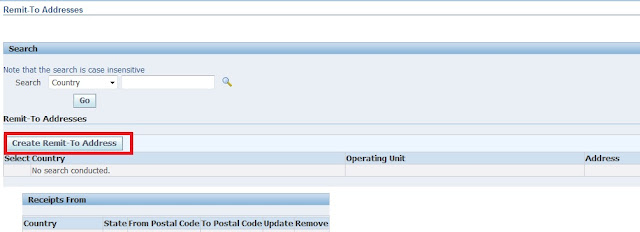
Enter the required information
Click on Apply.
Enter the country name in the same page and then click on the GO.
Click on the Receipts form Create button.
Enter the following information and click on Apply button.


Recent Comments