Use the Customer Overview page in R12 to manage details of your existing customers. 
This page has five subtabs:

  • Accounts.
  • Profile
  • Communication
  • Party Relationships
  • Tax Profile

 Accounts:

Use the Accounts subtab of the Customer Overview page to view, add, and update the accounts of existing customers.
  • view and update an account:
  • view and update an account site
  • create an account
  • create an account site

Customer Profiles:

Use the Profile subtab of the Customer Overview page to add and update the profiles of existing customers.

Tax Registration Number

  • The customer’s unique taxpayer registration number, also known as the VAT number.
  • Oracle Receivables prints this number on customer invoices.
  • Receivables provides country-specific validation of the tax registration number.

Credit Classification

  • Displays the credit classification for a particular profile class.

Credit Analyst

  • Indicates who is responsible for monitoring the creditworthiness of the account and for assisting in the resolution of credit-related issues.

Review Cycle

  • Specifies how often to review the credit status of the customer account. For example, you can specify that the creditworthiness of the account is reviewed each month.

Customer Communication Information:

Use the Communication subtab of the Customer Overview page to enter and update contact information, such as phone numbers, e-mail addresses, and URLs, of existing customers.
Phone Numbers:

  • FAX
  • MOBILE
  • PAGER
  • TELEPHONE
  • VOICEMAIL

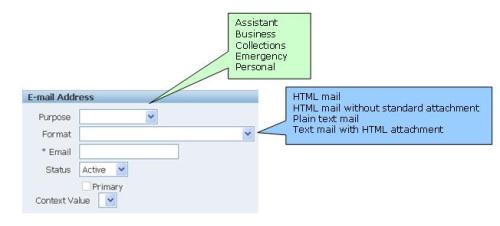
Email Address:

 URLs:

Party Relationships:

Use the Party Relationship subtab of the Customer Overview page to define, view, and update relationships among existing customers (parties), using predefined relationship types and roles.
Note: Relationship types and roles are defined using Oracle Trading Community Architecture Relationship Manager.

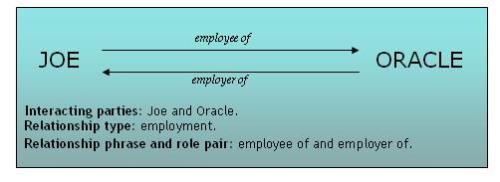
Relationship Role: Describes the role that an entity plays in a relationship.

Customer Tax Profiles:

Use the Tax Profile subtab of the Customer Overview page to set up, view, and update tax profiles for your customers.

Procure to Pay Lifecycle is one of the important Process in Oracle Applications. Procure to Pay means Procuring Raw Materials required to manufacture the final or finished Goods from a Supplier to Paying the Supplier from whom the material was purchased. But this process is not just two steps. It involves many steps. Let’s see the steps and Oracle Application involved in performing those steps.

1.Creation Of Purchase Requisition
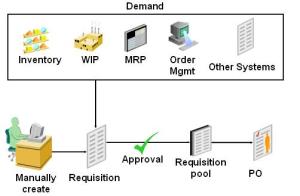
Requisition is nothing but a formal request to buy something. Requisitions represent the demand for any goods or services that an organization needs.

Requisitions for goods and services:

  • Are generated by applications including Inventory, Work in Process (WIP), Material Requirements Planning (MRP) and Order Management.
  • May be entered manually through Purchasing windows.
  • May be entered using iProcurement.
  • May be imported from external systems.

There are two types of Requisitions
1] Internal Requisition – Basically used when there is a Requirement from One Inventory Organization to the Other Inventory Organization (Inter- Organization Transfer)
2] Purchase Requisition – Basically used when there is a Requirement to be fulfilled by External Sources i.e. Suppliers, Requirement from MRP, Requirement from WIP, Requirement from Sales Order etc.
With Oracle Purchasing module, you can create, edit, and review requisition information on-line.  Then the Requisitions went for approvals from proper authorities.
2. Creation of Purchase Order
Based on the Purchase Requisition and its approval next we have to create a Purchase order to buy the item.

Purchasing supports four types of purchase orders:
1] Standard: Create standard purchase orders for one-time purchases of various items. You create standard purchase orders when you know the details of the goods or services you require, estimated costs, quantities, delivery schedules, and accounting distributions.
2] Blanket: Create blanket purchase agreements when you know the detail of the goods or services you plan to buy from a specific supplier in a period, but you do not yet know the detail of your delivery schedules.
3] Contract: Create contract purchase agreements with your suppliers to agree on specific terms and conditions without indicating the goods and services that you will be purchasing.
4] Planned: A planned purchase order is a long-term agreement committing to buy items or services from a single source. You must specify tentative delivery schedules and all details for goods or services that you want to buy, including charge account, quantities, and estimated cost.
Once purchase orders are created, they may be submitted for approval. The approval process checks to see if the submitter has sufficient authority to approve the purchase order.  Once the document is approved, it may be sent to your supplier using a variety of methods including: printed document, EDI, fax, e-mail, iSupplier Portal and XML. Once the purchase order or release is sent to your supplier, they are authorized to ship goods at the times and to the locations that have been agreed upon.
3. Receipt of Material
After receiving the PO, the supplier will send the items.

Purchasing lets you control the items you order through receiving, inspection, transfer, and internal delivery. You can use these features to control the quantity, quality, and internal delivery of the items you receive.
4. Creation of Payables Invoice
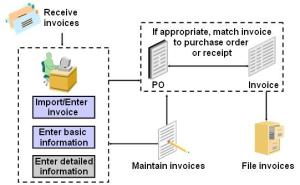
Once you’ve received goods or service from your supplier, you’ll also receive an invoice.  Using Payables you can record invoices in a number of different ways.

With Payables you can:

  • Import/Enter invoices manually, either individually or in batches.
  • Use Quick Invoices for rapid, high-volume entry of standard invoices and credit memos that are not complex and do not require extensive online validation.
  • Automate invoice creation for periodic invoices using the Recurring Invoice functionality.
  • Use iExpenses to enter employee expense reports using a web browser.
  • Import EDI invoices processed with the e-Commerce Gateway.
  • Import XML invoices.
  • Match invoices to purchase orders or receipts to ensure you only pay what you’re supposed to be paying for.

5. Payment to Supplier
Once invoices are validated, they can be paid. Payables integrates with Oracle Payments, the E-Business Suite payment engine, to handle every form of payment, including checks, manual payments, wire transfers, EDI payments, bank drafts, and electronic funds transfers.  Payables also integrates with Oracle Cash Management to support automatic or manual reconciliation of your payments with bank statements sent by the bank.
This is how the P2P Cycle occurs in Oracle Apps.

What is value set in Oracle application AOL?

  • Value set is primarily a container for your values, you define your value set such that it can control the types of values that are allowed into the value set (either predefined or nonvalidated). You can specify the format of your values.
  • Oracle Application Object Library uses value sets as important components of key flexfields, descriptive flexfields, and Standard Request Submission (value sets for report parameters for your reports that use the Standard Request Submission feature).

When to defining Values for Value Sets?

  • After you register your Flexfields & report parameters, if you are using independent or dependent value sets, you can enter values into each corresponding value set using the Segment Values form.
  • Values for the Value Sets, we are defining will be kept in the Oracle Application Object Library tables.

How many Format Types the value set have?

  • Char
  • Date
  • DateTime
  • Number
  • Standard Date
  • Standard Date Time
  • Time

You should take a note that Date and Date Time value set formats will be obsolete now and are provided for backward compatibility only. For new value sets, use the format types Standard Date and Standard Date Time.
What is Security type in value set?

  • By Security Rules window, we can define value security rules for ranges of flexfield and report parameter values.

There are two levels where you must activate Security, the one at value set level and other at individual segment or parameter level. You make Flex field Value Security available for your value set by choosing Hierarchical Security or Non-Hierarchical Security for the Security Type. When you make security available for a value set, all segments and report parameters that use that value set can use security. You then enable security for a particular segment or parameter.

  • Choose Hierarchical Security, If you want Security on a parent value to Cascade down to its child value or else you can choose Non-Hierarchical Security.

How many Character Formatting Options have for value set?

  • Numbers Only (0 – 9)
    • We cannot prevent users from entering a value that contains the radix character.
    • Cannot be used in Translatable Independent and Translatable Dependent value sets.
  • Uppercase Only(A-Z)
    • Here also we cannot use in Translatable Independent and Translatable Dependent value sets.
  • Right justify and Zero fill Numbers(001)
    • If you have selected Numbers Only (0-9) flag, then it wont allow you to affect this flag.
    • We are recommended to use this in Accounting Flex fields.
  • Minimum and Maximum Value Range
    • Your Minimum/maximum value may not be longer than the maximum size you specify for this value set.
    • Once you specify a range of values, you cannot define a new valid value that falls outside this range.
    • The Minimum Value and Maximum Value fields can therefore allow you to create a value set with a validation type of None.

How many validation Type does value set have?
There are several validation types that affect the way users enter and use segment or parameter values:

  • None (not validated at all)
    • Allow users to enter any value.
    • Only Format Validations will be done.
  • Independent
    • Provides a predefined list of values.
    • Independent values are stored in an Oracle Application Object Library table.
  • Dependent
    • Same like Independent Value Set, except the List of Values shown to you will depends on which the Independent value you have selected in the Prior Segment.
    • Must define your independent value set before you define the dependent value set that depends on it.
    • Advisable to create your independent values first.
    • Must create at least one dependent value for each independent value, or else it wont allow you to enter into that segment or field.
  • Table
    • It use your own application tables as value sets for flex field segments and report parameters instead of the special values tables which Oracle Applications provides.
    • You can also use validation tables with other special arguments to make your segments depend on profile options or field values.
    • You can use any existing application table, view, or synonym as a validation table.
    • If we are using non registered table for your value set, then we have to Create the necessary grants and synonyms to APPS Schema.
    • The value column and the defined ID column in the table must return a unique row for a given value or ID.
    • If the Hidden Id column is provided the value passed to the report will be Hidden and not the Value column.
    • Similarly, when you specify :$FLEX$.Value_Set_Name, your flex field segment or report parameter defaults to always use the hidden ID column to compare with your WHERE clause .
    • We can use Special BIND variable such as :$PROFILES$.Option_name, :$FLEX$.Value_set_name, :block.field in the WHERE clause.
  • Special
    • Special validation value sets allow you to call key flex field user exits to validate a flex field segment or report parameter using a flex field within a flex field mechanism. You can call flex field routines and use a complete flex field as the value passed by this value set.
  • Pair
    • Pair validation value set allows user to pass a range of concatenated Flex field segments as parameters to a report.
  • Translatable Independent & Translatable Dependent
    • These value sets are similar to Independent and Dependent value sets except that translated values can be displayed to the user. Translatable Independent and Translatable Dependent value sets allow you to use hidden values and displayed (translated) values in your value sets. In this way your users can see a value in their preferred languages, yet the values will be validated against a hidden value that is not translated.
    • We can convert the Independent value set to a Translatable Independent value set, or a Dependent value set to a Translatable Dependent value set. These are the only types of conversions allowed.

Which Oracle table store Value sets and underline information?

  • FND_FLEX_VALUE_HIERARCHIES
  • FND_FLEX_VALUE_SETS
  • FND_ID_FLEX_SEGMENTS
  • FND_FLEX_VALUE_NORM_HIERARCHY
  • FND_FLEX_HIERARCHIES
  • FND_FLEX_VALUE
  • FND_FLEX_VALIDATION_EVENTS
  • FND_FLEX_VALUE_RULE_LINES
  • FND_FLEX_VALUE_RULE
  • FND_FLEX_VALUE_RULE_USAGE
  • FND_RESPONSIBLITY
  • FND_TABLES
  • FND_FLEX_VALIDATION_TABLES

Any method to upload flexfield value?
Yes, FNDLOAD is utility which can be used for moving value set across different environment.
Do we have any restriction on value set?
Yes, here are some listed one:

  • Table Validated Value Sets
    • We cannot use table-validated id value sets for any accounting flexfield or any other key flexfields.
    • We cannot use :$FLEX$, :$PROFILES$ in table name, value and id of table validated value sets.
    • We cannot use DISTINCT clause in any of the column fields or in the WHERE clause of a table validate value set.
    • In an id value set, the value can be non-unique but id should be unique. In a non-id value set, value should be unique.
    • We can only use columns selected for the table-validated value set must be of type NUMBER, DATE or VARCHAR2.
    • Support for SQL expression in columns of Table Validated value sets will be obsolete in future release.
  • Translatable Independent and Translatable Dependent Valuesets
    • The Numbers Only and Uppercase Only option cannot be used.
    • Must have “Char” format type.
  • Special/Pair valuesets
    • Special/Pair value sets are user-exit value sets . PL/SQL APIs will not be able to validate them.

Lets now define a simple value set in R12:
Step 1: Go to Application Developer, and select menu /Validation/Set
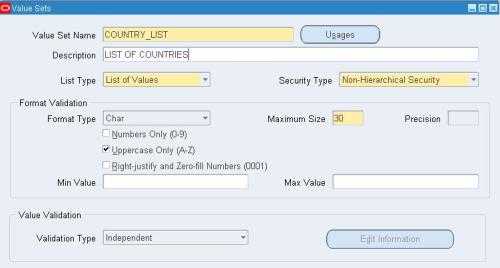
Create a value set name as COUNTRY_LIST which will contain a list of countries. Make it an independent value set. Format type is CHAR. Save the work.

Step 2: Go to Application Developer, and select menu /Validation/Values
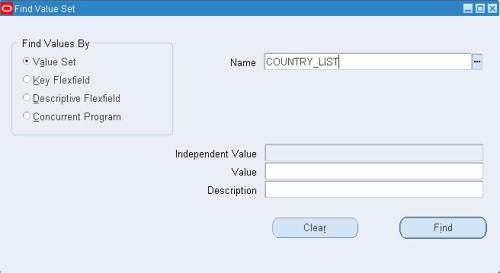
The below window will appear. Put the Search Name as COUNTRY_LIST and click Find.

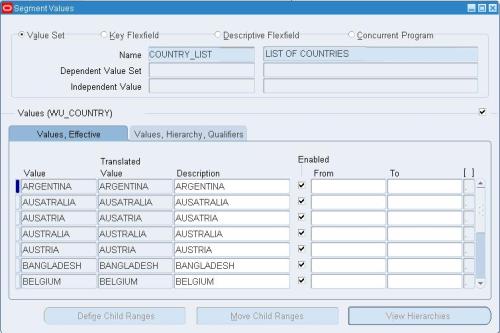
Step 3: Enter the country details in this window. Save the work.

Now the value set is ready to be used in any concurrent program.

This article gives an introduction of  Concurrent Processing in Oracle Application.
Concurrent Program:
An instance of an execution file, along with parameter definitions and incompatibilities. Several concurrent programs may use the same execution file to perform their specific tasks, each having different parameter defaults and incompatibilities.
Concurrent Program Executable:
An executable file that performs a specific task. The file may be a program written in a standard language, a reporting tool or an operating system language.
An execution method can be a PL/SQL Stored Procedure, an Oracle Tool such as Oracle Reports or SQL*Plus, a spawned process, or an operating system host language.
Concurrent Request:
A request to run a concurrent program as a concurrent process.
Concurrent Process:
An instance of a running concurrent program that runs simultaneously with other concurrent processes.
Concurrent Manager:
A program that processes user’s requests and runs concurrent programs. System Administrators define concurrent managers to run different kinds of requests.
There are many concurrent managers each monitoring the flow within each apps area.
But there are 3 MASTER CONCURRENT MANAGERS:
1. Internal Concurrent Manager (ICM): This is the one which monitors all other CMs
2. Standard Manager (SM) : This takes care of report running and batch jobs
3. Conflict Resolution Manager (CRM): checks concurrent program definitions for incompatibility checks.
We cannot delete a concurrent manager… but we can disable it… but it’s not recommended.

Concurrent Queue:
List of concurrent requests awaiting to be processed by a concurrent manager.
Phases and Statuses through which a concurrent request runs:
A concurrent request proceeds through three, possibly four, life cycle stages or phases: 

  • Pending                                       Request is waiting to be run
  • Running                                       Request is running
  • Completed                                   Request has finished
  • Inactive                                       Request cannot be run

Within each phase, a request’s condition or status may change.  Below appears a listing of each phase and the various states that a concurrent request can go through.
Concurrent Request Phase and Status 
Phase: PENDING      

  • Normal: Request is waiting for the next available manager.
  • Standby: Program to run request is incompatible with other program(s) currently running.
  • Scheduled: Request is scheduled to start at a future time or date.
  • Waiting: A child request is waiting for its Parent request to mark it ready to run.   

Phase:RUNNING       

  • Normal: Request is running normally.
  • Paused: Parent request pauses for all its child requests to complete. 
  • Resuming: All requests submitted by the same parent request have completed running.  The  Parent   request is waiting to be restarted.
  • Terminating: Running request is terminated, by selecting Terminate in the Status field of the Request Details zone.

Phase:COMPLETED    

  • Normal: Request completes normally.
  • Error: Request failed to complete successfully.
  • Warning: Request completes with warnings.  For example, a report is generated successfully but fails to print.
  • Cancelled: Pending or Inactive request is cancelled, by selecting Cancel in the Status field of the Request Details zone.
  • Terminated: Running request is terminated, by selecting Terminate in the Status field of the Request Details zone.

 Phase:INACTIVE          

  • Disabled: Program to run request is not enabled.  Contact your system administrator.
  • On Hold: Pending request is placed on hold, by selecting Hold in the Status field of the Request Details zone.
  • No Manager: No manager is defined to run the request.  Check with your system administrator.

 Different execution methods of executabls:

  • FlexRpt                             The execution file is written using the FlexReport API.
  • FlexSql                             The execution file is written using the FlexSql API.
  • Host                                 The execution file is a host script.
  • Oracle Reports                  The execution file is an Oracle Reports file.
  • PL/SQL Stored Procedure   The execution file is a stored procedure.
  • SQL*Loader                      The execution file is a SQL script.
  • SQL*Plus                          The execution file is a SQL*Plus script.
  • SQL*Report                      The execution file is a SQL*Report script.
  • Spawned                          The execution file is a C or Pro*C program.
  • Immediate                       The execution file is a program written to run as a subroutine of the concurrent manager.

 Output formats of a concurrent program:

  • HTML
  • PDF
  • TEXT
  • PS (Post Script)
  • PCL(HP’s Printer Control Language)
This document explains the basic setup needed to setup TDS for suppliers in R12.

Setup Steps
1. Pan Number at the Legal Entity level
When Legal Entity is created, enter the Pan Number in the “Pan” field. This field is mandatory for India territory.

2. Attach Inventory Organization in Location
Create the inventory organization and attach it with the location. Only those locations with inventory organization attached will appear in the location field of organization additional information form.

3. TDS Lookups (Seeded values)
We need to make sure that the following seeded values are available in Asis/Pacific Localization lookups.
  1. JAI_AP_TDS_SECTION_TYPES
  2. JAI_TDS_SECTION
  3. JAI_TDS_VENDOR_TYPE
  • TDS Vendor type is used for categorizing vendors from TDS perspective.
  • TDS Vendor type and TDS section code determines TDS rate and surcharge based on TDS thresholds defined
4. Create Organization Additional Information and Tax calendar for the organization
For all inventory organizations, additional localization information needs to be maintained.
  1. We need to define two records here for each organization, one with location and another without location.
  2. Excise details are mandatory for manufacturing organization
  3. For trading organization, excise tab details should not be filled and trading information tab should be entered.
  4. Pan No, Tan No, Ward No are currently redundant and not used
  5. Only one tax calendar can be active at a time.


5. Create Regime Registration for TDS
Query the recode with Regime code as TDS. All the details except registration value in the registration tab will be defaulted. Enter appropriate registration value against the registration name. These details would get defaulted for the operating units and can be changed, if required.


6. Enter TDS Period

We need to enter the TDS period for calculating the TDS amount for the period. TAN number will be available in the LOV only if regime registration is completed for TDS.

7. Create TDS Authority as Supplier
We need to create a supplier with supplier type as “India TDS Authority”. Enter all the mandatory fields like payment method, payment terms etc.
Other suppliers are entered as usual.
8. Create a Tax definition
We need to create different tax codes for different section codes and tax rates. Enter the basic percentage in the Percentage field and enter additional surcharge details. System will automatically calculate the total percentage. If any lower TDS is involved for certain forms like Form C, enter the certificate name and original tax percent.

9. Create Threshold Setup
Threshold is defined for each section by TDS vendor type. Thresholds applicable to specific vendors are defined as exception setups and vendors are assigned manually to this setup.
There are two types of Thresholds
  1. Single – Applicable to a Single transaction
  2. Cumulative – In this case, TDS is applicable only when the cumulative purchases made from the supplier in one financial year exceeds specified limit i.e, Cumulative threshold amount.
Multiple thresholds with different tax rates may exist. For example, tax rate is 12 percent for the cumulative amount below 10L and tax rate of 12.24 percent for the cumulative amount above 10L.
Before cumulative threshold is reached, single invoice amount greater than the threshold limit for a single invoice attracts TDS at predefined rate
Threshold Amount = Total Invoice Amount – Total Invoice Cancelled Amount – Total Invoice Apply Amount + Total Invoice Unapply Amount


10. Create Supplier Additional Information

We need to add Pan Number, TAN number and TDS Details for each supplier. We should create two records for each supplier, one without supplier site and another with supplier site. Pan number should be confirmed at the supplier level and it can not be modified thereafter.
Enable invoice approval checkbox, if TDS invoice created for the supplier should be in approved status.
Enter the default TDS Section and/or Tax name, if TDS tax code should be automatically defaulted in the invoice for this supplier. Tax code defaulting logic is given below.
If default section and default tax name are not given in the supplier additional information and if tax name is not manually entered in the invoice, then TDS will not be calculated and no TDS invoice will be generated.


11. Review and Complete DFF and Profile Settings

TDS tax code is now captured in Global Descriptive Flexfield in the invoice distribution screen. We need to make sure that the DFF JG_AP_INVOICE_DISRIBUTIONS is enabled.
Also define the following profile option values at the responsibility level
Profile Options
Values
JG: Application
Payables
JG: Product
Asia Pacific Localization
JG: Territory
India
The country used against the Legal entity / Operating unit has to be India
Invoice Transaction
Let us now create an invoice for the “Google” supplier.
Invoice Amount – 90000
TDS Tax rate – 12% if the invoice amount is above 50001
Hence the TDS Invoice amount will be 90000 * 0.12 = 10800
Make sure that the taxation country is defaulted as ‘India

As soon as the invoice distribution details are saved, the tax code ID is defaulted in DFF as shown below. The user can change the tax code, if required.
When the invoice is validated, system will run a concurrent program which will create TDS invoice (Credit Memo) for the supplier and another standard invoice for the TDS authority.

Click on ‘View Output’ for ‘Import TDS Invoices’ concurrent program to check for any errors. The report shows all the imported and error lines.
The invoice number format for the credit memo for the supplier and standard invoice for the TDS authority is given below
Supplier Credit Memo: (Original Invoice Number)-TDS-CM-(Serial Number)
Invoice for TDS Authority: (Original Invoice Number)-TDS-SI-(Serial Number)
References
  1. Oracle Financials for India – Implementation Guide
  2. Oracle Metalink Docs