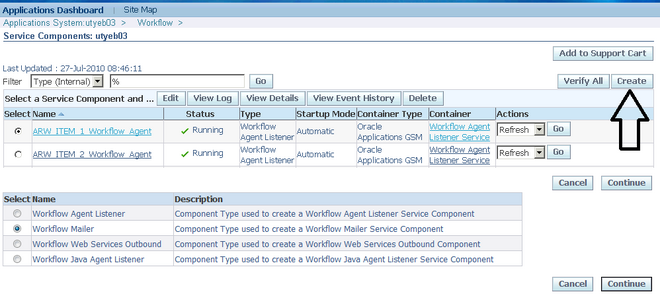
The Generic Service Component Framework helps to simplify and automate the management of background Java services. Service component containers and their service components are run through Generic Service Management (GSM), which you can control through Oracle Applications Manager (OAM).
A service component container is an instance of a service that manages the running of the individual service components that belong to it. The container monitors the status of its components and handles control events for itself and for its components. These actions are recorded in a log for the container.
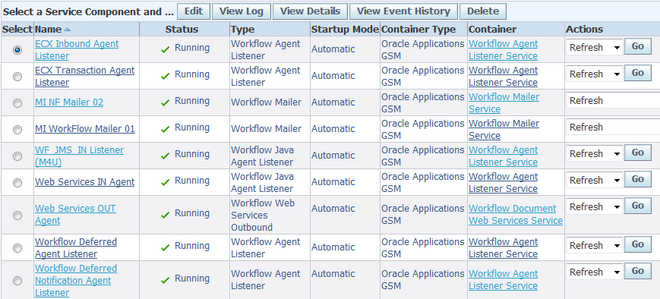
A service component is an instance of a Java program which has been defined according to the Generic Service Component Framework standards so that it can be managed through this framework. Currently, Oracle Workflow provides four service component types: Workflow Mailer, Workflow Agent Listener, Workflow Java Agent Listener, and Workflow Web Services Outbound.
Oracle Workflow provides several seeded service components of these types, within seeded containers, to perform standard processing. You can optionally create additional service components to perform custom processing. If you create custom service components, you can either assign them to the seeded containers, or, based on the volume to be handled by the seeded containers, you can also choose to create your own custom containers.
All service components have certain attributes required by the Generic Service Component Framework. General definition attributes for a component include the component name, startup mode, container type, inbound agent, outbound agent, and correlation ID. Detail attributes include the container that owns the component, the maximum idle time for an on-demand component, maximum error count, number of inbound and outbound processing threads, component log level, read timeout period, minimum sleep time, maximum sleep time, error sleep time, and whether to close connections when the read timeout period expires.

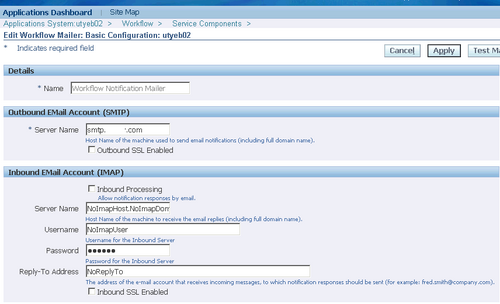
A notification mailer is a Java program that performs e-mail send and response processing for the Oracle Workflow Notification System, using the JavaMail API. You need to implement one or more notification mailers only if you want to have your workflow users receive their notifications by e-mail, as well as from the Worklist Web pages.
The notification mailer program is defined as a service component type in the Generic Service Component Framework. This framework helps to simplify and automate the management of background Java services.
Oracle Workflow provides one seeded notification mailer service component, called Workflow Notification Mailer. Most of the configuration parameters for this mailer are set to default values. You can enter several of the remaining required parameters using AutoConfig. After installation, you then only need to enter the e-mail inbox password
in order to complete the configuration of this mailer. Alternatively, if you only want to send outbound messages and do not need to receive inbound messages, you only need to disable inbound processing in order to complete the configuration of this mailer. If the mail servers and Business Event System components used by the notification
mailers are set up, and the Workflow Mailer Service container to which the Workflow Notification Mailer belongs is started, the seeded notification mailer automatically starts running once its configuration is complete.
You cannot delete the seeded Workflow Notification Mailer or edit its name, assigned agents, correlation ID value, or container. However, if necessary you can optionally update other configuration parameters, schedule control events, or manually choose control commands to start, stop, suspend, resume, or refresh this notification mailer.

Note: Oracle Alert also uses the Workflow Notification Mailer to send and receive alert e-mail messages. If you use Oracle Alert, ensure that the configuration of the Workflow Notification Mailer meets your alert requirements.
Custom Notification Mailer
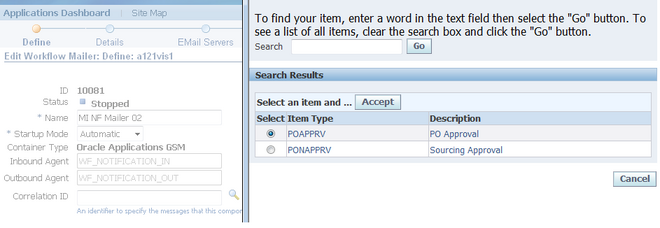
You can also optionally create additional notification mailer service components. For example, you can create a notification mailer that processes only messages that belong to a particular workflow item type, or create additional mailers that process the same types of message to increase throughput.

The correlation ID for a notification mailer determines which messages it can process
. To dedicate a notification mailer to processing messages from a particular item type, set that item type as the correlation ID. To create a general notification mailer that can process messages from any item type, leave the correlation ID blank. The seeded Workflow Notification Mailer has a blank correlation ID so that it can run as a general mailer.
Note: If you run a general notification mailer and a dedicated notification mailer for a particular item type at the same time, a message from that item type may still be processed by the general mailer if that mailer is the first to access the message. If you want only the dedicated notification mailer to process messages from that item type, disable any general mailers. In this case, however, ensure that you define dedicated mailers for all item types used in your Oracle Applications installation.
You can also configure any notification mailer service component to process only inbound messages, or only outbound messages. You associate inbound and outbound mailers with each other by assigning them the same mailer node name. The mailer node name indicates which inbound mailer can process incoming responses to  outbound messages sent by a particular outbound mailer.

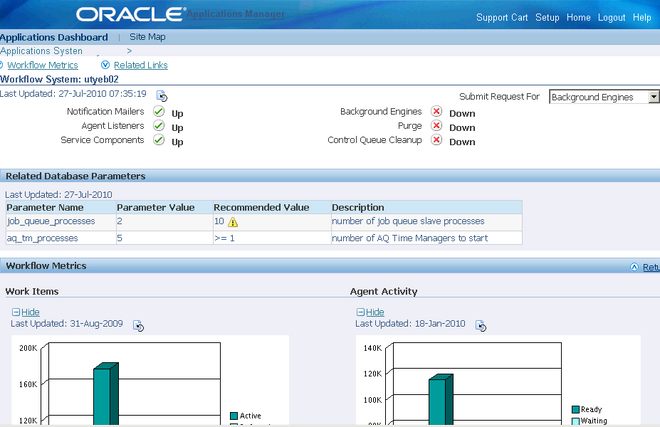
Oracle Workflow Manager is a component of Oracle Applications Manager that allows system administrators to manage Oracle Workflow for multiple Oracle Applications instances from a single console.
Using Oracle Workflow Manager, administrators can control Workflow system services, such as notification mailers, agent listeners, and other service components, background engines, purging obsolete Workflow data, and cleanup of the Workflow control queue.
Administrators can also monitor work item processing by viewing the distribution of all work items by status and drilling down to additional information. Additionally, they can monitor event message processing for local Business Event System agents by viewing the distribution of event messages by status as well as queue propagation schedules. With this ability to monitor work items and event messages, a system administrator can identify possible bottlenecks easily.
Navigation: Applications Dashboard > (pull-down menu) Workflow Manager > (B) Go
Gathering Oracle Workflow Statistics
Some Oracle Workflow Manager graphs and lists may summarize large volumes of data, depending on the level of activity in your Oracle Applications instance. To enhance performance in displaying these statistics, Oracle Workflow Manager periodically runs concurrent programs to gather the statistics and displays the graphs
and lists based on the latest data from the concurrent programs.
1.  Workflow Agent Activity Statistics Concurrent Program (FNDWFAASTATCC) –
Gathers statistics for the Agent Activity graph in the Workflow System status page and for the agent activity list in the Agent Activity page.
2. Workflow Mailer Statistics Concurrent Program (FNDWFMLRSTATCC) –
Gathers statistics for the throughput graph in the Notification Mailer Throughput page.
3. Workflow Work Items Statistics Concurrent Program (FNDWFWITSTATCC) –
Gathers statistics for the Work Items graph in the Workflow System status page, for the Completed Work Items list in the Workflow Purge page, and for the work item lists in the Active Work Items, Deferred Work Items, Suspended Work Items, and Errored Work Items pages.
These concurrent programs are scheduled to run every 24 hours by default. They do not require any parameters. You can optionally cancel the default scheduled requests and run the programs with a different schedule if you want to gather statistics at a different frequency.
Each of these graphs and lists displays the date and time when its statistics were last updated, as well as a refresh icon that you can select to refresh the statistics immediately if necessary. However, note that if your Oracle Applications instance contains very large volumes of workflow data, you may encounter delays or page timeouts when refreshing the data.
Note: Oracle Workflow Manager statistics that typically represent smaller volumes of data, such as work item details and work item activity details, are queried directly rather than through the concurrent programs.

The Oracle Applications Tablespace Model (OATM) uses twelve consolidated tablespaces^(including three system tablespaces: temporary, system and undo segments) and provides support for locally managed tablespaces. OATM was introduced in Release 11i.10. In prior 11i releases of the E-Business Suite, each product was allocated two tablespaces, one for data and one for indexes.
The Migration Utility is a menu-based PERL program and a series of sizing estimate reports that enables conversion of E-Business Suite applications schemas either in a single comprehensive migration or a phased, schema-by-schema migration. In general Oracle recommends performing a single comprehensive migration, however this requires a sufficient amount of down time and disk space. Oracle does not support partial migration of tablespaces. You must still migrate all schemas when performing a phased schema-by-schema migration.
With OATM, each database object is mapped to a tablespace based on its Input/Output characteristics, which include object size, life span, access methods and locking granularity. This model allows for easier maintenance, and reduced space usage for the E-Business Suite.
Migrating database objects to OATM provides the following benefits:

  1. Fewer and more consolidated tablespaces
  2. Locally Managed Tablespaces
  3. Accounts for the I/O characteristics of an object
  4. Reclaims space after migration
  5. Real Application Cluster (RAC) Support

The advantages of OATM’s product tablespaces are best understood in terms of the tablespace model that preceded it. This model contained two tablespaces for each Oracle Applications product. One tablespace was allocated for tables and one for indexes. In this model, the standard naming convention for tablespaces contained the product’s Oracle schema name with a suffix of either “D” for “Data” tablespaces or “X” for “Index” tablespaces. For example, the tablespaces APD and APX were the default tablespaces for Oracle Payables tables and indexes, respectively.
In contrast to the previous tablespace model, OATM contains nine default tablespaces for applications objects in addition to Undo, Temp and System database tablespaces. Indexes on transaction tables are held in a separate tablespace dedicated for transaction table indexes whereas all other indexes are held in the same tablespace as the parent/base table.
All Oracle Applications product schemas now have a default tablespace set to point to the TRANSACTION_TABLES tablespace type for data objects and the TRANSACTION_INDEXES tablespace type for index objects.
^A tablespace is a database storage unit that groups related logical structures together. The database data files are stored in tablespaces.


After you log on to Oracle System Administrator, complete the following steps to set up your Oracle Applications:

Create Accounts for Implementors to Complete Setting Up
Create individual Oracle Applications accounts for users who will be completing the implementation of your Oracle Applications. Assign these users the full access responsibilities for the products they will be implementing.
Create New Responsibilities (Optional)
A responsibility in Oracle Applications is a level of authority that determines how much of an application’s functionality a user can use, what requests and concurrent programs the user can run, and which applications’ data those requests and concurrent programs can access. Oracle Applications provides a set of predefined responsibilities that you can use. You can also define your own responsibilities if the ones provided do not meet your needs.
Set Up Oracle Applications Manager
Oracle Applications Manager (OAM) allows you to configure and maintain many components of the Oracle Applications system.
Define Your Concurrent Managers (Optional)
Concurrent Processing is a feature of Oracle Applications that lets you perform multiple tasks simultaneously. Oracle Applications Concurrent Processing lets you run long, data-dependent functions at the same time as your users perform online operations. Concurrent managers are components of concurrent processing that monitor and run your time-consuming tasks without tying up your computers.
Oracle Applications automatically installs one standard concurrent manager that can run every request. You may want to take advantage of the flexibility of concurrent managers to control throughput on your system.
You can define as many concurrent managers as you need. Keep in mind, however, that each concurrent manager consumes additional memory.
You can specialize each of your concurrent managers so that they run all requests, requests submitted by a particular user, requests submitted by a particular application, or other constraints, or any combination of these constraints.
If you are using Parallel Concurrent Processing in a cluster, massively parallel, or homogeneous networked environment, you should register your Nodes and then assign your concurrent managers to primary and secondary nodes. You can spread your concurrent managers, and therefore your concurrent processing, across all
available nodes to fully utilize hardware resources.
Use the Define Concurrent Manager form to define new concurrent managers
Define Request Sets (Optional)
A request set is a group of reports or programs which you submit with one request. To define and maintain request sets, use the Request Sets form.
Specify Preferences for Oracle Workflow Notifications (Required)
The SYSADMIN user is the default recipient for some types of notifications in Oracle Applications, such as error notifications. You need to specify how you want to receive these notifications by defining the notification preference and e-mail address for the SYSADMIN user.
By default, the SYSADMIN user has a notification preference to receive e-mail notifications. To enable Oracle Workflow to send e-mail to this user, navigate to the Users window and assign SYSADMIN an e-mail address that is fully qualified with a valid domain. However, if you want to access notifications only through the Oracle
Workflow Worklist Web page, then you should change the notification preference for SYSADMIN to “Do not send me mail” in the Preferences page. In this case you do not need to define an e-mail address.
Set Up AuditTrail (Optional)
If you want to keep track of the changes made to your data by application users, you should set up AuditTrail for the relevant tables.
Defining AuditTrail for your site involves defining Audit Groups, which are groups of tables and columns for which you intend to track changes. You then define Audit Installations to instruct AuditTrail which ORACLE IDs you want to audit. Finally, you run the Audit Trail Update Tables Report, which allows your AuditTrail definitions to take effect.
Set Up Your Printers
You must define any printer types used at your site that are not shipped with Oracle Applications, then register each printer with its name as determined by your operating system.
For every custom printer type or specialized print style you define, use the Printer Drivers form to assign a printer driver to use with each print style used by a printer type Specify Your Site-level and Application-level Profile Options
Use the System Profile Values form (Profile > System) to set site-level and other profile optons..
Optionally set your Site Name profile option to your site name. Many profile options are set by AutoConfig and their values can be reviewed in Oracle Applications Manager.
Define Internationalization Options (Optional)
Optionally define settings for internationalization features.
Modify Language Prompts (Optional) : If you want to modify the field name displayed in the Translations window, you should change the Description value for the language you want to modify in the Languages window.
Modify Territory LOV Values (Optional) : If you want to modify the territory value displayed in LOVs, you should change the Description value for the territory you want to modify in the Territories window.