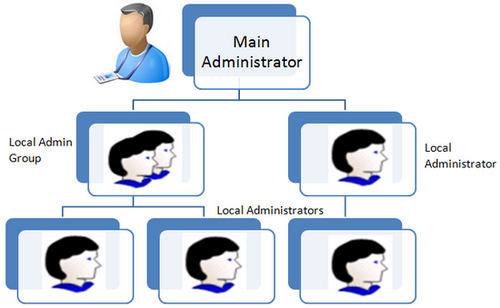
Delegated Administration Privileges determine the users, roles and organization information that delegated administrators (local administrators) can manage. Each privilege is granted separately, yet the three work in conjunction to provide the complete set of abilities for the delegated administrator.
A local administrator must be granted User Administration Privileges to determine the users and people the local administrator can manage. Local administrators can be granted different privileges for different subsets of users. For example, a local administrator can be granted privileges only to query one set of users, and granted full privileges (including update and reset password) for another set. Local administrators cannot query users for which they do not have administration privileges.
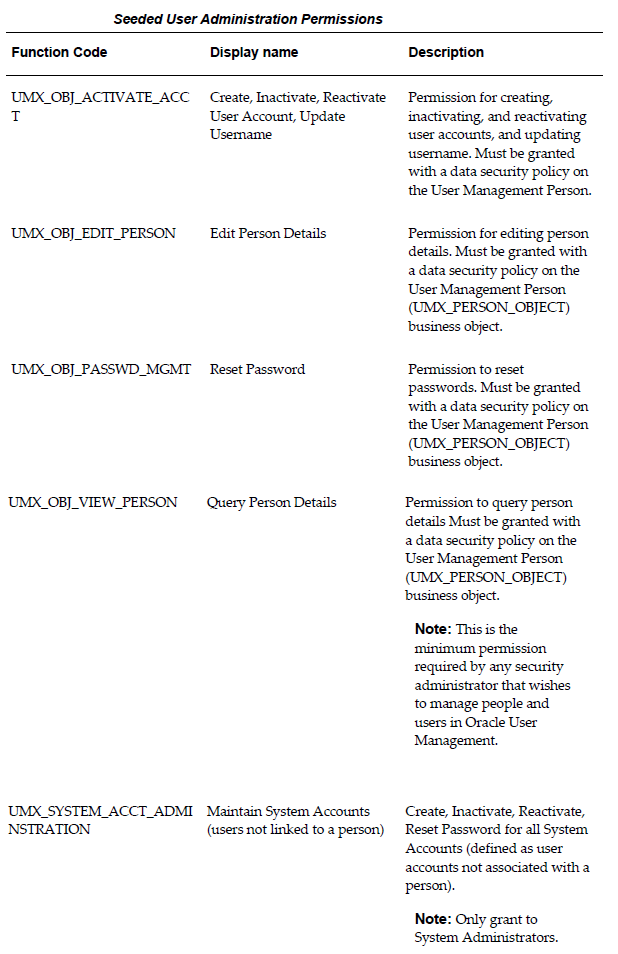
Oracle User Management ships with the following seeded permissions for defining user administration privileges for roles:

Steps
  1. Log on as a user that is assigned the Security Administrator role (typically as sysadmin), select the User Management responsibility in the navigator and then click the Roles & Role Inheritance subtab.
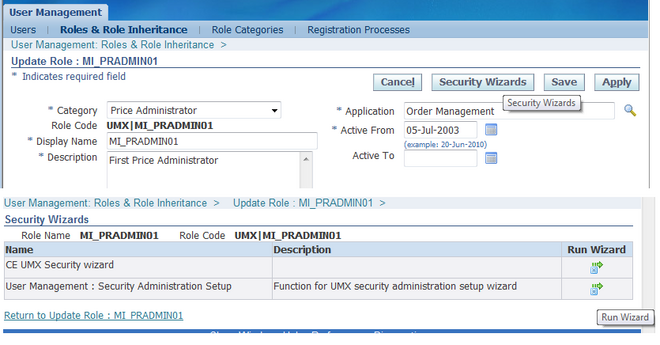
  2. In the role hierarchy, access the role to which you want to assign user administration privileges and click the Update icon.
  3. Click on the Security Wizards button.
  4. Click on the Run Wizard icon for “User Management: Security Administration Setup”.
  5. Click the User Administration subtab and then click the Add More Rows button.
  6. In the Users field, select the set of users that can be managed by Administrators to whom the role is assigned. The drop down list contains various data security policies that pertain to the User Management Person Object (UMX_PERSON_OBJECT). Oracle User Management ships with sample data security policies for users. Organizations can use these policies or create their own.
  7. In the Permissions field, select the permissions that you wish to associate with the delegated administration role. Permissions determine the actions an administrator can perform when managing the set of users defined in the previous step. The Permissions drop down list includes permission sets that contain permissions associated with the User Management Person object. Different combinations of the existing permissions can be grouped into new permission sets, enabling organizations to add permission sets based on their business needs and the level of granularity they prefer for administering users.
  8.  Click Save or Apply to save your changes.
Navigate back to the user tab to assign the new role to any existing user.
Defining Role Administration Privileges for Roles
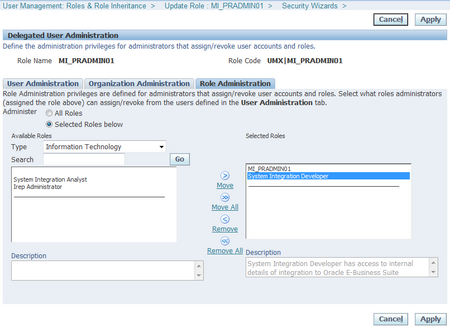
Role Administration Privileges define the roles that local administrators can directly assign to and revoke from the set of users they manage.
 
Steps

1. Log on as a user that is assigned the Security Administrator role (typically as sysadmin), select the User Management responsibility in the navigator and then click the Roles & Role Inheritance subtab.
2. In the navigation menu access the role for which you want to define role administration and click the Update icon.
3. Click on the Security Wizards button.
4. Click on the “Run Wizard” icon for “User Management: Security Administration Setup”.
5. Click the Role Administration link and use the Available Roles fields to search for the role(s) that you want to associate with this role and which administrators can manage once they are assigned this role.
6. Select the desired role(s), move them to the Selected Roles column and click Save or Apply.
Defining Organization Administration Privileges for Organizations

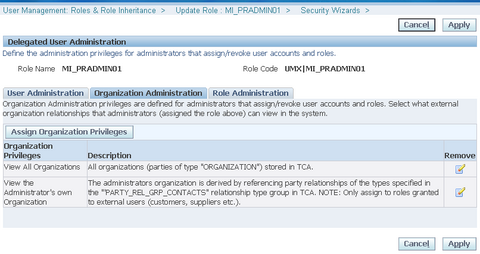
Organization Administration Privileges define the external organizations a local administrator can view in Oracle User Management. This privilege enables an administrator to search for people based on their organization, assuming the local administrator has also been granted access to view the people in that organization (User Administration Privileges). Depending on what administration account registration process has been granted, the administrator may have the ability to register new people for that organization.

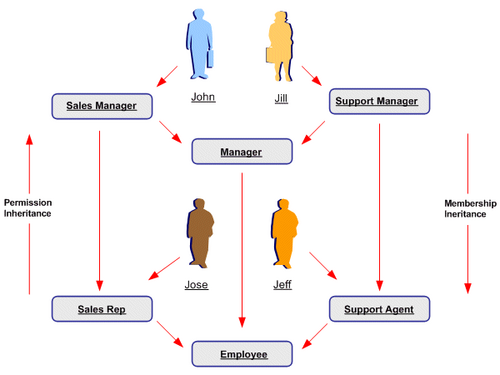
With role inheritance hierarchies, a role can contain sub roles. When a user is assigned a role, the user inherits the privileges defined for that role and for all of its sub roles. For example, the Sales Manager role can contain the Manager and Sales Rep roles, both of which in turn contain the Employee role. Any individual who is granted the Sales Manager role automatically inherits the Manager, Sales Rep and Employee roles.
With Role Inheritance Hierarchies, roles inherit the permissions assigned to their sub roles.
Steps
1. Log on as a user that is assigned the Security Administrator role (typically as sysadmin), select the User  Management responsibility in the navigator and then click the Roles & Role Inheritance subtab.
2. Locate the role for which you want to create a role inheritance hierarchy by using the Search fields or by expanding the appropriate nodes in the Role Inheritance Hierarchy menu. If you are building a role inheritance hierarchy that contains several roles, start with highest level role to which you want to add inherited subordinate roles.
3. Click the Add Node icon next to this role.
4. In the resulting menu, search for the role either by using the Search fields or by locating it in the Role Inheritance Hierarchy menu.
5. Select the role and then click the Select button or the Quick Select icon.
6. Repeat this process until you have added all of the required subordinate roles to their corresponding super roles. You can optionally verify the results by expanding the nodes for all super roles within your role inheritance hierarchy. You can also remove any subordinate roles by clicking the Remove Node icon.
Deployment Options
Organizations can use different deployment options for role inheritance hierarchies depending on their requirements.
Assigning Existing Responsibilities to Roles
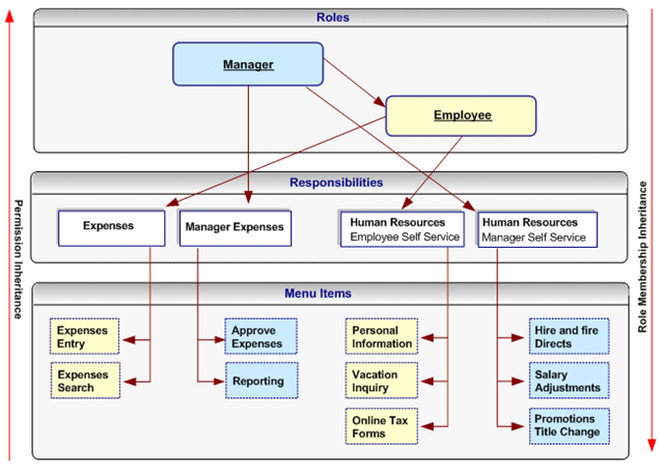
Using Role Inheritance Organizations that have already defined their responsibilities can utilize RBAC by creating roles and assigning their existing responsibilities to those roles. For example, an organization could create an Employee role and a Manager role, and add to these the Expenses and Human Resources responsibilities that it wishes to make available to employees and managers respectively. Then, instead of manually assigning or revoking each of these responsibilities to or from its employees, the organization can simply assign or revoke the Employee and Manager roles as required. Since the Manager role inherits the employee role, managers that are assigned the Manager role also inherit all the responsibilities and privileges associated with the Employee role.
In the following example, a Human Resource Manager inherits the Human Resources Manager Self Service responsibility through the Manager role as well as the Human Resources Employee Self Service responsibility, which the Manager role inherits from the Employee role.
Steps
1. Create roles representing the required job functions such as Manager and Employee.
2. Define a role inheritance hierarchy.
3. Ensure the responsibilities are inherited by their corresponding roles.
4. Assign the roles to users as required.
Fully Utilizing RBAC and Role Inheritance to Determine Access to an Application
In previous releases of Oracle Applications, access to individual functions within an application could only be defined through responsibilities, menu hierarchies, and menu exclusions. Responsibilities had the dual role of defining application navigation menus and granting permissions to the application. New responsibilities with one of the
following had to be defined for each set of users with different job functions that required access to a set of pages within an application:
• A completely new menu hierarchy for each responsibility, or
• A common menu covering the superset of all functions within the application, and menu exclusion rules defined for each responsibility.
The Human Resources application, for example, typically required a minimum of two responsibilities, one for employees and one for managers.
Separating Navigation Menus and Access Control
Oracle User Management provides new alternatives for defining access to an application with RBAC and Role Inheritance, allowing organizations to separate navigation menus from access control. Responsibilities can now be defined to represent an application itself and as a result, only one responsibility may be required for each
application. A menu can be tailored for each application with specific consideration to usability and end user navigation experience. Access to parts of the application (responsibility) and its corresponding menu hierarchy are instead controlled by different roles, each representing a specific job function or set of people.
Benefits
Using this mechanism for determining access control provides several benefits.
1.  Administration and changes can be accomplished with minimal effort:

  • A new page only has to be added to a single menu.
  • The permission to access a new page, only has to be granted once to the lowest level (subordinate role) in the role inheritance hierarchy.
  • An entirely new application (responsibility) can automatically be assigned to a set of people by simply defining it as the subordinate role of an existing role.
  • Permissions to access the various pages and functions within a new application should only be assigned at the lowest level in the role inheritance hierarchy.
  • The permissions are then automatically inherited by all superior roles in the hierarchy.
  •  Revoking access to a page, or an entire application, can be accomplished as
    easily as adding access.

2.  Improved end user experience. In the applications navigator, end users will see a list of applications to which they have access. Access to the various functions within each application is determined by the roles assigned to the end user.
Steps
1. Define a new responsibility that will be used to represent a specific application such as Expenses or Human Resources.
2. Design a complete menu that includes all the menu functions within an application as well as any required submenus, and attach this menu to the new responsibility. For example, both the Expenses and Human Resources responsibilities would include all employee and manager menus.
3. Following the “principle of least privilege”, all the menu options within the application (each menu item corresponds to a function/permission) should be disabled by default. To accomplish this, remove the selection from the “grant” checkbox for each menu item.
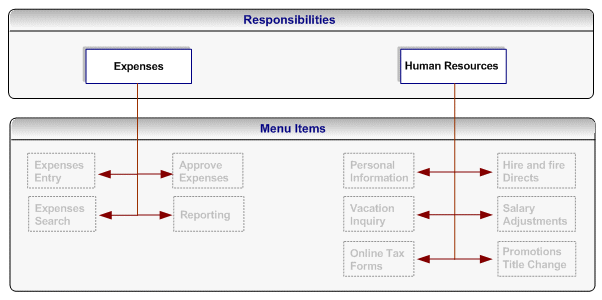
Note: A user cannot access any of the menu items (functions) within the application if you assign the responsibility to the user at this stage.
4. Create roles representing the people with various job functions that require access to the application, for example, a Manager role and an Employee role.
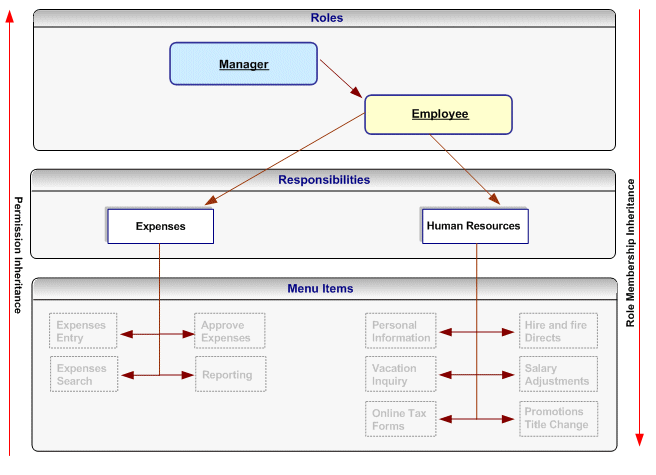
5. Define role inheritance relationships. For example, the Manager role should inherit the Employee role, and the Employee role should inherit the Expenses and Human Resources responsibilities.
The following figure illustrates a role inheritance relationship in which a role inherits the responsibilities that are inherited by its subordinate role:
6. Assign permissions to each role. Each permission maps to a menu item (function) within the application responsibility) that should be available to the users to whom the role is assigned. For example, an organization will grant the employee-related permissions from the Expenses and Human Resources responsibilities to the Employee role, and
will grant the manager-related permissions for these responsibilities to the Manager role. Consequently, the manager role will have access to all the menu items within these responsibilities, but the Employee role will only have access to the Employee-related functions.
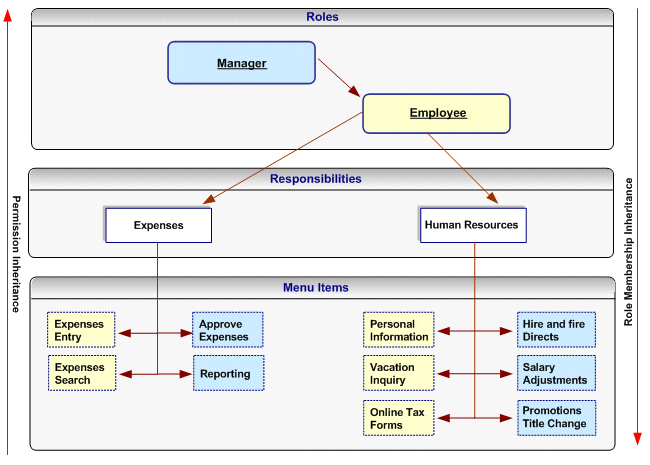
Permissions assigned to a subordinate role in the role inheritance hierarchy are automatically inherited by the superior roles. For example, if you grant the permission for accessing the Online Tax Forms page to the Employee role, anyone with the Manager role will automatically have access to this page through role inheritance. Because the Hire and Fire Directs page is only granted to the Manager role, it is not available to users that are only assigned the Employee role. Permissions are always assigned through permission sets, which represent named sets of functions (permissions). When determining what permissions (functions/menu items) should be granted to each role, you may have to create new
permission sets. Menus and permission sets are stored in the same tables  in the database; which means that they are interchangeable (both can be used) to assign permissions.
7. Optionally assign any additional permissions and data security policies to roles as required by each application.
With Oracle Applications, organizations can use Data Security to manage permission assignments that control access to objects. Data Security policies can only be defined for applications that have been written to utilize the Data Security Framework. Access to the specific object must be formed with a specified Data Security Policy (also referred to as the Data Scope or Access Policy).
The Data Security Policy restricts operations so that they only can be performed on a subset of instances of the corresponding database object.
Steps
1. Log on as a user with the Functional Developer responsibility, click the Functional Developer responsibility in the navigator, navigate to the Security tab and then click the Objects subtab.
2. Search for and access the object for which you want to create data security policies.
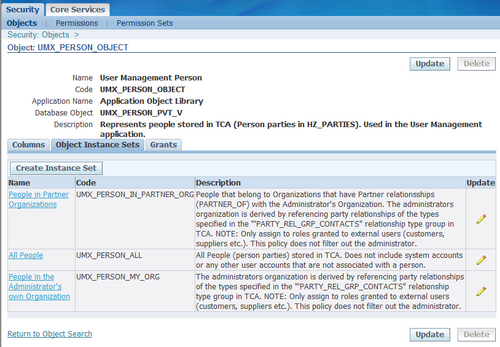
For example, to locate the User Management Person business object (UMX_PERSON_OBJECT), enter “UMX%” in the Code field, click the Go button, and then click User Management Person object (UMX_PERSON_OBJECT) in the
search results list. For any object for which you are creating a policy, ensure that the SQL statement returns the primary key value for that object. In this example, this is a list of person party IDs.
3. Click the Object Instance Sets subtab. Click the Create Instance Set button to create a new object instance set or click the Update icon to modify an existing one.
4. Enter the required information and then click the Apply button.

Registration processes are predefined registration components that enable end users to perform some of their own registration tasks, such as requesting new accounts or requesting additional access to the system. They also provide administrators with a faster and more efficient method of creating new user accounts.
Oracle User Management provides four types of registration process:

  1. Self Service Account Requests
  2. Self-Service Requests for Additional Access
  3. Account Creation by Administrators
  4. Administrator Assisted Request for Additional Access

Steps


Registration processes all use the same infrastructure and processing logic. Steps for defining a registration process will vary depending on the type of registration process you are creating.
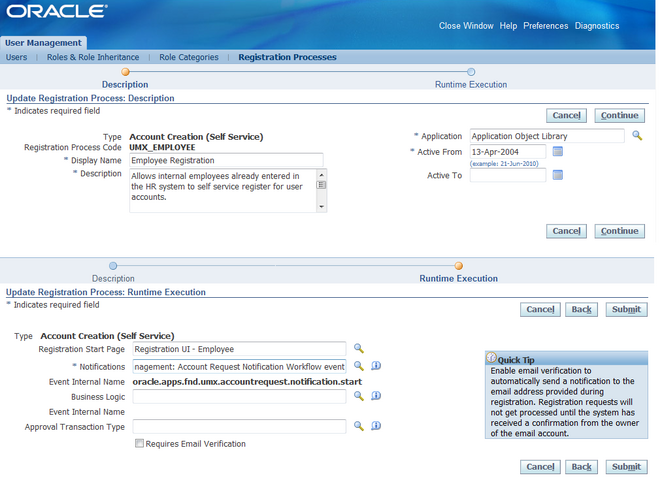
1. Log on as a user that is assigned the Security Administrator role (typically as sysadmin), select the User Management responsibility in the navigator and then click the Registration Processes subtab.
2. Click the Create Registration Process button.
3. Enter the required information for the Registration Process Description and click the Next button.
4. Enter the runtime execution information for the registration process and click the Next button.
5. Enter the eligibility information for the registration process by selecting the appropriate roles or groups from the Available Groups column and clicking the Submit button. For Self-Service Requests for Additional Access, eligibility defines the users who are able to register for the role associated with the registration process. For Account Creation by Administrators, eligibility determines what administrators can register new users through the registration process
6. Register subscriptions to the appropriate business events raised by Oracle User Management, and ensure that your subscription logic writes the registration data into the appropriate destination schemas.
7. Optionally update the registration process by searching for it and clicking the Update button in the search results page.


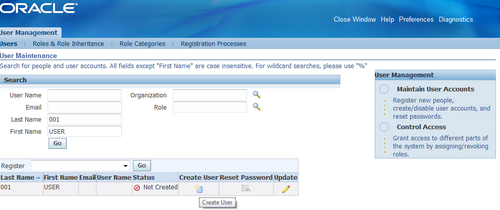
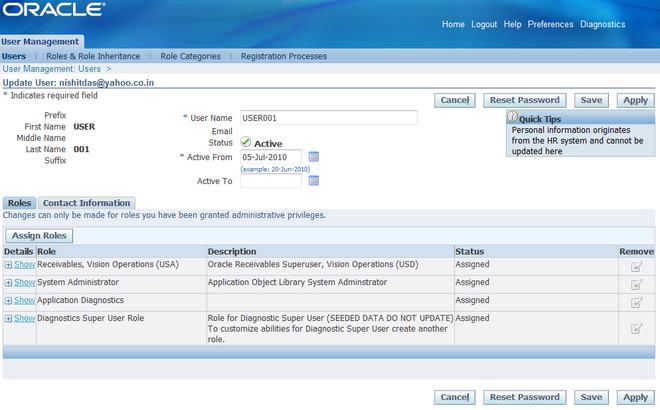
An user id should be created for each employee who needs access to the system. After an employee is created in HRMS, SYSADMIN logins to User Management and search for that employee by first and last name.
The sysadmin needs to enter the mail id and password (not mandatory, if not entered manually system generates a password). A mail is sent to the user with the log in credentials. Next the sysadmin can add the roles/responsibilities to the user as per the business requirements.

Configuring the User Name Policy
The Oracle User Management registration infrastructure supports a configurable user name policy. This policy is used to generate a suggested user name in the sample user creation flows shipped with the application, as well as for validating the chosen user name format.
Note: Oracle User Management is supplied with a default policy that identifies users by their email address.
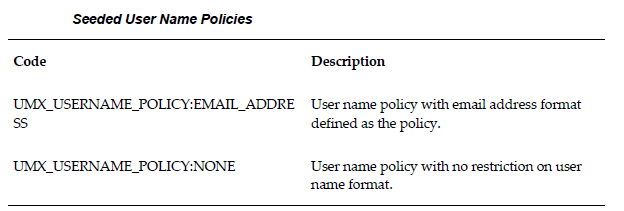
Seeded User Name Policies
The following table lists the seeded user name policies that are shipped with Oracle Applications.

Administrators can configure either of these seeded policies. In addition to these, custom policies can also be implemented if desired.
Configuration of user name policy is a three-stage process.
Stage 1 – Suggested User Name Generation Subscription Setup
1. Log on as a user that is assigned the Workflow Administrator Web Applications responsibility (typically sysadmin).
2. Go to Workflow Administrator Web Applications > Business Events
3. From the Business Events page, search for the Business Event with the name racle.apps.fnd.umx.username.generate.
4. Click on the Subscription icon to go to the Subscriptions page.
5. For the subscription corresponding to the policy, change the status to “Enabled”.
Stage 2 – Validation Event Subscription Setup
1. Log on as a user that is assigned the Workflow Administrator Web Applications responsibility (typically sysadmin).
2. Go to Workflow Administrator Web Applications > Business Events
3. From the Business Events page, search for the Business Event with the name
oracle.apps.fnd.user.name.validate.
4. Click on the Subscription icon to go to the Subscriptions page.
5. For the subscription corresponding to the policy, change the status to “Enabled”.
Stage 3 – Profile Option Setup
1. Log on as a user that is assigned the Functional Administrator responsibility (typically sysadmin).
2. Go to Functional Administrator > Core Services > Profiles
3. Search with the Profile Name of UMX: User Name Policy in the Maintain Profile Options page.
4. Click on the Update icon to go to the Update Profile Option page.
5. Choose a value corresponding to the policy and click on the Apply button.
Additional Requirements
In all the three of the stages above, the values set must correspond to the same user name policy.
The Listener and JVMs must be restarted after the user name policy is changed.