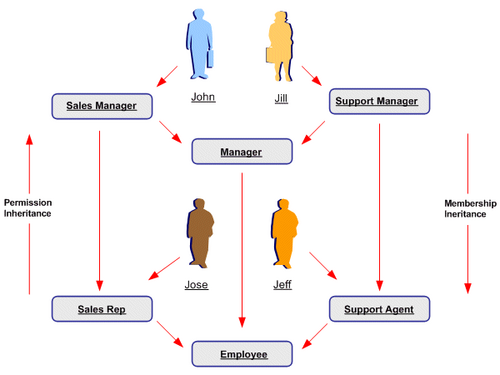
With role inheritance hierarchies, a role can contain sub roles. When a user is assigned a role, the user inherits the privileges defined for that role and for all of its sub roles. For example, the Sales Manager role can contain the Manager and Sales Rep roles, both of which in turn contain the Employee role. Any individual who is granted the Sales Manager role automatically inherits the Manager, Sales Rep and Employee roles.
With Role Inheritance Hierarchies, roles inherit the permissions assigned to their sub roles.
Steps
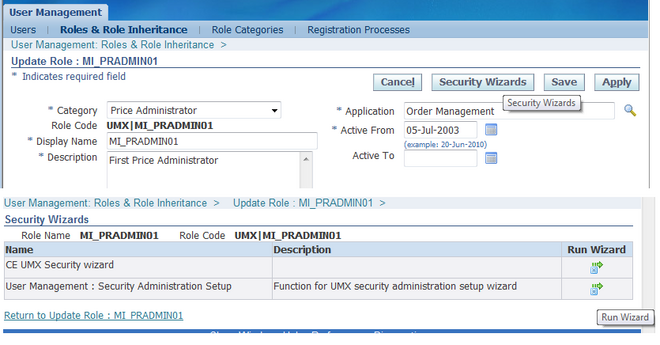
1. Log on as a user that is assigned the Security Administrator role (typically as sysadmin), select the User Management responsibility in the navigator and then click the Roles & Role Inheritance subtab.
2. Locate the role for which you want to create a role inheritance hierarchy by using the Search fields or by expanding the appropriate nodes in the Role Inheritance Hierarchy menu. If you are building a role inheritance hierarchy that contains several roles, start with highest level role to which you want to add inherited subordinate roles.
3. Click the Add Node icon next to this role.
4. In the resulting menu, search for the role either by using the Search fields or by locating it in the Role Inheritance Hierarchy menu.
5. Select the role and then click the Select button or the Quick Select icon.
6. Repeat this process until you have added all of the required subordinate roles to their corresponding super roles. You can optionally verify the results by expanding the nodes for all super roles within your role inheritance hierarchy. You can also remove any subordinate roles by clicking the Remove Node icon.
Deployment Options Organizations can use different deployment options for role inheritance hierarchies depending on their requirements.
Assigning Existing Responsibilities to Roles
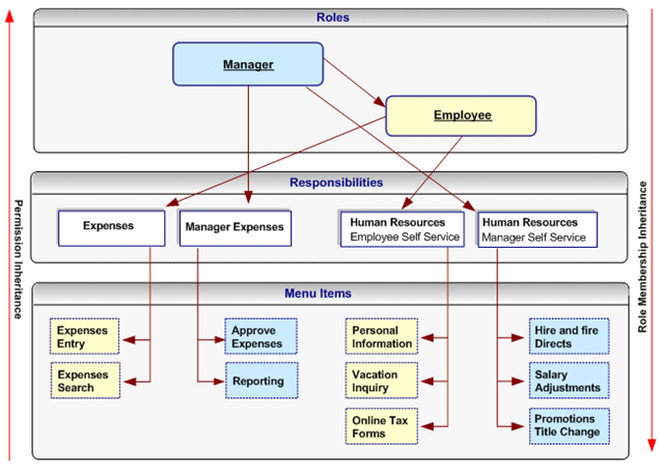
Using Role Inheritance Organizations that have already defined their responsibilities can utilize RBAC by creating roles and assigning their existing responsibilities to those roles. For example, an organization could create an Employee role and a Manager role, and add to these the Expenses and Human Resources responsibilities that it wishes to make available to employees and managers respectively. Then, instead of manually assigning or revoking each of these responsibilities to or from its employees, the organization can simply assign or revoke the Employee and Manager roles as required. Since the Manager role inherits the employee role, managers that are assigned the Manager role also inherit all the responsibilities and privileges associated with the Employee role.
In the following example, a Human Resource Manager inherits the Human Resources Manager Self Service responsibility through the Manager role as well as the Human Resources Employee Self Service responsibility, which the Manager role inherits from the Employee role.
Steps
1. Create roles representing the required job functions such as Manager and Employee.
2. Define a role inheritance hierarchy.
3. Ensure the responsibilities are inherited by their corresponding roles.
4. Assign the roles to users as required.
Fully Utilizing RBAC and Role Inheritance to Determine Access to an Application
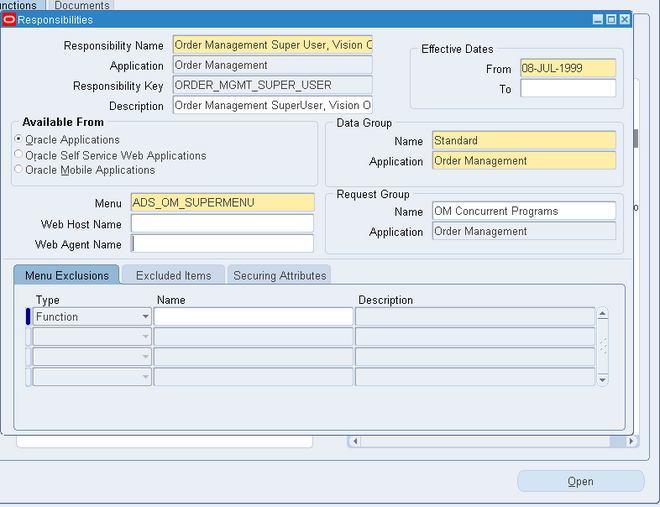
In previous releases of Oracle Applications, access to individual functions within an application could only be defined through responsibilities, menu hierarchies, and menu exclusions. Responsibilities had the dual role of defining application navigation menus and granting permissions to the application. New responsibilities with one of the
following had to be defined for each set of users with different job functions that required access to a set of pages within an application:
• A completely new menu hierarchy for each responsibility, or
• A common menu covering the superset of all functions within the application, and menu exclusion rules defined for each responsibility.
The Human Resources application, for example, typically required a minimum of two responsibilities, one for employees and one for managers.
Separating Navigation Menus and Access Control
Oracle User Management provides new alternatives for defining access to an application with RBAC and Role Inheritance, allowing organizations to separate navigation menus from access control. Responsibilities can now be defined to represent an application itself and as a result, only one responsibility may be required for each
application. A menu can be tailored for each application with specific consideration to usability and end user navigation experience. Access to parts of the application (responsibility) and its corresponding menu hierarchy are instead controlled by different roles, each representing a specific job function or set of people.
Benefits
Using this mechanism for determining access control provides several benefits.
1. Administration and changes can be accomplished with minimal effort:
- A new page only has to be added to a single menu.
- The permission to access a new page, only has to be granted once to the lowest level (subordinate role) in the role inheritance hierarchy.
- An entirely new application (responsibility) can automatically be assigned to a set of people by simply defining it as the subordinate role of an existing role.
- Permissions to access the various pages and functions within a new application should only be assigned at the lowest level in the role inheritance hierarchy.
- The permissions are then automatically inherited by all superior roles in the hierarchy.
- Revoking access to a page, or an entire application, can be accomplished as
easily as adding access.
2. Improved end user experience. In the applications navigator, end users will see a list of applications to which they have access. Access to the various functions within each application is determined by the roles assigned to the end user.
Steps
1. Define a new responsibility that will be used to represent a specific application such as Expenses or Human Resources.
2. Design a complete menu that includes all the menu functions within an application as well as any required submenus, and attach this menu to the new responsibility. For example, both the Expenses and Human Resources responsibilities would include all employee and manager menus.
3. Following the “principle of least privilege”, all the menu options within the application (each menu item corresponds to a function/permission) should be disabled by default. To accomplish this, remove the selection from the “grant” checkbox for each menu item.

Note: A user cannot access any of the menu items (functions) within the application if you assign the responsibility to the user at this stage.
4. Create roles representing the people with various job functions that require access to the application, for example, a Manager role and an Employee role.
5. Define role inheritance relationships. For example, the Manager role should inherit the Employee role, and the Employee role should inherit the Expenses and Human Resources responsibilities.
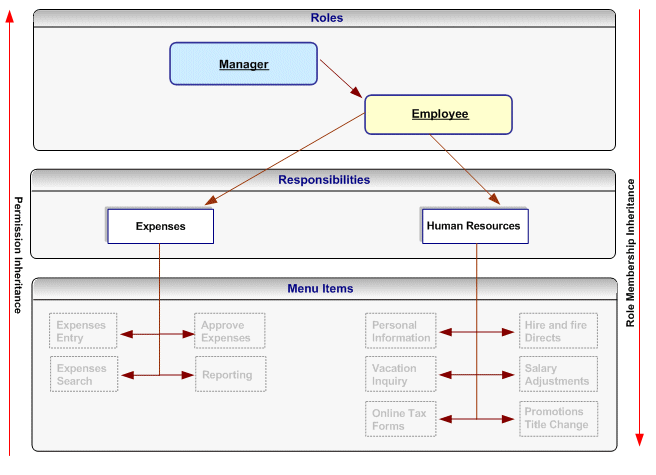
The following figure illustrates a role inheritance relationship in which a role inherits the responsibilities that are inherited by its subordinate role:
6. Assign permissions to each role. Each permission maps to a menu item (function) within the application responsibility) that should be available to the users to whom the role is assigned. For example, an organization will grant the employee-related permissions from the Expenses and Human Resources responsibilities to the Employee role, and
will grant the manager-related permissions for these responsibilities to the Manager role. Consequently, the manager role will have access to all the menu items within these responsibilities, but the Employee role will only have access to the Employee-related functions.
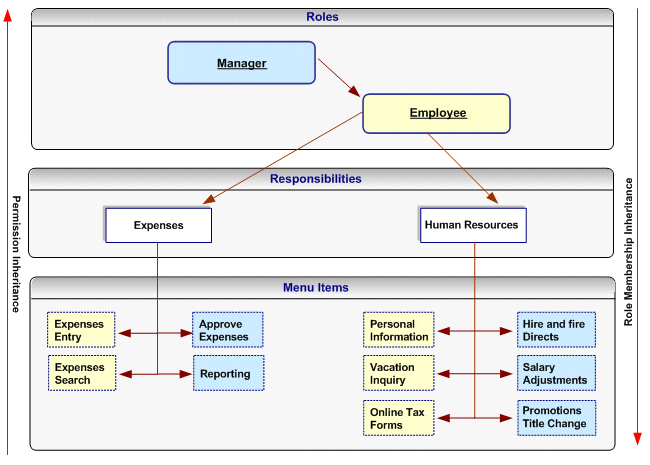
Permissions assigned to a subordinate role in the role inheritance hierarchy are automatically inherited by the superior roles. For example, if you grant the permission for accessing the Online Tax Forms page to the Employee role, anyone with the Manager role will automatically have access to this page through role inheritance. Because the Hire and Fire Directs page is only granted to the Manager role, it is not available to users that are only assigned the Employee role. Permissions are always assigned through permission sets, which represent named sets of functions (permissions). When determining what permissions (functions/menu items) should be granted to each role, you may have to create new
permission sets. Menus and permission sets are stored in the same tables in the database; which means that they are interchangeable (both can be used) to assign permissions.
7. Optionally assign any additional permissions and data security policies to roles as required by each application.

Recent Comments