For partial shipment of the sales order, we need to call the WSH_DELIVERY_DETAILS_PUB.Update_Shipping_Attributes API to update the corresponding delivery details to ship all/entered quantity in the delivery details.

— OM – Script to Ship Partial Quantities in a SO using WSH_DELIVERY_PUB API —
–===========================================================

DECLARE

p_sales_order NUMBER := 10014445;
p_line_number NUMBER := 1.1;
p_org_id NUMBER := 308;
l_shipped_quantity NUMBER := 5;
p_api_version_number NUMBER := 1.0;
init_msg_list VARCHAR2 (200);
l_commit VARCHAR2 (30);
x_msg_details VARCHAR2 (3000);
x_msg_summary VARCHAR2 (3000);
x_return_status VARCHAR2 (3);
x_msg_count NUMBER;
x_msg_data VARCHAR2 (3000);
p_validation_level NUMBER;
v_errbuf VARCHAR2 (2000);
v_retcode VARCHAR2 (20);
v_released_status wsh_delivery_details.released_status%TYPE;
v_inv_interfaced_flag wsh_delivery_details.inv_interfaced_flag%TYPE;
v_oe_interfaced_flag wsh_delivery_details.oe_interfaced_flag%TYPE;
v_source_code wsh_delivery_details.source_code%TYPE;
v_pending_interface_flag wsh_trip_stops.pending_interface_flag%TYPE;
l_changed_attributes wsh_delivery_details_pub.changedattributetabtype;
l_source_code VARCHAR2 (30) := ‘OE’;
— Parameters for WSH_DELIVERIES_PUB
p_delivery_name VARCHAR2 (30);
p_action_code VARCHAR2 (15);
p_asg_trip_id NUMBER;
p_asg_trip_name VARCHAR2 (30);
p_asg_pickup_stop_id NUMBER;
p_asg_pickup_loc_id NUMBER;
p_asg_pickup_loc_code VARCHAR2 (30);
p_asg_pickup_arr_date DATE;
p_asg_pickup_dep_date DATE;
p_asg_dropoff_stop_id NUMBER;
p_asg_dropoff_loc_id NUMBER;
p_asg_dropoff_loc_code VARCHAR2 (30);
p_asg_dropoff_arr_date DATE;
p_asg_dropoff_dep_date DATE;
p_sc_action_flag VARCHAR2 (10);
p_sc_intransit_flag VARCHAR2 (10);
p_sc_close_trip_flag VARCHAR2 (10);
p_sc_create_bol_flag VARCHAR2 (10);
p_sc_stage_del_flag VARCHAR2 (10);
p_sc_trip_ship_method VARCHAR2 (30);
p_sc_actual_dep_date VARCHAR2 (30);
p_sc_report_set_id NUMBER;
p_sc_report_set_name VARCHAR2 (60);
p_sc_defer_interface_flag VARCHAR2 (60);
p_sc_send_945_flag VARCHAR2 (60);
p_sc_rule_id NUMBER;
p_sc_rule_name VARCHAR2 (60);
p_wv_override_flag VARCHAR2 (10);
p_asg_pickup_stop_seq NUMBER;
p_asg_dropoff_stop_seq NUMBER;
x_trip_id VARCHAR2 (30);
x_trip_name VARCHAR2 (30);
fail_api EXCEPTION;
x_debug_file VARCHAR2 (100);
l_ship_method_code VARCHAR2 (100);
l_user_id NUMBER;
l_resp_id NUMBER;
l_appl_id NUMBER;

CURSOR c_ord_details
IS

SELECT DISTINCT det.source_header_number sales_order, det.org_id,
det.source_line_number, det.source_header_id,
det.source_line_id, det.source_header_type_name,
det.inventory_item_id, det.requested_quantity,
det.delivery_detail_id,
(SELECT concatenated_segments
FROM mtl_system_items_kfv
WHERE inventory_item_id =
det.inventory_item_id
AND organization_id = det.organization_id)
ordered_item,
det.organization_id, det.src_requested_quantity,
det.shipped_quantity, del.delivery_id,
del.status_code delivery_status_code,
det.released_status pick_release_status,
det.oe_interfaced_flag, det.inv_interfaced_flag
FROM wsh_delivery_details det,
wsh_delivery_assignments asn,
wsh_new_deliveries del
WHERE 1 = 1
AND det.delivery_detail_id = asn.delivery_detail_id
AND asn.delivery_id = del.delivery_id(+)
AND det.source_header_number = p_sales_order
AND det.source_line_number = p_line_number
AND det.org_id = p_org_id
AND shipped_quantity IS NULL
AND NVL (del.status_code, ‘OP’) <> ‘CL’
AND det.released_status = ‘Y’;

BEGIN
— Initializing the Applications

SELECT user_id
INTO l_user_id
FROM fnd_user
WHERE user_name = ‘A42485’;

SELECT responsibility_id, application_id
INTO l_resp_id, l_appl_id
FROM fnd_responsibility_vl
WHERE responsibility_name = ‘Order Management Super User’;

fnd_global.apps_initialize (l_user_id, l_resp_id, l_appl_id);

FOR i IN c_ord_details
LOOP
DBMS_OUTPUT.put_line
(‘Initializing the Application for Shipping Transactions’);
— Mandatory initialization for R12
mo_global.set_policy_context (‘S’, i.org_id);
mo_global.init (‘ONT’);
— Ship Confirming
p_delivery_name := TO_CHAR (i.delivery_id);

DBMS_OUTPUT.put_line
(‘Before Shipping, Calling WSH_DELIVERY_DETAILS_PUB API to Update Shipping Attributes’
);
DBMS_OUTPUT.put_line (‘=============================================’);
l_changed_attributes (1).delivery_detail_id := i.delivery_detail_id;
l_changed_attributes (1).shipped_quantity := l_shipped_quantity;
wsh_delivery_details_pub.update_shipping_attributes
(p_api_version_number => 1.0,
p_init_msg_list => init_msg_list,
p_commit => l_commit,
x_return_status => x_return_status,
x_msg_count => x_msg_count,
x_msg_data => x_msg_data,
p_changed_attributes => l_changed_attributes,
p_source_code => l_source_code
);

IF (x_return_status <> wsh_util_core.g_ret_sts_success)
THEN
RAISE fail_api;
DBMS_OUTPUT.put_line (‘Failed to Update the Shipping Attributes’);
ELSE
DBMS_OUTPUT.put_line (‘Successfully Updated the Shipping Attributes’);
END IF;

BEGIN
SELECT shipping_method_code
INTO l_ship_method_code
FROM oe_order_headers_all
WHERE order_number = i.sales_order AND org_id = i.org_id;
EXCEPTION
WHEN OTHERS
THEN
l_ship_method_code := NULL;
END;

p_action_code := ‘CONFIRM’; — The action code for ship confirm
p_sc_action_flag := ‘S’; — Ship entered quantity.
p_sc_intransit_flag := ‘Y’;
–In transit flag is set to ‘Y’ closes the pickup stop and sets the delivery in transit.
p_sc_close_trip_flag := ‘Y’; — Close the trip after ship confirm
p_sc_trip_ship_method := l_ship_method_code; — The ship method code
p_sc_defer_interface_flag := ‘Y’;
p_sc_stage_del_flag := ‘Y’;
p_sc_create_bol_flag := ‘N’;
p_wv_override_flag := ‘N’;

— API Call for Ship Confirmation
DBMS_OUTPUT.put_line
(‘Calling WSH_DELIVERIES_PUB to Perform Ship Confirmation’);
DBMS_OUTPUT.put_line (‘=============================================’);

wsh_deliveries_pub.delivery_action
(p_api_version_number => 1.0,
p_init_msg_list => init_msg_list,
x_return_status => x_return_status,
x_msg_count => x_msg_count,
x_msg_data => x_msg_data,
p_action_code => p_action_code,
p_delivery_id => i.delivery_id,
p_delivery_name => p_delivery_name,
p_asg_trip_id => p_asg_trip_id,
p_asg_trip_name => p_asg_trip_name,
p_asg_pickup_stop_id => p_asg_pickup_stop_id,
p_asg_pickup_loc_id => p_asg_pickup_loc_id,
p_asg_pickup_stop_seq => p_asg_pickup_stop_seq,
p_asg_pickup_loc_code => p_asg_pickup_loc_code,
p_asg_pickup_arr_date => p_asg_pickup_arr_date,
p_asg_pickup_dep_date => p_asg_pickup_dep_date,
p_asg_dropoff_stop_id => p_asg_dropoff_stop_id,
p_asg_dropoff_loc_id => p_asg_dropoff_loc_id,
p_asg_dropoff_stop_seq => p_asg_dropoff_stop_seq,
p_asg_dropoff_loc_code => p_asg_dropoff_loc_code,
p_asg_dropoff_arr_date => p_asg_dropoff_arr_date,
p_asg_dropoff_dep_date => p_asg_dropoff_dep_date,
p_sc_action_flag => p_sc_action_flag,
p_sc_intransit_flag => p_sc_intransit_flag,
p_sc_close_trip_flag => p_sc_close_trip_flag,
p_sc_create_bol_flag => p_sc_create_bol_flag,
p_sc_stage_del_flag => p_sc_stage_del_flag,
p_sc_trip_ship_method => p_sc_trip_ship_method,
p_sc_actual_dep_date => p_sc_actual_dep_date,
p_sc_report_set_id => p_sc_report_set_id,
p_sc_report_set_name => p_sc_report_set_name,
p_sc_defer_interface_flag => p_sc_defer_interface_flag,
p_sc_send_945_flag => p_sc_send_945_flag,
p_sc_rule_id => p_sc_rule_id,
p_sc_rule_name => p_sc_rule_name,
p_wv_override_flag => p_wv_override_flag,
x_trip_id => x_trip_id,
x_trip_name => x_trip_name
);

IF (x_return_status <> wsh_util_core.g_ret_sts_success)
THEN
DBMS_OUTPUT.put_line
(‘Ship confirm has not been Completed For SO => ‘);
ROLLBACK;
RAISE fail_api;
ELSE
DBMS_OUTPUT.put_line
(‘Ship confirm Successfully Completed For SO => ‘);
COMMIT;

DBMS_OUTPUT.put_line
(‘Checking the Delivery Status after delivery action API Call’);
DBMS_OUTPUT.put_line (‘==========================================’);

SELECT wdd.source_code, wdd.released_status,
wdd.inv_interfaced_flag, wdd.oe_interfaced_flag,
wts.pending_interface_flag
INTO v_source_code, v_released_status,
v_inv_interfaced_flag, v_oe_interfaced_flag,
v_pending_interface_flag
FROM wsh_trips wtr,
wsh_trip_stops wts,
wsh_delivery_legs wlg,
wsh_new_deliveries wnd,
wsh_delivery_assignments wda,
wsh_delivery_details wdd
WHERE wtr.trip_id = wts.trip_id
AND wts.stop_id = wlg.pick_up_stop_id
AND wts.pending_interface_flag = ‘Y’
AND wdd.inv_interfaced_flag <> ‘Y’
AND wlg.delivery_id = wnd.delivery_id
AND wnd.delivery_id = wda.delivery_id
AND wda.delivery_detail_id = wdd.delivery_detail_id
AND wnd.delivery_id = p_delivery_name
AND wdd.source_line_id = i.source_line_id;

IF ( v_source_code = ‘OE’
AND v_released_status = ‘C’
AND v_inv_interfaced_flag <> ‘Y’
AND v_oe_interfaced_flag <> ‘Y’
AND v_pending_interface_flag = ‘Y’
)
THEN

DBMS_OUTPUT.put_line
(‘The Delivery has been Shipped & the Next Step is – Run Interface’
);
DBMS_OUTPUT.put_line
(‘===========================================’);
— API Call for Submitting Interface Trip Stop

wsh_ship_confirm_actions.interface_all_wrp
(errbuf => v_errbuf,
retcode => v_retcode,
p_mode => ‘ALL’,
p_stop_id => NULL,
p_delivery_id => p_delivery_name,
p_log_level => 0,
p_batch_id => NULL,
p_trip_type => NULL,
p_organization_id => i.organization_id,
p_num_requests => 1,
p_stops_per_batch => 1
);

ELSE
DBMS_OUTPUT.put_line (‘The Delivery has not Shipped Properly’);
END IF;
END IF;
END LOOP;

EXCEPTION
WHEN fail_api
THEN

DBMS_OUTPUT.put_line (‘==============’);
DBMS_OUTPUT.put_line (‘Error Details If Any’);
DBMS_OUTPUT.put_line (‘==============’);

wsh_util_core.get_messages (p_init_msg_list => ‘Y’,
x_summary => x_msg_summary,
x_details => x_msg_details,
x_count => x_msg_count
);

IF x_msg_count > 1
THEN
x_msg_data := x_msg_summary x_msg_details;
DBMS_OUTPUT.put_line (x_msg_data);
ELSE
x_msg_data := x_msg_summary x_msg_details;
DBMS_OUTPUT.put_line (x_msg_data);

END IF;
END;

1. Supplier Creation and Maintenance:

In Oracle R12, Suppliers are now part of TCA(Trading Community Architecture), where suppliers are defined as parties and supplier sites as party sites. Each supplier, supplier sites and contact details can be defined globally in TCA level. It means, any changes to supplier/supplier sites/address reflects across Operating Units with out really updating every OU and all the supplier information can be leveraged by multiple Operating Units. Supplier bank information can also be handled at TCA level.

In Release 12, there is a new user interface for suppliers entry and maintenance. When user opens Supplier entry form, Oracle automatically redirects the page to TCA with a jsp form.

Impact of Upgrade:

1. During the upgrade from 11i to R12, TCA party and party sites records are created and updated in TCA for all the existing suppliers and supplier sites.             
2. TCA data model requires country and address information for suppliers, which will be used by E-Business Tax. If there is no country or address information specified to a supplier site, Oracle automatically infer the data based on most frequently used site from the supplier’s historical transactions.
3.Oracle Payables reviews the supplier sites and determines duplicates, based on         supplier,address,city,province, state, country, zip and language and creates only one party site for each distinct supplier site address.
4. In 11i the employees are associated with Payables as internal suppliers to create the payments for their expense reports. During migration of data, for internal suppliers, only party will be created in TCA and employee address will not not be migrated to party site and the data remains in HRMS records for data security.
5. As the supplier objects are moved from AP to TCA, the tables related to supplier, supplier site, and supplier address are obsolete in R12 and views are created with the obsoleted table names to link the information from old tables with information in TCA.

Table Changes:

AP_SUPPLIERS, AP_SUPPLIER_SITES_ALL, AP_SUPPLIER_CONTACTS, AP_SUPPLIER_INT_REJECTIONS are the new tables introduced to replace obsoleted tables PO_VENDORS, PO_VENDOR_SITES_ALL, PO_VENDOR_CONTACTS

2. Invoice Entry & Cancellation:

In Oracle R12, there is an additional level of detail called Invoice lines between Invoice Header and invoice distribution to capture the data related to Items, freight, miscellaneous, Tax, Prepayment or withholding tax. An invoice line can have one or more invoice distributions.
                                                                                                                                                               With the introduction of invoice lines, there is lot of significant improvement in the data flow to other modules which are integrated with Payables.
For example: 1. Fixed Assets use the data stored in the Invoice lines fields such as Manufacturer, Model,  Serial Number, Warranty Number, Asset Book and Asset Category to track the assets.
                     2. E-Business tax takes information from the AP invoice lines and creates summary and detail  tax lines in E-Business tax repository.
                     3. Sub ledger Accounting require the invoice distributions should be stored at the maximum level of detail. With additional level in the invoice hierarchy, data flow will be improved to the Sub ledger accounting.

Impact of Upgrade:

During a upgrade one invoice line will be created for every distribution for existing data in 11i.

Cancellation of Invoices:

An invoice line may be discarded on its own or as a part of invoice cancellation. A discarded invoice line will have an amount as 0, marked as discarded and creates a negative respective transaction in the distributions. If a line is discarded as a part of invoice cancellation it will be marked as cancelled.

Recurring Invoice:

In Oracle R12,For Recurring invoices,  invoice definition and line definition are introduced in place of template definition.  In line definition additional information such as Item description, Manufacturer and Model number are included. This will be helpful in smooth data flow to the integrated modules. In addition to Invoice definition and line definition few more tabs are introduced namely Tax, Control and Payment. E-business tax uses the data in Tax ad Payment module uses the data from payment tab on recurring invoices window.

Table Changes:

AP_INVOICE_LINES_ALL              New table introduced to represent the data stored in invoice lines
AP_CHRG_ALLOCATIONS_ALL    Obsolete and now distributions itself represent the allocation of charges

3. Payment Process:

In R12, Oracle Payments is a new module introduced to centralize the payment process into one payment engine, so that multiple applications can leverage the same functionality. In R12 Payables, user can find Payments manager under payment entry, which will re-direct the page to a OAF page. So unlike in 11i, user need to use Payables Payments dashboard to begin the payment process.

Build Payment Batch:

The first step in the payment process is to submit a Payment Process Request(PPR), which replaces Build payment Batch in Release 11i. The Payments Process Request form enable users to set invoice selection criteria. This form consists of various tabs such as Scheduled payment Selection Criteria, Payment Attributes, User Rates, Processing, Validation failure result and additional Information to specify the required criteria for payment processing.

Format Payment Batch:

Payment Process Request will be formatted automatically after submitting the Payment Process Request form. Users can check the status of PPR under Payment Process Request status.

Confirm Payment Batch:

When users click on start action icon, the form takes user to Payment Process Instructions tab, where users can confirm the batch if it is printed correctly, by clicking on ‘Record Print Status’ button. Here the module name changes from Payables to Payments.

>  There are no different processes  for payment and payment batch in R12. Same screen and process can be used for both .
> If user selects Payee under Scheduled payment Selection Criteria tab in the Payment Process Request  then  single payment will be done for a selected payee. If user leaves it blank, payment will be done to all suppliers.

> All Payment related setups are now moved to Oracle Payments.

4. Create Payment Instructions:

In R12 there are two programs to create payment instructions:

Create Electronic Payment Instructions    for Electronic Payments
Create Printed Payment Instructions        for Check payments

We can run these programs automatically or manually by selecting an option in the Build Payment process.

5. Transmit Payment File to Banks:

As part of R12 , there is a check box in the “Payment System” set up . When enabled the check box ” Automatic Transmit of File” – This would transfer the file to bank automatically.

There are few new set ups that needs to be done in the R12.
1. Payment System – External organization ( Internal bank) needs to be set up.
2. Transmission Configuration – This includes the ftp details and how to pull the flat file from a particular location.

6. Banks:

> Bank accounts are moved into TCA architecture which needs to be defined in R12
> Cash Management now owns Banks Set up Definition.
> All the internal bank accounts of 11.5.10, will be migrated into Centralized Bank model automatically during the upgrade.


7. Transfer journal entries to General Ledger:

Users can transfer journal entries to General Ledger in two ways.                                       
1. Run Create Accounting Program with Transfer to GL option as Yes.                          
2. Run Transfer Journal Entries to GL after running Create Accounting Program with Transfer to GL parameter set to NO or after create accounting online in Final mode.

Create Accounting Program:

Payables Accounting Process is obsolete in R12 and is replaced with Create Accounting program. The create accounting program creates sub ledger journal entries by processing eligible accounting events. The Create Accounting program uses application accounting definitions, which are created in Accounting Method Builder(AMB) to create sub ledger journal entries.

The Create Accounting program
1. Creates and validates sub ledger journal entries.
2. Transfers the final journal entries in the current batch run to General Ledger and starts General Ledger Posting Process.
3. Generates Sub ledger Accounting Program Report.

The create Accounting program creates journal entries in three modes.

Draft: Users can create the journal entries in SLA in draft mode and can review and make changes again.

Final: With this option users can create journal entries in SLA which can not be modified again. Here users need to run Transfer Journal Entries to GL to post the subledger journal entries to GL.

Final Post: With this options users can create the journal entries and post to GL with out using Transfer Journal Entries to GL program.

Transfer Journal Entries to GL:

Payables Transfer to General Ledger program is obsolete in R12 and is replaced with Transfer Journal Entries to GL. The Transfer Journal entries to GL program enables users to transfer eligible journal entries to GL, including those from the previous run that have not yet been transferred to GL.

This program is used when the Create Accounting program is run with Transfer to GL parameter set to NO or after create accounting online in Final mode.
                                                                                                                                                                      
8. Invoice Approval Workflow:

Invoice work flow has been enhanced to include line level invoice approval. Based on rules setup for Payables Invoice Approval Transaction Type in AME, the work flow determines if the invoice Header (invoice document) needs approval or invoice lines needs approval or both. If both invoice lines and document need approval, all the lines of the invoice requiring approval must be approved before the invoice document can be approved.                                                                  
                                                                              
The approval  status both at header level as well as line level shows whether the invoice document or invoice lines need approval or not.     

Setup:

> The item class provided in defining rule in AME determines whether this rule effects the invoice document approval or invoice line approval.
> If item class is given as Header, this rule govern the invoice document approval and if given as line item, would govern the invoice line approval. Remaining all setups in AME are same as in 11i.

Changes in Tables: 

In R12, there are 2 history tables for invoice approval.                                                                                               
   1.     AP_APINV_APPROVERS                Stores the line level approval history            
   2.     AP_INV_APRVL_HIST_ALL              Stores both Header and line level history.

Grouping Rules group Revenue and Credit transactions into  Invoices, Credit memos and Debit Memos. Autoinvoice program uses the Grouping Rules to group similar sales orders into a single invoice. We need to assign matching attributes while defining the Grouping Rules. These attributes include mandatory and optional parameters. Mandatory parameters are pre-defined by Oracle, where as optional attributes are optional and can be assigned based on the business requirements. Following is the list of all Mandatory and Optional attributes which can be assigned to the Grouping Rules.

Mandatory Attributes:
AGREEMENT_ID
COMMENTS
CONS_BILLING_NUMBER
CONVERSION_DATE
CONVERSION_RATE
CONVERSION_TYPE
CREDIT_METHOD_FOR_ACCT_RULE
CREDIT_METHOD_FOR_INSTALLMENTS
CURRENCY_CODE
CUSTOMER_BANK_ACCOUNT_ID
CUST_TRX_TYPE_ID
DOCUMENT_NUMBER
DOCUMENT_NUMBER_SEQUENCE_ID
GL_DATE
HEADER_ATTRIBUTE1-15
HEADER_ATTRIBUTE_CATEGORY
HEADER_GDF_ATTRIBUTE1-30
INITIAL_CUSTOMER_TRX_ID
INTERNAL_NOTES
INVOICING_RULE_ID
ORIG_SYSTEM_BILL_ADDRESS_ID
ORIG_SYSTEM_BILL_CONTACT_ID
ORIG_SYSTEM_BILL_CUSTOMER_ID
ORIG_SYSTEM_SOLD_CUSTOMER_ID
ORIG_SYSTEM_BATCH_NAME
PAYMENT_SERVER_ORDER_ID
PAYMENT_SET_ID
PREVIOUS_CUSTOMER_TRX_ID
PRIMARY_SALESREP_ID
PRINTING_OPTION
PURCHASE_ORDER
PURCHASE_ORDER_DATE
PURCHASE_ORDER_REVISION
REASON_CODE
RECEIPT_METHOD_ID
RELATED_CUSTOMER_TRX_ID
SET_OF_BOOKS_ID
TERM_ID
TERRITORY_ID
TRX_DATE
TRX_NUMBER


Optional Attributes
:
ACCOUNTING_RULE_DURATION
ACCOUNTING_RULE_ID
ATTRIBUTE1-15
ATTRIBUTE_CATEGORY
INTERFACE_LINE_ATTRIBUTE1-15
INTERFACE_LINE_CONTEXT
INVENTORY_ITEM_ID
REFERENCE_LINE_ID
RULE_START_DATE
SALES_ORDER
SALES_ORDER_DATE
SALES_ORDER_LINE
SALES_ORDER_REVISION
SALES_ORDER_SOURCE
TAX_CODE
TAX_RATE

The following Ship-To fields were mandatory grouping attributes in release 11i, but are optional in release 12 ORIG_SYSTEM_SHIP_CUSTOMER_ID
ORIG_SYSTEM_SHIP_ADDRESS_ID
ORIG_SYSTEM_SHIP_CONTACT_ID
This is because ship to information is now stored at the line level in R12. Therefore a single invoice could have different ship to information for each line.
Autoinvoice program matches all the mandatory parameters and group the transactions into invoices. If all the mandatory parameters are matched for two or more similar transactions, they will fall in a same invoice. If we define any optional attribute, Autoinvoice program matches optional attributes in addition to the mandatory attributes to group the transactions.

For Example: SALES_ORDER is the optional attribute assigned to a grouping rule, there Autoinvoice program matches all mandatory attributes + Sales Order for the transactions. For any two or more transactions, if all the mandatory attributes and Sales Order(optional attribute) are matching, only one invoice will be created for those transactions.

If your Grouping rule doesn’t include Sales Order and Ship To fields in Optional attributes, similar sales orders with different ship-to addresses but same bill to will be grouped into one invoice and AR transaction form will not show any value in Ship-To address as it can not determine which ship-to value to be picked from multiple sales orders.
Steps to create a Grouping Rule:

Responsibility: Receivables Manager
Navigation: Setup -> Transactions -> Auto Invoice -> Grouping Rules

Select Line Ordering Rules if you are using any. Optional grouping characteristics are optional. If we are not giving any optional Grouping Characteristics, Autoinvoice will only matches mandatory characteristics. We can assign Optional characteristics for Invoices, Credit Memos and Debit Memos.
 

If  we want to assign optional attributes for all invoices, credit memos and debit memos, First assign optional characteristics for invoice class and the place the cursor on Class Invoices ad use Down Arrow to define  attributes for other classes(Credit Memo and Debit Memo) as well.

Procure to Pay Process flow:

————————————–
Let’s see the steps involved in performing using Oracle Applications
1. Oracle Purchasing: You enter Suppliers of different materials and products you want to purchase to manufacture a finished good that your organization plans to sell.
2. Oracle Purchasing: You prepare a Request for Quotation (RFQ) and send it to different suppliers to get the best and/or economical price for the product.
3. Oracle Purchasing:Suppliers sends their quotations and you upload those quotations in Oracle Purchasing to get the best three quotes and further to get the one best quote.
4. Oracle Purchasing: You prepare a Purchase Order(PO) against the best RFQ to buy the goods from the supplier who quoted the suitable price and sends the PO to that supplier
5. Oracle Purchasing: The supplier receives the confirmation of purchase from PO and ships the ordered goods. You receive the goods enter a Goods Received Note (GRN) in Oracle Purchasing.
6. Oracle Inventory:It’s up to you whether you want to receive the goods at your head office or you Inventory directly. In either case you move the received goods to your different Raw Material Inventory from Oracle Purchasing to Oracle Inventory and the Item Count increases.
7. Oracle General Ledger: Once you move the goods to Oracle Inventory, it sends the Material Accounting to Oracle General Ledger.
8. Oracle Payables: After that the supplier sends you the invoice for the purchased goods and you Enter or Match the invoice against the PO from Oracle Purchasing in Oracle Payables.
9. Oracle General Ledger: When you enter the invoice it means that you have created a Liability against that supplier.
10. Oracle Payables: You pay the invoice and settle the Liability
11. Oracle General Ledger: The liability is settled, your expense is recorded.

12. Oracle Process Manufacturing(OPM) / Oracle Discrete Manufacturing(ODM):
You start the manufacturing of your final product. Both OPM or ODM requests the different raw materials from you inventory organizations and manufactures a finished good.
13. Oracle Inventory: As the raw materials are issued to OPM and ODM the inventory sends the issuing material accounting to General Ledger and decreases the Item Count from the Raw Material Store. As the finished good is prepared, Oracle Inventory receives the finished good in Finished Good Store and increase the Item Count.
Payable Integration:
——————————

Payables Processes:
————————–
 Overview of Suppliers:
——————————-
When you enter a supplier that does business from multiple locations, you enter header information only once, and you enter supplier sites for each location. Most supplier information defaults to supplier sites. However, you can override the values that default if necessary. After you define suppliers, you can use them when you import/enter invoices and create purchasing documents Define how supplier sites can be used with the following options:
• Pay – You can import/enter invoices for and make payments to the site.

• Primary Pay – Default pay site for invoice entry and import.
• Purchasing – You can create purchase orders for the site.
• RFQ Only – You can create request for quotations in Purchasing for the site. You cannot
create purchase orders for an RFQ Only site.
• Procurement Card – You can purchase goods or services using a procurement card.
• Primary Pay – If a supplier has multiple pay sites, one can be designated as the primary.The primary pay site defaults in the Invoices window, helping to speed the invoice entry process. Also, Payables Open Interface Import uses this site when it imports an external invoice with no specified site.

Designate a site as an RFQ Only site during the beginning of negotiations with a supplier. If you decide to use the supplier, designate the supplier site as a Purchasing site by deselecting the RFQ Only option and selecting the Purchasing Site option. For each supplier site, you can enter contact information (name, address, telephone) specific to that site. Contact information is for your reference only.
Flow of Default Values(P2P):
—————————————-
• Defaults set at higher levels flow down to lower levels where you can override them.
• Defaults reduce data entry by providing default values based on corporate policy.
Optional defaults (especially the higher level ones) should be left blank if you frequently override them.
• Purchase order matched invoices will receive defaults from the purchase order you specify when you match. Note: Changes to default values affect only new records, not existing records. For example, if
payment terms in the Payables Options window are reset to Net 15 from Net 30, new suppliers will have a default of Net 15. Existing suppliers will have terms of Net 30.
Invoice Entry:
——————–

You can enter invoices through:
Manual entry: Manually enter invoices in the Invoice Gateway and Invoices windows.
Import: The Payables Open Interface Import program imports invoices from the Payables Open Interfaces table. This table is loaded by many sources including invoices entered online by suppliers in iSupplier Portal, invoices sent by suppliers in EDI or XML formats, and Oracle applications that load invoices into the Open Interfaces Table such as Oracle Property Manager and Oracle Assets.
Automatically generated: Oracle Payables automatically generates the following invoice
types: withholding ax invoices to pay tax authorities, interest invoices, and payment on receipt invoices.
Recurring invoices: You can set up Oracle Payables to generate regularly scheduled invoices such as rent.
Matching: You can match most invoices to purchase orders or receipts. You can group manually entered and imported invoices in invoice batches.
Invoice import:
———————
Oracle Internet Expenses expense reports:
Expense reports your employees enter using a Web browser.
Payables expense reports:
Expense reports entered in the Payables Expense reports window by the Payables department.
Credit Card invoices:
Invoices for employee credit card expenses. The credit card company sends you these invoices as a flat file.
Oracle Projects expense reports:
Project–related expense reports entered in Oracle Projects.
EDI invoices:
Electronic invoices transferred from Oracle e–Commerce Gateway.
Invoices from external systems:
Invoices, such as invoices from legacy systems, loaded using SQL*Loader.
Oracle Property Manager invoices:
Lease invoices transferred from Oracle Property Manager.
Oracle Assets lease payments:
Lease payments transferred from Oracle Assets.
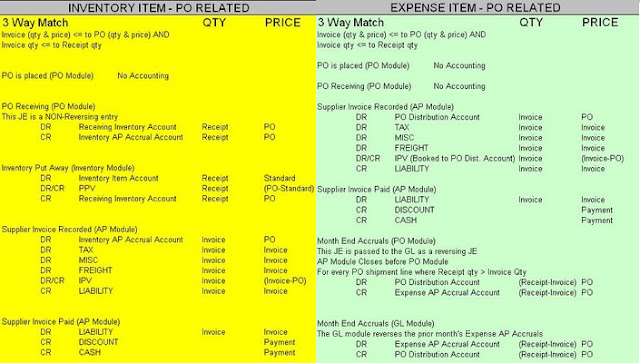
Oracle Procure to Pay Accounting:
——————————————-
As you know “procure to pay” Business Flow start Purchasing requisition till paying to supplier and most important, in all the case the purchase is made for basic element called Items.
There are three types of items:
1. Inventory Asset Item/Inventory item-PO Related
2. Inventory Expense Item/Inventory Expenses – PO Related
3. Expense item/Non-PO Invoice.
1. Inventory Asset Item/Inventory item-PO Related : 2. Inventory Expense Item/ Expense Item-PO Related:

————————————————————————————————————

3. Expenses items/ Non-PO Invoice:
————————————–
To execute the test, do the following:
  1. Start Oracle E-Business Suite
  2. Connect to responsibility Application Diagnostics
  3. Select the Diagnose menu option
  4. Click button Select Application and select Application “Oracle Receivables
  5. Scroll down to group “Transactions
  6. Select test name “AutoInvoice Setup
  7. Input Parameters (* required)
      Responsibility ID  
      Operating Unit Id  
      Batch Source Id  

  8. Output contains
    • Database Information
      Application Information
      Oracle Diagnostics Information
      Product Installation Status and Patchset Level
      Parameters
      System Options
      Batch Source
      Grouping Rule
      Ledger Definition
      Open Calendar Periods Oracle Receivables
      Open Calendar Periods General Ledger
      Accounting Flexfield
      Territory Flexfield
      Line Transaction Flexfield
      Invoice Transaction Flexfield
      Linkto Transaction Flexfield
      Reference Transaction Flexfield
      Profile Options
      Application Setup
      Active Import Batch Sources
      AutoAccounting Setup
      Pro*C File Versions
      AutoInvoice Interface Totals
      Indexes on RA_CUSTOMER_TRX_ALL
      Indexes on RA_CUSTOMER_TRX_LINES_ALL
      Indexes on RA_INTERFACE_LINES_ALL
      Indexes on RA_INTERFACE_DISTRIBUTIONS_ALL
      Indexes on RA_INTERFACE_SALESCREDITS_ALL
      Indexes on GL_CODE_COMBINATIONS
      Indexes on MTL_SYSTEM_ITEMS_B
      Indexes on RA_TERRITORIES
      Interface Database Triggers
      Invalid Objects
      Disabled Triggers
      References