Complex folders contain items from one or more base folders. It is same like a view in database. It enables you to create a combined view of data from multiple folders.
A base folder can be any of the following types of folder:
  • a simple folder, containing items based on columns in a single database table or view
  • a custom folder, based on SQL statements
  • a complex folder, containing items from one or more base folders
However you could produce the same result set using a database view instead of a complex folder. But using complex folders has few advantages over using database views.
  • When we use complex folders, the sql queries are automatically optimized by Discoverer. If we use view, we cannot get that improved performance.
  • We can create complex folders without database privileges, but for view creation we require that.
How to create complex folders?
1] Logon to Discoverer Administrator.
2] Select the business area in which you want to create a complex folder.
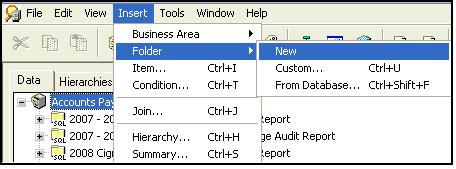
3] Choose Insert > Folder > New to create a new complex folder.
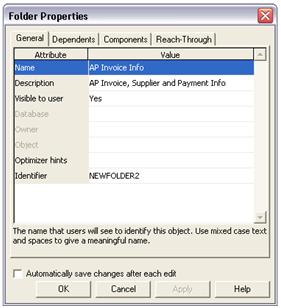
4] Click the new folder’s icon on the Data tab and choose Edit | Properties. We can give a more descriptive name, Description and Identifier Name for the new folder.

5] On the “Workarea: Data tab”, Drag an item from any folder in any open business area to the new folder. Or you can simply do copy and paste.
Tip: You might find it easier to drag items between folders if you have two Workareas open. To open a second Workarea, choose Window | New Window (Shift W).
Note: When you add an item to a complex folder, the folders that it comes from must be joined to the folder of at least one other item already in the complex folder. If this is not the case, Discoverer Administrator will display an error dialog. 
Note: If you select items from two folders that are joined using more than one join, Discoverer displays the Choose Join dialog. Here you can select one or more joins and click OK.
Note: If you select an item from a simple folder that has a join that conflicts with existing items, Discoverer will display an error and you will not be allowed to add the item.
If you want to see all the joins, conditions and the workbooks that are based on your complex folder, go to Folder Properties | Dependents Tab.
What is complex folder reach through?
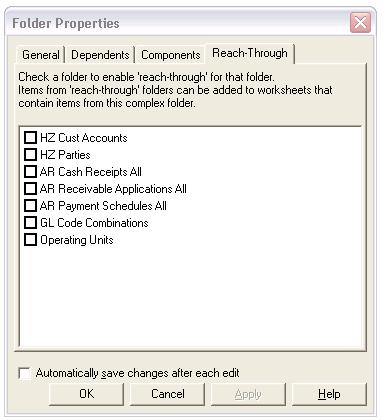
Complex folder reach through is a mechanism that enables Discoverer Plus and Discoverer Desktop users to add items to their worksheets in addition to those provided in a selected complex folder.
In Discoverer Administrator you can define one or more base folders within a complex folder as ’reach through enabled’. When a Discoverer Plus or Discoverer Desktop user selects an item from the complex folder, the associated reach through enabled base folders become available for selection in a worksheet.

All discoverer folders and workbooks that you create get stored in database. You can use the below queries to find the details.
Find your Discoverer Workbook and Folder Details from Database:
select  fu.user_name owner,
doc.doc_id "Document Id",
doc.doc_name "Document Name",
doc.doc_developer_key,
doc.doc_folder_id,
doc.doc_created_by,
doc.doc_created_date,
doc.doc_updated_by,
doc.doc_updated_date,
min(qs.qs_created_date) first_acc,
max(qs.qs_created_date) Last_Acc
from disco_apps.eul5_documents doc,
apps.fnd_user fu,
disco_apps.eul5_qpp_stats qs
where '#'||fu.user_id = doc.doc_created_by
and qs.qs_doc_name=doc.doc_name
and qs.qs_doc_owner=fu.user_name
and doc.doc_created_date<qs.qs_created_date
group by fu.user_name,
doc.doc_id,
doc.doc_name,
doc.doc_developer_key,
doc.doc_folder_id,
doc.doc_created_by,
doc.doc_created_date,
doc.doc_updated_by,
doc.doc_updated_date
order by doc.doc_updated_date desc;

Find your Discoverer Workbook performance for different Business Areas:

select  ba.ba "Business Area",
usr.user_name,
doc.doc_name "Work Book",
min(qs_act_elap_time) "Fastest",
max(qs_act_elap_time) "Slowest",
round(avg(qs_act_elap_time),2) "AVG (s)",
round(avg(qs_act_elap_time)/60,2) "AVG (m)",
count(*) "Often",
doc.doc_created_date,
min(acc.qs_created_date) "First",
max(acc.qs_created_date) "Last Access"
from disco_apps.eul5_documents doc,
apps.fnd_user usr,
disco_apps.eul5_qpp_stats acc,
(select distinct gd_doc_id from disco_apps.eul5_access_privs ) privs,
(
select distinct doc.doc_id,ba.ba_name ba
from disco_apps.eul5_documents doc
,disco_apps.eul5_elem_xrefs eex
,disco_apps.eul5_ba_obj_links bol
,disco_apps.eul5_objs obj
,disco_apps.eul5_bas ba
WHERE doc.doc_id = eex.ex_from_id
AND eex.ex_to_par_name = obj.obj_name
AND obj.obj_id = bol.bol_obj_id
AND bol.bol_ba_id = ba.ba_id
)ba
where '#'||usr.user_id=doc.doc_created_by
And doc.doc_name=acc.qs_doc_name
And privs.gd_doc_id = doc.doc_id
And usr.user_name = upper(acc.QS_DOC_OWNER)
And doc.doc_created_date<acc.qs_created_date
And doc.doc_id=BA.doc_id
group by ba.ba,
usr.user_name,
doc.doc_name,
doc.doc_created_date;

Oracle Business Intelligence 10g Release 2, a key component of Oracle Application Server 10g Release 2, is an integrated business intelligence solution supporting intuitive ad hoc query, reporting, analysis, and web publishing. Discoverer 10.1.2 is tightly integrated with Oracle E-Business Suite Release 12.  Release 12 users can use Discoverer to analyze data from selected business areas in Financials, Operations, and Human Resources etc.
The following are the Discoverer 10g Installation steps for Oracle R12 environment.

1] Install Oracle Business Intelligence Tools 10g (10.1.2.0.2) using below link

First right click on the zip file (as_windows_x86_bi_tools_101202). Extract all to a directory on your PC. Click on the Extracted folder which has the same name (as_windows_x86_bi_tools_101202). Click on the 10g set up icon and follow only the default settings. This installation creates a home “BIToolsHome_1” (If Default location is selected during install).

2] Apply the latest certified Discoverer Plus and Viewer Patches

To upgrade to Oracle Discoverer 10.1.2.2 – Apply the patch: 4960210
To upgrade to Oracle Discoverer 10.1.2.3 – Apply the patch: 5983622
Follow the installation instructions provided in the patch README to install the patch on your Discoverer 10g Server and to check supported operating systems.

3] Copy Database Connection file

Discoverer needs access to the Database Connection (dbc) file for the database you wish to connect to. A dbc file is a text file which stores all the information required to connect to a particular database.
First identify the Oracle Home for Discoverer. For example: If you could find dis51usr.exe under the directory D:oracleBIToolsHome_1bin. Then the Oracle Home is D:oracleBIToolsHome_1
Create a folder named “secure” in the ORACLE_HOME directory (i.e. D:oracleBIToolsHome_1Secure).
Then copy the dbc file from the $FND_SECURE directory of the E-Business Suite Release 12 instance you are setting up Discoverer with to the Discoverer 10.1.2 “ORACLE_HOMEsecure” directory you just created.
Save the dbc file in lowercase.

4] Update tnsnames.ora file

On your standalone Oracle Business Intelligence Server 10g Release 2 node, update the file ORACLE_HOME/network/admin/tnsnames.ora and include the tnsnames entry to connect to your Oracle E-Business Suite Release 12 database. Use the same entry as exists in the tnsnames.ora file on your Oracle E-Business Suite Release 12 application tier server node.

5] Set the Environment

Discoverer requires Windows Environment variables to dynamically retrieve the location of the .dbc file on the PC.
Open Windows Control Panel and double click on the System icon. Select the Environment tab and create two new System Variables.
FND_SECURE = ORACLE_HOMESecure
FND_TOP= ORACLE_HOME
Note: The Oracle Home is the one identified in step 3.
6] Restart the PC and you should be able to connect to Discoverer in an Oracle Applications mode.
Note: When you are connecting to Discoverer for the first time, then Goto Tools > Options. Check the proper EUL in the Connection Tab.
For More Detailed Information Please refer the below metalink note:
Using Discoverer 10.1.2 with Oracle E-Business Suite Release 12 [ID 373634.1]

SRW (Sql Report Writer) Package is a built in package in Oracle Reports Builder. It is a collection of PL/SQL constructs that include many functions, procedures, and exceptions you can reference in any of your libraries or reports.
The PL/SQL provided by the SRW package enables you to perform such actions as change the formatting of fields, run reports from within other reports, create customized messages to display in the event of report error, and execute SQL statements. There are nearly 70 functions, procedures, and exceptions are there in this package. Here I am giving brief information and uses of few important functions, procedures, and exceptions.
SRW.MESSAGE:
It is a Procedure that displays a message with the message number and text that you specify. It is mainly used to debug a report in Reports Builder.
SRW.MESSAGE(msg_number NUMBER, msg_text CHAR);
Example:
function foo return boolean is
begin
if :sal < 0 then
SRW.MESSAGE(100, 'Found a negative salary. Check the EMP table.');
raise SRW.PROGRAM_ABORT;
else
:bonus := :sal * .01;
end if;
return(true);
end;

SRW.PROGRAM_ABORT:
This exception stops the report execution and raises the following error message: REP-1419: PL/SQL program aborted. SRW.PROGRAM_ABORT stops report execution when you raise it.
SRW.DO_SQL:
This procedure executes the specified SQL statement from within Reports Builder. The SQL statement can be DDL (statements that define data), or DML (statements that manipulate data). DML statements are usually faster when they are in PL/SQL, instead of in SRW.DO_SQL.
Since you cannot perform DDL statements in PL/SQL, the SRW.DO_SQL packaged procedure is especially useful for performing them within Reports Builder.
Example:

FUNCTION CREATETABLE RETURN BOOLEAN IS
BEGIN
SRW.DO_SQL('CREATE TABLE TEST_EMP (EMPNO NUMBER NOT NULL
PRIMARY KEY, SAL NUMBER (10,2)) PCTFREE 5 PCTUSED 75');
RETURN (TRUE);
EXCEPTION
WHEN SRW.DO_SQL_FAILURE THEN
SRW.MESSAGE(100, 'ERROR WHILE CREATING TEST_EMP TABLE.');
RAISE
SRW.PROGRAM_ABORT;
END;

SRW.DO_SQL_FAILURE:
Reports Builder raises this exception when the SRW.DO_SQL packaged procedure fails. This exception stops the report execution and raises the following error message:
REP-1425: Error running DO_SQL package – REP-msg ORA-msg.
SRW.GET_REPORT_NAME:
This function returns the file name of the report being executed.
SRW.GET_REPORT_NAME (report_name);
Example:

function AfterPForm return boolean is
my_var varchar2(80);
BEGIN
SRW.GET_REPORT_NAME (my_var);
SRW.MESSAGE(0,'Report Filename = '||my_var);
RETURN (TRUE);
END;

SRW.RUN_REPORT:
This procedure synchronously executes the specified report within the context of the currently running report.
SRW.RUN_REPORT (“report=test.rdf … “)
SRW.SET_FIELD:
This procedure sets the value of a character, number, or date field. This is useful when you want to conditionally change a field’s value.
SRW.SET_FIELD (object_id, text CHAR | number NUM | date DATE);
Example:
Suppose you want to conditionally change the number of a field, based on each employee’s salary. In the format trigger for the field, you could type the following:

FUNCTION CHGFIELD RETURN BOOLEAN IS
TMP NUMBER;
BEGIN
if :sal >= 5000 then
tmp := :sal * 1.10;
srw.set_field (0, tmp);
else
srw.set_field (0, 4000);
end if;
RETURN (TRUE);
END;


SRW.SET_FIELD should be used only to change the contents of a field’s datatype, not change the field to a different datatype.


Others in Brief:


  • SRW.SET_FONT_FACE: This procedure specifies font face for a CHAR, DATE, or NUMBER field. SRW.SET_FONT_FACE(‘arial’);

  • SRW.SET_FONT_SIZE: This procedure specifies font size for a CHAR, DATE, or NUMBER field. SRW.SET_FONT_SIZE(10);

  • SRW.SET_FONT_STYLE: This procedure specifies font style for a CHAR, DATE, or NUMBER field. SRW.SET_FONT_STYLE(SRW.ITALIC_STYLE);

  • SRW.SET_FORMAT_MASK: This procedure specifies the format mask for the DATE or NUMBER field. SRW.SET_FORMAT_MASK(‘mask’);

  • SRW.SET_TEXT_COLOR: This procedure specifies the global text color of the CHAR, DATE, or NUMBER field. SRW.SET_TEXT_COLOR(‘color’);

Bind Parameters:
Bind references (or bind variables) are used to replace a single value in SQL or PL/SQL, such as a character string, number, or date. Specifically, bind references may be used to replace expressions in SELECT, WHERE, GROUP BY, ORDER BY, HAVING, CONNECT BY, and START WITH clauses of queries. Bind references may not be referenced in FROM clauses or in place of reserved words or clauses. You create a bind reference by entering a colon (:) followed immediately by the column or parameter name. If you do not create a column or parameter before making a bind reference to it in a SELECT statement, Report Builder will create a parameter for you by default.
Lexical Parameters:
Lexical references are placeholders for text that you embed in a SELECT statement. You can use lexical references to replace the clauses appearing after SELECT, FROM, WHERE, GROUP BY, ORDER BY, HAVING, CONNECT BY, and START WITH. You cannot make lexical references in a PL/SQL statement. You can, however, use a bind reference in PL/SQL to set the value of a parameter that is then referenced lexically in SQL.