This tutorial will tell you the basic steps to create a Hello Word Page in OA Framework.
Earlier Posts:

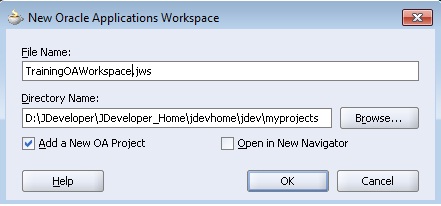
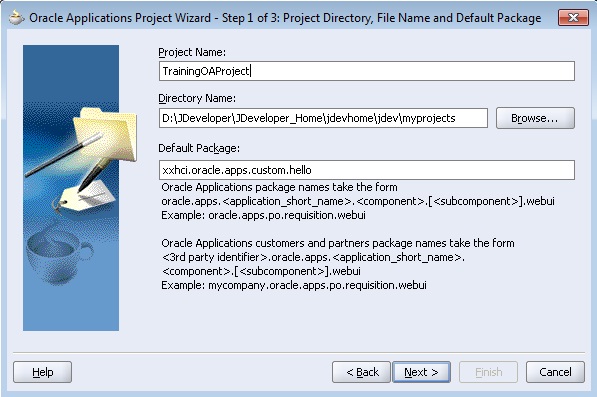
Step 1: Start JDeveloper. Create a New OA Workspace and Empty OA Project with the New…Dialog

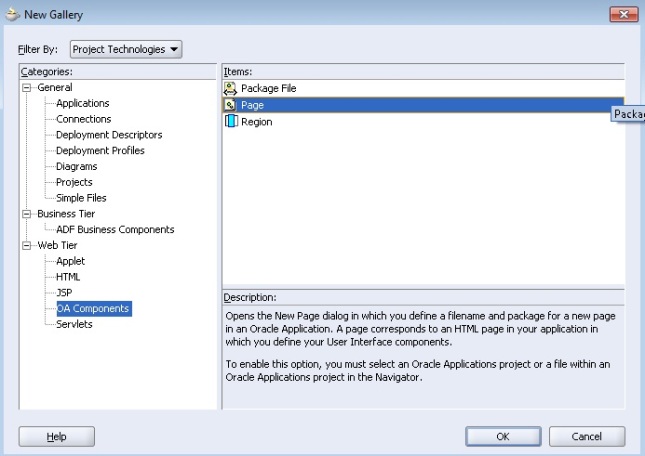
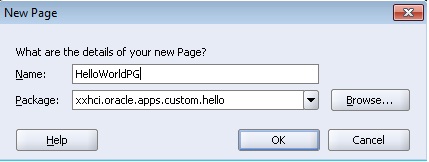
Step 2: Create the OA Component Page

JDeveloper creates your top-level page layout region for you automatically when you create your page.

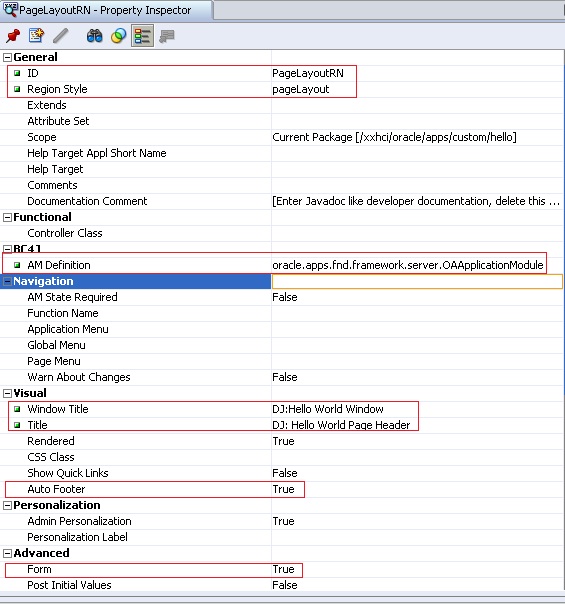
Step 3: Modify the Page Layout (Top-level) Region

  • Set the ID property to PageLayoutRN.
  • Verify that the Region Style property is set to pageLayout.
  • Verify that the Form property is set to True.
  • Verify that the Auto Footer property is set to True.
  • Set the Window Title property to <your name>: Hello World Window Title. This becomes the window title for the page.
  • Set the Title property to <your name>: Hello World Page Header.
  • Set the AM Definition property to oracle.apps.fnd.framework.server.OAApplicationModule (you will have to type in the value). This is a generic application module supplied by the OA Framework.

Step 4: Create the Second Region (Main Content Region)

Create your second region under the page layout region by selecting the page layout region in the Structure window and choosing New > Region from the context menu.
  • Replace the default value in the ID property with MainRN.
  • Set the Region Style property to messageComponentLayout (this provides an indented single- or multiple-column layout for the child items of the region).

Step 5: Create the First Item (Empty Field)

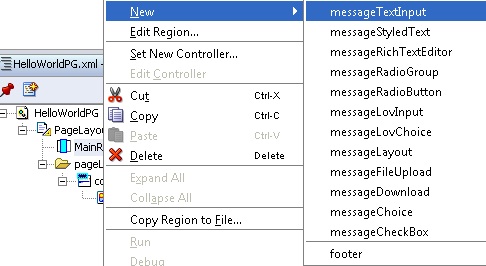
Create your first item under the second region (main content region) by selecting the second region in the Structure window and choosing New > messageTextInput from the context menu. This item will take any name as parameter.
  • Set the ID property to HelloName.
  • Verify that your Item Style property is set to messageTextInput (this style provides a text label and an input field).
  • Set the Prompt property to Name.
  • Set the Visual Length to 20.
  • Set the Data Maximum Length to 50.

Step 6: Create a Container Region for the Go Button

To add a non-message-type bean such as a submitButton to a messageComponentLayout region, you must first add the bean to a messageLayout region.
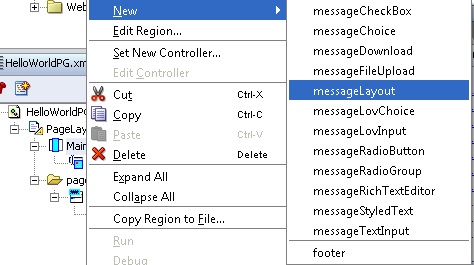
Select the messageComponentLayout region and select New > messageLayout.
Name this region ButtonLayout.

Step 7: Create the Second Item (Go Button)

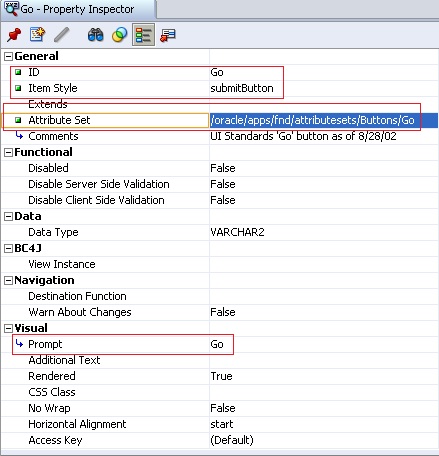
Create your Go button item by selecting the messageLayout region, ButtonLayout, in the Structure window and choosing New > Item from the context menu.
Set the following properties for your button item:
  • Set the value of the ID property to Go.
  • Set the Item Style property to submitButton.
  • Set the Attribute Set property to /oracle/apps/fnd/attributesets/Buttons/Go.

Step 8: Save Your Work (Save-All)

Step 9: Run Your Page Using the Run Option

You can try out your page using the Run option on the context menu. If you are using a database other than what you already have in your project settings, you will need to modify the Runtime Connection project settings by selection your project file and choosing Project Properties… from the main menu. Specifically, you must use a combination of Username, Password, (Responsibility) Application Short Name and Responsibility Key that is valid for your database to enable your session to log in.
The output will be like:
Here the Go Button has no functionality. Now to add some functionality to this Button, we need to add a Controller.

Step 10: Add a Controller

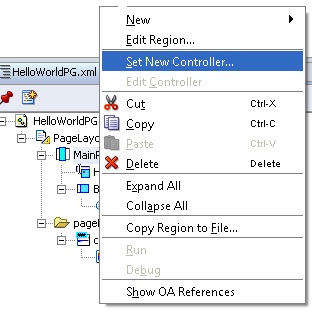
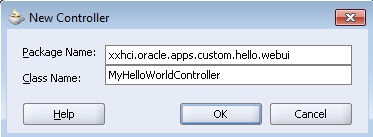
Add a controller to display a message when the user clicks on the Go button. Select your second region (MainRN) and choose Set New Controller… from the context menu.

Step 11: Edit Your Controller

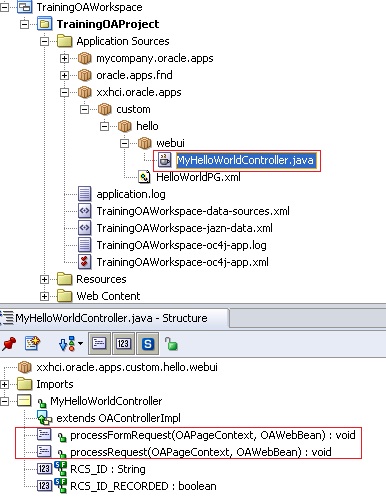
When you create a controller .java file will be automatically created and it will contain below 2 methods.
  • public void processRequest(OAPageContext pageContext, OAWebBean webBean) { }
  • public void processFormRequest(OAPageContext pageContext, OAWebBean webBean) { }
Now you need to add the below code in the java file to add the required functionality.
  • Add the following line as the last line of the import section to make the OA Framework OAException routines available:
import oracle.apps.fnd.framework.OAException;

  • Add the below code in processFormRequest method

if (pageContext.getParameter("Go") != null)
{
String userContent = pageContext.getParameter("HelloName");
String message = "Hello, " + userContent + "!";
throw new OAException(message, OAException.INFORMATION);
}

Step 12: Build Your Controller

Build your controller by selecting Rebuild from the context menu within the code editor window.

Step 13: Test Your Work Using the Run Option

Save your work, and then test it using the Run option. Type something into your field and then click the Go button. You should see the page with an informational message that contains what you typed into the field, as shown:
Congratulations…! You have created your first OA Page. I will try to put articles on how to create search, create and update page in OAF in future. 

If you are new to OAF Development and want to create a new Hello World Page, then this tutorial will help you. For that first you need to do a Setup to use JDeveloper to develop and run your OA Pages.

You can refer here for that.
After the Setup is completed, you are all set to run your first OA Page. Oracle itself has created the Hello World page for you! Just go through the below steps to run the page.
1] Open Oracle JDeveloper and go to File > Open. Open the “toolbox.jws” file from the location jdevhomejdevmyprojects.
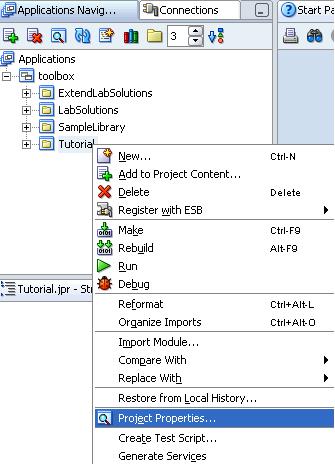
2] Right click on Tutorial and then click on Project properties.

3] Go to Oracle Applications > Database Connections tab
4] Click on New to create a new database connection. Choose the Connection Type as Oracle (JDBC).
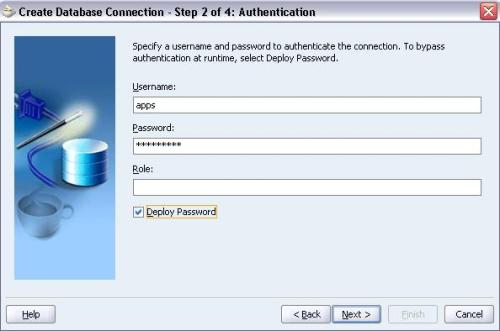
5] Give your Oracle Apps database username and password.
6] Choose the thin driver and give Host Name, Port and SID details of your Oracle Application Database Server. You can get the details in your tnsnames.ora file.
7] After that click on Test Connection button to check if the JDeveloper can connect to the specified database or not. If the status is success then go ahead or check the above settings if you get different status.
8] Go to Run Options and select OADiagnostic and OADeveloperMode.
9] In the Runtime Connection tab, add the path of your DBC file name and give your Oracle Apps username and password. Click Ok. Also add Application Short Name as AK and Responsibility Key as FWK_TBX_TUTORIAL.
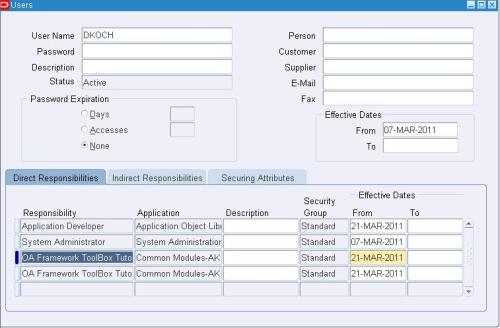
10] Go to Oracle Application Front end and add the responsibilities “OA Framework ToolBox Tutorial” & “OA Framework ToolBox Tutorial Labs” to the user that you have added on the Runtime Connection tab above.
11] Now right click on Tutorial and Rebuild the project. You should get zero errors. If you get few warnings it is ok.
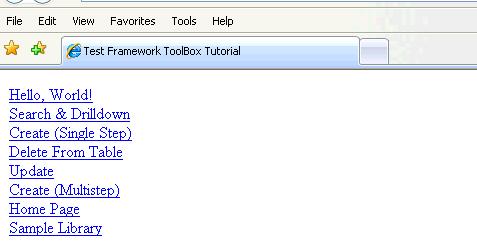
12] Now go to toolbox > Tutorial > Web Content and Run the test_fwktutorial.jsp page.
13] Click on Hello, World!
14] Here is your Hello World page.
You might get errors while running the project. Here I have listed such few errors and their solutions.
Error: oracle.apps.fnd.framework.OAException: Application: ICX, Message Name: Could not find the specified responsibility.
Solution :
1 . Check that the user name and password are correct in the project settings.(Make sure to give Application username and password.)
2. Check the Responsibility key and Application short name.
3. Check whether the user name given in point #1 is attached to the responsibility mentioned in the point #2.
4. Check your dbc file for correct settings.
Error: oracle.apps.fnd.framework.OAException: Application: FND, Message Name: FND_GENERIC_MESSAGE. Tokens: MESSAGE = java.lang.NullPointerException;
Solution :
Set profile “Sign-On:Notification” to “No” at site level.

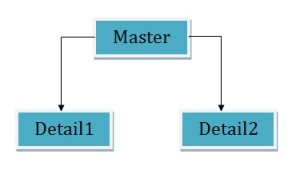
Fan Trap is a situation while running discoverer reports that return unexpected results due to a group of joined database tables. The most common manifestation of a fan trap occurs when a master table is joined to two or more detail tables independently.
If you use a straightforward SQL statement to aggregate data points here, you may get incorrect results due to fan trap. Now, if you enable fan trap detection in Discoverer and if you use Discoverer to aggregate the data points, Discoverer will never return incorrect results.

Example of Fan Trap:
Consider an example fan trap schema that includes a master folder (ACCOUNT) and two detail folders (SALES and BUDGET), as shown below:
Now let’s say we need to answer the question, “What is the total sales and total budget by account?
Straightforward SQL statement approach:
SELECT Account.Name,
SUM(sales),
SUM(budget)
FROM
Account,
Sales,
Budget
Where
Account.id=Sales.accid
AND Account.id=Budget.accid
GROUP BY Account.Name;


Account    Sales Budget


Account 1   800   1200


Account 2   130    200


Account 3    600   750


Account 4    600   600


The above results are incorrect, because they are based on a single query in which the tables are first joined together in a temporary table, and then the aggregation is performed. However, this approach causes the aggregates to be summed (incorrectly) multiple times.


Discoverer Approach:


If we run the query in Discoverer interrogates the query, detects a fan trap, and rewrites the query to ensure the aggregation is done at the correct level. Discoverer rewrites the query using inline views, one for each master-detail aggregation, and then combines the results of the outer query.


Here are the results from discoverer which is correct:


Account   Sales   Budget


Account 1  400      400


Account 2  130      100


Account 3  200      750


Account 4  300      200


How to enable fan trap in discoverer?


By default, fan trap detection is always enabled for you. If you want to disable it (however not recommended), you can logon to Discoverer Plus, go to Tools > Options >Advanced Tab and click on ‘Disable fan trap detection’.


How Discoverer handles fan trap?


If a fan trap is detected, Discoverer can usually rewrite the query using inline views to ensure the aggregation is done at the correct level. Discoverer creates an inline view for each master-detail aggregation, and then combines the results of the outer query.


In some circumstances, Discoverer will detect a query that involves an unresolvable fan trap schema, as follows:


  • If the detail folders use different keys from the master for the join

  • If there is a direct join relationship between the detail folders (thereby creating an ambiguous circular relationship)

  • If non-aggregated values are chosen from more than one of the detail folders

  • If more than one detail folder has a separate join relationship to a different master folder


In the above circumstances, Discoverer disallows the query and displays an error message.

If you want to do some OAF Development in JDeveloper for the first time, you will need to do the following things.
1] Download JDeveloper Patch
Based on your instance release level, check out the version of JDeveloper to use using below link.
You can identify the OA Framework version in your instance by activating diagnostics and click the “About This Page” from any OAF page. Click the “Technology Components” tab. The OA Framework version in the top row of the table can then be matched to the JDeveloper Patch.
Download the JDeveloper Patch.
2] Extract the JDeveloper patch in a directory say D:DevSuiteHome_1jdev
The patch actually contains below three directories
  • jdevbin – Includes an extended version of the Oracle JDeveloper 10executable and OA Framework class libraries.
  • jdevhome – Includes the OA Framework Toolbox Tutorial source and developer working area.
  • jdevdoc – Contains documentation.
3] Define an environment variable
Define an environment variable JDEV_USER_HOME for your local machine. This has to be set to jdevhomejdev directory. In above example it has to be D:DevSuiteHome_1jdevjdevhomejdev.
My Computer  Properties  Advanced tab  Environment Variables  New
Variable: JDEV_USER_HOME
Value: D:DevSuiteHome_1jdevjdevhomejdev
4] Extract Tutorial.zip
Extract D:DevSuiteHome_1jdev jdevbinTutorial.zip into D:DevSuiteHome_1jdev jdevhome.
It will create following directories
D:DevSuiteHome_1jdev jdevhomejdevmyhtml
D:DevSuiteHome_1jdev jdevhomejdevmyprojects
5] Get the DBC file
Obtain the FND database connection (.dbc) file from the system administrator who installed the OA Framework database where you want to do your development.
For the instance to use, you can get the .dbc file from $FND_SECURE and put it in <JDEV_USER_HOME>dbc_filessecure i.e. D:DevSuiteHome_1jdevjdevhomejdev dbc_filessecure
6] Creating a Desktop Shortcut to JDeveloper
To facilitate launching JDeveloper, create a desktop shortcut to jdevbinjdevbinjdevw.exe.
7] Configuring the Environment Encoding of JDeveloper
Confirm the environment encoding of your JDeveloper if it is appropriately set.
Go to Tools – Preferences – Environment – Encoding
If Encoding is not set to “UTF-8″, set it to “UTF-8″.
The initial setup is now complete!….Now you are ready to develop your first OAF page. For more information you can refer OAF Developer’s Guide.

Although Discoverer provides many functions for calculation in reports, sometime we require to use custom PL/SQL functions to meet additional Discoverer end user requirements (for example, to provide a complicated calculation). For this we first need to create the functions in database through Toad or other PL/SQL editors.
To access custom PL/SQL functions using Discoverer, you must register the functions in the EUL. When you have registered a custom PL/SQL function, it appears in the list of database functions in the “Edit Calculation dialog” and can be used in the same way as the standard Oracle functions.
Note: To register a PL/SQL function you must have EXECUTE privilege on that function.
You can register custom PL/SQL functions in two ways:
  •  Import automatically, by importing the functions (recommended)
  •  Manually

How to register custom PL/SQL functions automatically:

To register PL/SQL functions automatically you must import them in the following way:
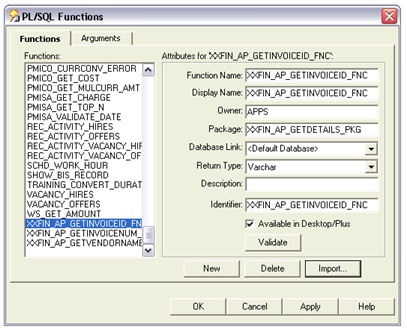
 1. Choose Tools | Register PL/SQL Functions to display the “PL/SQL Functions dialog: Functions tab”.
  
 2. Click Import to display the “Import PL/SQL Functions dialog”. This dialog enables you to select the PL/SQL functions that you want to import.

 
3. Select the functions that you want to import. You can select more than one function at a time by holding down the Ctrl key and clicking another function.
 
4. Click OK.
Discoverer imports the selected functions and displays the function details in the “PL/SQL Functions dialog: Functions tab”. Information about the selected functions is imported automatically. In other words, you do not have to manually enter information or validate the information.
 
5. Click OK.
The PL/SQL function is now registered for use in Discoverer.

How to register custom PL/SQL functions manually:

To manually register a PL/SQL function for use in Discoverer:
1. Choose Tools | Register PL/SQL Functions to display the “PL/SQL Functions dialog: Functions tab”.
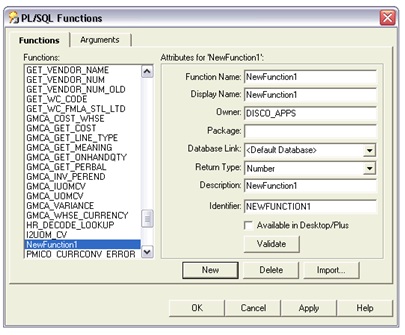
2. Click New and specify the function attributes.
 
3. Click Validate to check the validity and accuracy of the information you have entered.
4. If the function is invalid, correct the attributes and click Validate again.
5. (Optional) if the function accepts arguments:
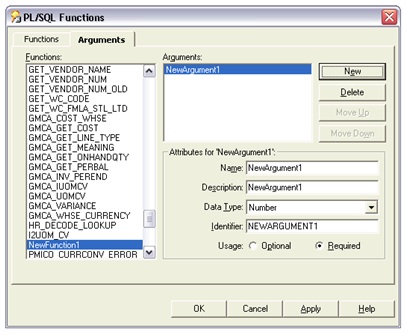
a. Display the “PL/SQL Functions dialog: Arguments tab”.
b. On the Arguments tab, click New and specify the argument attributes.
 
6. Click OK when you have finished defining the function.
The custom PL/SQL function is now registered for use in Discoverer.
It is always recommended to register PL/SQL functions by importing automatically (especially if you have many functions to register), because it is easy to make mistakes when manually entering information about functions. When you import functions, all of the information about each function (for example, names, database links, return types, lists of arguments) is imported.