How to add a context dependent descriptive flex-field on OAF Control Item page?
These context dependent flexfields were at first not possible in framework because the references like BLOCK etc (which you can use in Forms) are not applicable to framework pages. Starting from release 12.0.6 of E-Business Suite there is a way to implement context descriptive flexfields on framework pages.
As an example I’ll use some example we encountered during an implementation. There was a requirement that additional details should be given to a control item in Project Management. Control Items in Project Management can be used to record your issues and risk on your running projects. In this case we have 2 Control Item Types being Issue and Risk. Based on the type we need to display additional segments in a DFF for the end user to use. This DFF must change with every type of issue.
To implement this behaviour we need to do a number of things:
- Implement the DFF and add segments on it for 2 context values (Issue and Risk)
- Implement a reference value used by the DFF which is the Control Item Type
- Enable the Descriptive Flexfield on the Control Item page of a project
- Add a so called Flex Map to the Descriptive Flexfield on the OAF page to hold the control item type (and used by the DFF definition
- Bounce Apache
Key thing in the above is step number 4. Starting from release 12.0.6 E-Business Suite introduces the functionality of Flex Maps. Follow the below steps to implement the behaviour. Of course the same method can be used in other parts of E-Business Suite if the page has a seeded DFF. If that’s not the case than also a self made descriptive flexfield can be added but I’ll write a post about that in near future.
Step 1: Implement the DFF for Control Items
a) Go to Application Developer – Flexfield – Decriptive – Segments and query the Control Item flexfield with the name Control Items Desc Flex.
b) Unfreeze the Flexfield Definition if needed. Tick the checkbox Synchronize with Reference Field to make sure the context is updated when you move along control items. Also untick the Displayed checkbox as we don’t want to show the Context field to the end user. Set the Reference Field. Add the syntax :$PROFILES$.<Name>. As a name anything can be used. Remember that name because we need it in a later step. In my example I’ll set it to :$PROFILES$.TypeCICyriel
c) Add Context Field values. I’ll add 2 values named Issue and Risk. It’s very important that these names represent the exact naming of your control item types. Add as many as you like representing each option you have for the types. Add your segments to the contexts and assign them to one of the attribute fields.
By default the segments are set to be a required segment. If applicable turn this off by opening the segment (click on Open) and untick the required checkbox.
d) When done adding your context field values and the related segments save the work and freeze the Flexfield definition. Your DFF should compile without problems.
Step 2: Handle the DFF on the framework page (Control Items)
- Create Seeded Personalizations
- FND: Personalization Region Link Enabled
- FND: Personalization Seeding Mode
- HR: Enable User Personalization
- Personalize Self-Service Defn
Make sure the DFF is enabled (Shown) for the page. If that’s not the case than click the Personalize pencil on the row Flex: (PaDescFlex) and change the rendered setting to Yes.
Step 3: Add a Flex Map (bean) to the DFF in OAF through personalization
a) Click on Create Item on the row Flex: (PaDescFlex). You get a new screen where you define the Flex Map settings.
b) Enter the ID which can be anything you want. Leave the Attribute Set and Comments blank. For Name you have to use the exact name as defined in the reference field setting in the DFF definition without the :$PROFILES$. I used the reference field name settting :$PROFILES$.TypeCICyriel so the name of the Reference Value of the Flex Map must be TypeCICyriel.
The Reference Value is very important and will be the placeholder for in this case the Control Item Type name. This setting can use the so called SPEL language with which you reference an attribute of the page or view object of the OAF page. In this case the Control Item Type name is a seeded attribute of the ControlItemVO object of the page. We enter ${oa.ControlItemVO.CiTypeName} as the reference value. The Refers Context option needs to be set to true as we use this Flex Map as a context item.
c) Save all your work and bounce apache if the changes are not reflexted immediately.
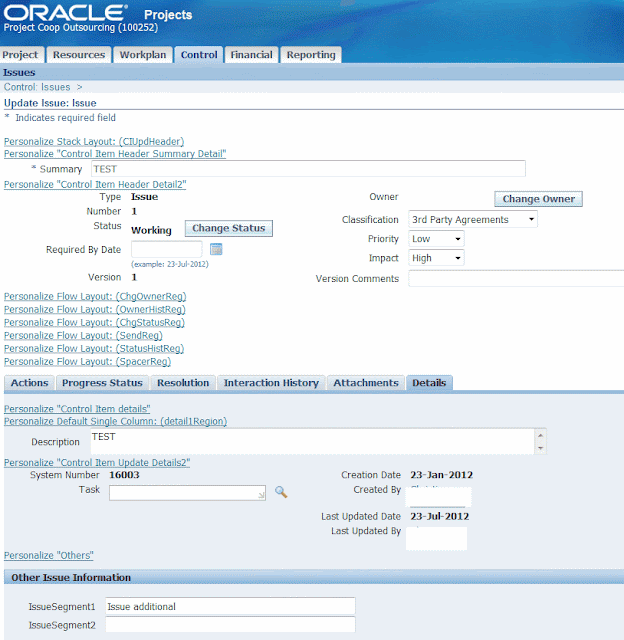
The end result will be that when you create a new control item being, in our example, a risk or an issue the applicable additional segments are shown for the type. We’ve unticked the Displayed checkbox within the DFF definition so it’s also not visible in the OAF page. See below the shots for the end results. Good luck with using this feature 🙂
 |
| Risk showing the 2 defined risk segments of the DFF (Context hidden) |
 |
| Issue showing the 2 defined issue segments of the DFF (Context hidden) |


Hi, I'm having a problem migrating a DFF from 11i to R12.
My DFF uses a LOV that used to reference a form value (:block.field) to get current segment1 value (in my case used for a customer code), how can I make it work in framework page?
How do you get the Reference Value? I have issues in getting it. I am trying to add a flex item in create PO OAF page, and i modified the PO Headers DFF and added 2 segments. Can you suggest a way?