You can define manufacturer part numbers for items. You can use this information for reporting purposes; and in catalog searches for particular items.
Navigate to the Manufacturers window , Enter the name of the manufacturer &  Save your work.

1. Navigate to the Manufacturers window.
2. Choose Parts.
3. Enter a manufacturer part number.
4. Enter an item.
You can assign the same item to multiple manufacturer part numbers.


The concept of customer item is to link the customer item with the inventory item of the organization so that the customer can order with their customer item for which we have a refernce to the inventory item. To facilitate the process we use commodity code to group all the customer items.

  • Customer items can be defined at customer category level, customer level and customer ship to level.
  • For a single customer item we can have two differnt inventory items in customer cross reference with rank 1, 2 etc
  • The process of difining customer cross reference is  

1. Define commodity code
2. Define customer item and
3. Enter the customer reference.
Use the Customer Items Summary and Customer Items Detail windows to define and update customer items. You can toggle between these windows with the Summary/Detail option in the Go option on the Toolbar. You can cross reference customer items to your Oracle Inventory items to support processing orders and shipments.

A customer item defined at the Customer level is recognized across all address and address categories for that customer. If you ship an item to multiple customer ship–to sites that have been grouped as an address category, you can define the customer item for that address category. You would define a customer item at the address level if you ship the item to only one ship–to site for that customer.
Commodity Codes
Customer Item Commodity Codes are used to group customer items and can be entered during the definition of customer items.
Navigation : INV -> Setup ->Items -> Customer Item commodity code.

Customer Item1. Select one of the existing Customer Names (in the Details window, you can use either Customer Name or Customer Number,).
2. Select the Definition Level: Customer, Address Category, or Address.
A customer item defined at the Customer level is recognized across all address and address categories for that customer. If you ship an item to multiple customer ship-to sites that have been grouped as an address category, you can define the customer item for that address category. You would define a customer item at the address level if you ship the item to only one ship-to site for that customer.
For the Address Category definition level, enter the address category.
For the Customer Address definition level, enter the customer address.
3. Enter the Customer Item number and description.
4. In the Commodity tabbed region, you can assign the customer item to a Commodity Code.
5. In the Container tabbed region, you can enter the default master and detail containers for this customer item as well as the minimum fill percent for the container.
6. In the Model, Departure Planning tabbed region, you can reference a customer item as a Model by entering the inventory item number of an existing Model item (the BOM Item Type attribute is set to Model).
You can also check Required to indicate that items must be departure planned before they released and Before Build to indicate that ATO items must be departure planned before they are built.
7. In the Demand Tolerances, Active tabbed region, you can enter positive and negative tolerance percentages and select or deselect the Active check box.

Customer Item Cross References
Use the Customer Item Cross References window to define and update cross references between your inventory items and the customer item numbers defined in the Customer Items Summary/Detail windows.
You can also navigate to this window by selecting the Cross Reference button in the Customer Items Summary window. Inventory displays the existing cross references for the customeritem on the current line in the Customer Items Summary window, and you can add new cross references by selecting a new row.
Enter the Rank as a positive number. To permit alternate or substitute inventory items for a customer item, you can define multiple cross references to inventory items for a single customer item. In these cases, you must specify the Rank of the cross reference. The highest rank is 1.

Cross–reference types define relationships between items and entities such as old item numbers or supplier item numbers. For example, you can create a cross–reference type Old to track the old item numbers, and a type Supplier to track supplier part numbers.

Navigate to INV : Items -> Cross reference , Enter a unique cross–reference type name and save it.
Click on Assign an old/supplier item and its corresponding inventory item.

1. item in cloumn1 represents a current inventory item
2. Indicate whether the cross–reference applies only in the specified organization or to all organizations to which the item is assigned
3. Enter a cross–reference value. This value is the entity you cross–reference to the item, such as its old item number or supplier part number.
Cross reference can also be attached from tools in item master
The User Item Type item attribute is a QuickCode you use when you define an item. You can use the types provided by Oracle Inventory or create your own.
Setup Steps
1. Navigate to the Item Type QuickCodes window. The User access level is selected indicating you can add or modify  QuickCodes without restriction.
2. Enter a unique alphanumeric code describing the item type. You can define a maximum of 250 QuickCodes for a single QuickCode type.
You cannot change the values in this field after saving them. To remove an obsolete QuickCode you can either disable the code, enter an end date, or change the meaning and description to match a replacement code.
3. Enter the meaning of the item type. Inventory uses this value in the list of values for the User Item Type item attribute in the Items window.

Item attributes are information about an item, such as order cost, lead time, and revision control.
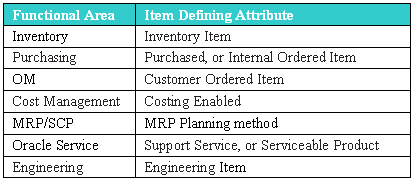
Item Defining Attributes – An item defining attribute identifies the nature of an item. What designates an item as an “engineering item” is the attribute Engineering Item, but what controls the functionality of the item are the collection of
attributes that describe it. You can buy an engineering item if you want to; simply set Engineering Item, Purchased, and Purchasable to Yes.
The following table presents item defining attributes:

When you set an item defining attribute to Yes, the item is automatically assigned to the default category set of the corresponding functional area. For example, if you set Inventory Item to Yes, the item is automatically assigned to the default category set for the inventory functional area.
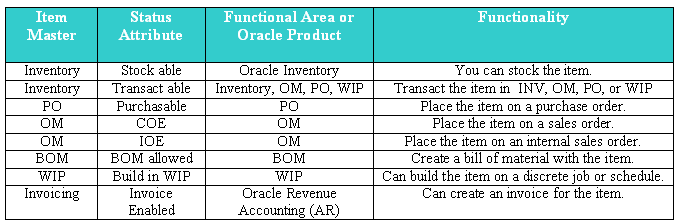
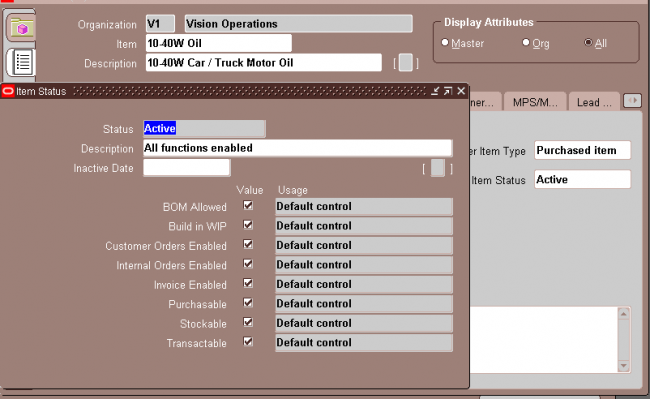
Item Status attributes are item attributes that enable key functionality for each item.
Status attributes enable and disable the functionality of an item over time. Each status attribute allows you to enable the item for a particular use. For example, if you set the status attribute Purchasable to Yes, you can put the item on a purchase order. The status attributes are related to the item defining attributes. You cannot enable a status attribute if you do not set the corresponding item defining attribute to Yes.
The following table presents status attributes:


An item status Codes
is defined by selecting the value check boxes for the status attributes.
Item Status Codes may be used to set or update the default values for certain item attributes.  They can be used to control the functionality of an item.  When you update the values for a status, all items that use that status will be updated also.
The Item Status Code controls certain item attributes designated as status attributes.  Each status attribute has a Status Setting option.   The option determines whether a status attribute value is set by the status code and is not updateable, defaulted and updateable, or not used when you define an item
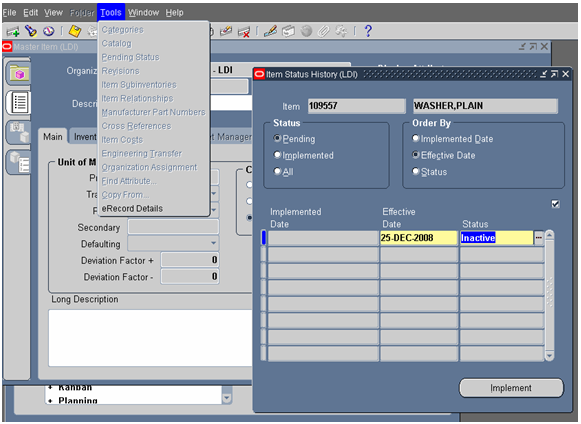
Pending Status:
You can assign one or more pending statuses for an item, to be implemented on future dates. These statuses become effective on their assigned effective dates. You can also view the history of an item status.
(N) Items—>Master Items (M)—>Tools -> Pending Status

You can submit the Update item statuses with the Pending statuses of the concurrent program to update the status of all items with Pending statuses and current effective dates. When you submit this concurrent program, change its parameters so that it resubmits itself periodically, automatically updating item statuses to a Pending status, as effective dates become current. Pending statuses are used in the product development cycle.

Item Attribute Control determines whether you have centralized (Master level) or decentralized (Organization level) control of item attributes. Both status attributes and item status can be controlled at the item level or organization levels.

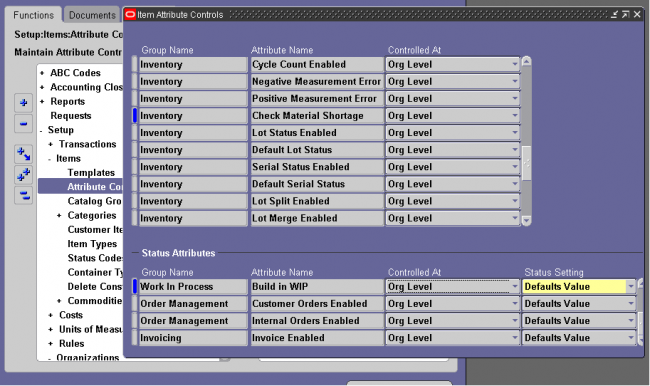
You can choose the status setting level of each status attribute in the Item Attribute Controls window. The status setting level determines whether you can update the value of each status attribute within an item status.
Sets Value: The status that you assign to the item loads a non updatable value into the status attribute. You can update the status attribute by changing the status that you assigned to your item.
Defaults Value: The status that you assign to the item loads a default value into the status attribute. You can update the status attribute as you define your item.
Not Used: The status that you assign to the item does not determine the value of the status attribute. You can enable or disable the status attribute as you define your item.
Status Setting Level Consideration: You have the flexibility to change individual status attribute settings. Using meaningful status codes gives you control over item usage.