This article will explain how to add a DFF to a existing OAF page through personalization.I am using Supplier Quick Update Page ( /oracle/apps/pos/supplier/webui/SuppSummPG ).
If you want to see how to create DFF please click here.
In this scenario I am using a custom DFF. Following are the details.
Application -> Payables ( Code: SQLAP )
Name -> XXCUST_SUPPLIER_DFF
Title -> XXCUST – Supplier DFF
Table Name -> AP_SUPPLIERS
DFV View name -> XXCUST_SUPPLIER_DFV
Reference Fields -> ATTRIBUTE_CATEGORY
Following are the Context Field Details.
Prompt -> Supplier Type
Value Set -> XXCUST_SUP_TYPE ( Values : External and Internal )
Reference Field -> ATTRIBUTE_CATEGORY
Below table shows the segment details of XXCUST_SUPPLIER_DFF.
Code
Segments
Column
Value Set
Global Data Elements
Identification Number
ATTRIBUTE1
15 Characters
External
Type
ATTRIBUTE2
XXCUST_EXT_SUP_TYPE
Values
         Domestic 
          International
Internal
Department
ATTRIBUTE2
15 Characters
Following steps you need to perform to create flex item in the Quick Update page.
1) Click on Personalize Page.In the Personalize Page click on Complete View.
2) Click on Create Item.( Based on where you want to place the DFF choose appropriate layout).
3) Create flex item with following details.
4) If you want to arrange the item in the page click on Reorder.
Following is the output.

How to Clear Apache Cache (Oracle EBS General)

Steps to Clear Apache Cache

Step – 1 Navigate to Functional Administrator responsibility.

Step – 2 Go to: Home > Core Services > Caching Framework
Step – 3 Go to: Global Configuration > Clear All Cache.
Click Apply. Apache Cache is now clear.
We all know (I think :-)) the way in Oracle Forms to create context dependent descriptive flexfields. That is displaying additional segments within the form based on some other value in the form or maybe a value on a profile option.


These context dependent flexfields were at first not possible in framework because the references like BLOCK etc (which you can use in Forms) are not applicable to framework pages. Starting from release 12.0.6 of E-Business Suite there is a way to implement context descriptive flexfields on framework pages.

As an example I’ll use some example we encountered during an implementation. There was a requirement that additional details should be given to a control item in Project Management. Control Items in Project Management can be used to record your issues and risk on your running projects. In this case we have 2 Control Item Types being Issue and Risk. Based on the type we need to display additional segments in a DFF for the end user to use. This DFF must change with every type of issue.

To implement this behaviour we need to do a number of things:

  1. Implement the DFF and add segments on it for 2 context values (Issue and Risk)
  2. Implement a reference value used by the DFF which is the Control Item Type
  3. Enable the Descriptive Flexfield on the Control Item page of a project
  4. Add a so called Flex Map to the Descriptive Flexfield on the OAF page to hold the control item type (and used by the DFF definition
  5. Bounce Apache

Key thing in the above is step number 4. Starting from release 12.0.6 E-Business Suite introduces the functionality of Flex Maps. Follow the below steps to implement the behaviour. Of course the same method can be used in other parts of E-Business Suite if the page has a seeded DFF. If that’s not the case than also a self made descriptive flexfield can be added but I’ll write a post about that in near future.

Step 1: Implement the DFF for Control Items
a) Go to Application Developer – Flexfield – Decriptive – Segments and query the Control Item flexfield with the name Control Items Desc Flex.


b) Unfreeze the Flexfield Definition if needed. Tick the checkbox Synchronize with Reference Field to make sure the context is updated when you move along control items. Also untick the Displayed checkbox as we don’t want to show the Context field to the end user. Set the Reference Field. Add the syntax :$PROFILES$.<Name>. As a name anything can be used. Remember that name because we need it in a later step. In my example I’ll set it to :$PROFILES$.TypeCICyriel


c) Add Context Field values. I’ll add 2 values named Issue and Risk. It’s very important that these names represent the exact naming of your control item types. Add as many as you like representing each option you have for the types. Add your segments to the contexts and assign them to one of the attribute fields.


By default the segments are set to be a required segment. If applicable turn this off by opening the segment (click on Open) and untick the required checkbox.


d) When done adding your context field values and the related segments save the work and freeze the Flexfield definition. Your DFF should compile without problems.

Step 2: Handle the DFF on the framework page (Control Items)

Go to your Control Item page. If you don’t have the Personalize options enable the profile options and set it to the username who’s going to do the change. Change the below profile options and set it for the specific username on value Y (for Yes).
  • Create Seeded Personalizations
  • FND: Personalization Region Link Enabled
  • FND: Personalization Seeding Mode
  • HR: Enable User Personalization
  • Personalize Self-Service Defn

Make sure the DFF is enabled (Shown) for the page. If that’s not the case than click the Personalize pencil on the row Flex: (PaDescFlex) and change the rendered setting to Yes.


Step 3: Add a Flex Map (bean) to the DFF in OAF through personalization
a) Click on Create Item on the row Flex: (PaDescFlex). You get a new screen where you define the Flex Map settings.

b) Enter the ID which can be anything you want. Leave the Attribute Set and Comments blank. For Name you have to use the exact name as defined in the reference field setting in the DFF definition without the :$PROFILES$. I used the reference field name settting :$PROFILES$.TypeCICyriel so the name of the Reference Value of the Flex Map must be TypeCICyriel. 

The Reference Value is very important and will be the placeholder for in this case the Control Item Type name. This setting can use the so called SPEL language with which you reference an attribute of the page or view object of the OAF page. In this case the Control Item Type name is a seeded attribute of the ControlItemVO object of the page. We enter ${oa.ControlItemVO.CiTypeName} as the reference value. The Refers Context option needs to be set to true as we use this Flex Map as a context item.

c) Save all your work and bounce apache if the changes are not reflexted immediately.

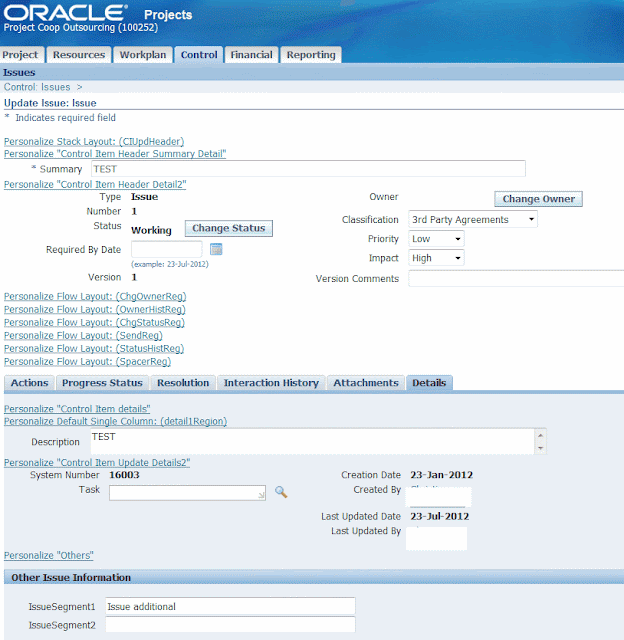
The end result will be that when you create a new control item being, in our example, a risk or an issue the applicable additional segments are shown for the type. We’ve unticked the Displayed checkbox within the DFF definition so it’s also not visible in the OAF page. See below the shots for the end results. Good luck with using this feature 🙂

Risk showing the 2 defined risk segments of the DFF (Context hidden)


Issue showing the 2 defined issue segments of the DFF (Context hidden)
In Oracle Trade Management the links ‘About This Page’ & ‘Personalize Page’ links are not enabled on any page of Oracle Trade Management even though the required profile options ‘FND: Diagnostics’, ‘FND: Personalization Region Link Enabled’ ‘,’ Personalize Self-Service Defn’ are set to ‘YES’.
How to proceed further with personalisations/customizations in Oracle Trade Management?
Solution
Oracle Trade Management is built based on 2 different frameworks, OAF and JTF.
So in Oracle Trade Management the links ‘About This Page’ & ‘Personalize Page’ links are not enabled
The w-a is that :
there is another navigation for the Personalization of OA pages to do customizations from here:
Functional Administrator > Personalization Tab > Application Catalog
Search by Application = Trade Management and Document Path. e.g. for Create Special Pricing UI, Document Path =/oracle/apps/ozf/request/webui/SpRequestPartnerCreatePG
Click on Personalize Page UI.
Click on Apply Button.
This will take  Personalization Structure of this UI.

Here are the steps to create a simple search page in OA Framwork. I have used OAF Version 12.1.1 for this exercise. There are many ways to do this and here I have followed one of these.
Step 1: Create a Package
All BC4J model components must belong to a Business Components (BC4J) package. So create a package with a name like xxhci.oracle.apps.custom.LabExamples.server.
Step2: Create an Entity Object (EO)
Entity objects encapsulate business logic and DML operations for application tables.
To create a new entity object in the above defined Business Components (BC4J) package:
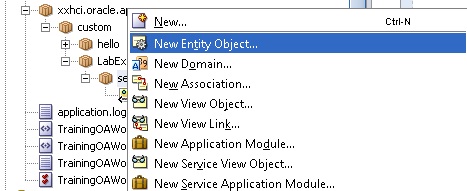
1. In the JDeveloper Navigator, select the BC4J package where you want to create your entity object.
2. Right click and select ‘New Entity Object’
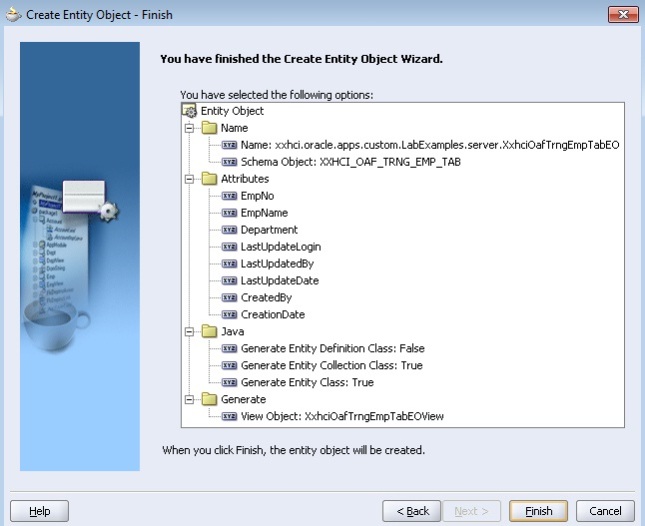
3. Do the following steps to create an EO.
2.1 Specify a Schema Object (the exact name of the table for the entity object)

2.2 In the Attributes page (Step 2 of 5), you should see all the columns in the table that you specified in the Name page.
Select New… to create a transient attribute that is used in the business logic, such as a calculated OrderTotal in a purchase order that is used for approval checking.
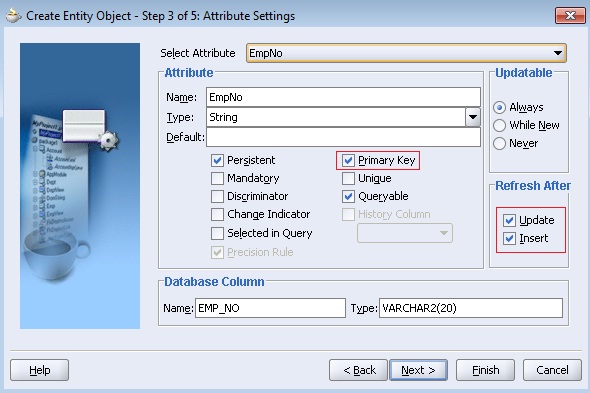
2.3 In the Attribute Settings page (Step 3 of 5), verify or set the following information for each of the entity object’s attributes:
The Attribute and Database Column Name and Type properties default correctly from the table definition. For primary key columns, ensure that the Primary Key and Mandatory checkboxes are selected. For columns that are never updateable, or updateable only when new, select the appropriate Updateable radio button. For columns whose values change after database triggers execute, select the Refresh After update or insert as appropriate.
2.4 In the Java page (Step 4 of 5) page:
  • Check the option for generating an Entity Object Class. In the Generate Methods box, opt to generateAccessors, a Create Method and a Remove Method.
2.5 Click on ‘Generate default view object’ to create a VO. Select Finish to save your entity object definition and implementation. BC4J will create an XML definition file and a Java implementation file for your entity object.
Step3: Create an View Object (VO)
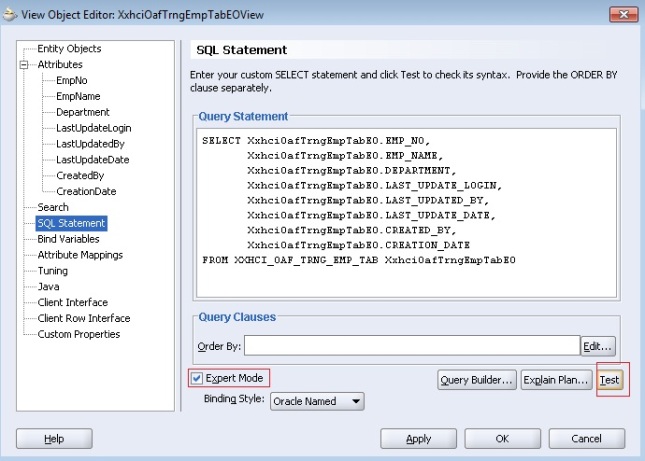
If you click ‘Generate default view object’ tab as mentioned above, you don’t have to create a VO separately. If you forgot this, you have to create a VO. Click on the VO to test the SQL Statement generated by the EO and check in the ‘Expert Mode’.
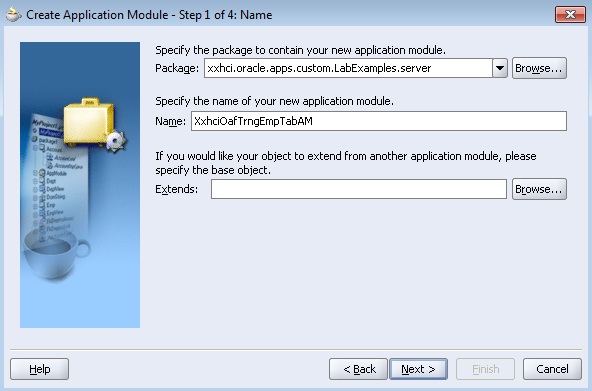
Step4: Create a New Application Module (AM)
To create a new application module in a Business Components (BC4J) package:
1. In the JDeveloper Navigator, select the BC4J package where you want to create your application module.
2. From the main menu, choose File > New to open the New Object Gallery.
Select the view object.
In the Java page (Step 4 of 5), deselect the Generate Java File(s) checkbox ONLY if you are certain that you won’t be writing any code for your application module (you can always delete the class later if you find that you don’t need it, so it’s probably best to simply generate it at this point unless you are creating a simple container for LOV view objects).
Select Finish to create your application module. BC4J will create an XML definition and implementation file.
Step5: Create a Page (EmpSearchPG)
Create the EmpSearchPG page as follows
  • Right click on project à New à Web Tier à OA Components à Page
  • Give the Page Name as EmpSearchPG and package as “xxhci.oracle.apps.custom.LabExamples.webui”
  • Select region1 page from Structure Window and change its properties as
    ID à PageLayoutRN
  • Select the AM Definition as ‘xxhci.oracle.apps.custom.LabExamples.server.XxhciOafTrngEmpTabAM’
  • Give a Window Title as ‘Employees Search Window’
  • Give a Title as ‘Employees’
Step6: Add a Query region and Results table
  • Right click on PageLayoutRN à New à Region. Set the properties of the new region as
    ID à QueryRN
  • Select the Region Style as ‘query’ and Construction Mode as ‘resultBasedSearch’.
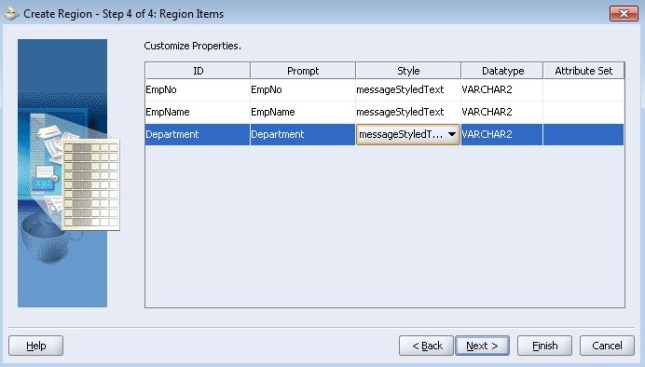
  • Right click on QueryRN region on structure navigator à New à Region using wizard.
  • Select the AM and VO which we have created in earlier steps as shown in below figure.
Set the Region Style as Table
Change the Prompt and Style for all three items.
Step7: Changes the Item Properties
Go to EmpNo item and set the Search Allowed property to true. Similarly do the steps for EmpName and Department also.
Step8: Save all changes (Save All).
Step9: Run the Page (EmpSearchPG)
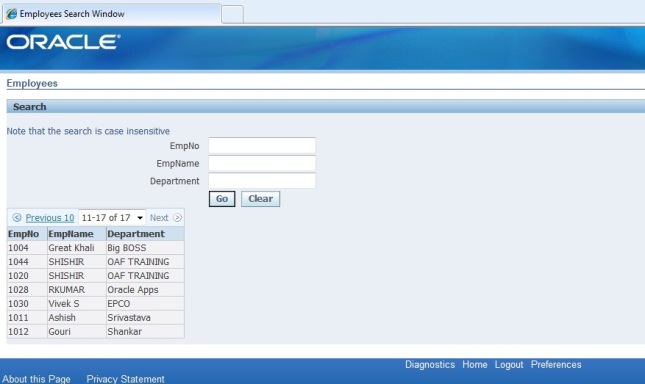
Creation of search page is complete. Run the EmpSearchPG to test the page. If everything works fine for you, you should able to view an output like below:
Few Note:
Understanding Query Regions
When you add a query region to a pageLayout region, OA Framework automatically generates an oracle.apps.fnd.framework.webui.beans.layout.OAQueryBean which, depending on its configuration, works in concert with a child table, advanced table or HGrid to implement any combination of simple search, advanced search and view panels. OA Framework automatically generates buttons as appropriate for toggling between the applicable regions.
Construction Modes:
There are three construction modes available. In the above example we have used ‘resultBasedSearch’construction mode. Here is a brief comparison of the three modes.
1] resultsBasedSearch:
  • OA Framework automatically renders both the Simple and Advanced search regions based on the designated queryable items in the associated table.
  • The search regions automatically include both a Go and a Clear button.
  • OA Framework automatically executes the underlying search when the user selects the Go button.
2] autoCustomizationCriteria:
  • OA Framework automatically renders both the Simple and Advanced search regions based on the corresponding Simple search and Advanced search regions that you define and specify as named children of the query region.
  • The search regions automatically include a Go button. In addition, the Advanced search region includes a Clear button.
  • OA Framework automatically executes the underlying search when the user selects the Go button. However, developers must explicitly define mappings between items in the Search panel and items in the table region.
3] none
  • The Search regions are rendered based on the Simple Search and Advanced Search regions that you define and specify as named children of the query region.
  • You must implement your own Go button in this mode.
  • The underlying search must be executed by the developer.