Everyone who has an experience of setting up a Set of Books would have come across the 3 C’s, Calendar, Currency and Chart of Accounts. For creating Chart of Accounts we will create segments and value sets for each of the segments to hold value. Then we will enter the values for each and every value set.

The normal order/steps involved in creating a Chart of Account is:
1) Create Value Sets First
2) Create Structure and assign the value sets created
3) Assign Flexfield Qualifiers
4) Compile the Flexfield
5) Enter Values in to Value sets
6) Define Segment Qualifiers

Why the above order becomes standard, who suggested it, does oracle recommend this order ?
All materials and books says that Value sets are the container of values, one can create a value set then enter values and then attach to the Structure.

A question got raised in my mind as to why one must enters the value in to the value set after the flexfield is compiled, why not we can enter values in to value set as a second step, that is, as soon as we create a Value set ?
Have asked few who were on the field, they said there is no difference , you can enter values as and when you please.

But later one fine day, have found the logic why it was done like this way.

The logic is….

Every one knows that every value in a value set will have a Segment Qualifier.
Standard segment Qualifiers for all the segments will be ” Allow Posting” and ” Allow Budgeting” and for Natural Account segment the additional qualifiers will be ” Account Type” , “Control Account” and “Reconciliation Flag”.

How the system identifies that whether a segment is an normal segment or a natural accounting segment ?
System will identify it only based on the Flexfield Qualifier attached to that segment. There is no setup that is related to the value set alone for this identification.

“Which means that a Value set will show those segment qualifiers only when that value set is assigned to a Segment which holds natural account flexfield qualifier”

When we try to enter a Value for a value set which is created for holding accounting segment values, without creating the structure, the segment qualifiers will show only “Allow Posting and Allow Budgeting ” qualifiers and not the others, since there is no way that system can assume that this value set is created for an Accounting Purpose.

So the accepted methodology is to enter the value in to value sets after it has got assigned to a Structure.

What is Translation?
Foreign Currency translation is the process that restates functional currency account balances in another currency.
Translation converts balances from your functional currency to a foreign currency, you can translate both actual and budget balances. if you have average balance processing enabled the system can translate average balances as well.
Tranlation is frequently used to prepare financial reports for consolidation into global financial statements. It is also used in highly inflationary economies to produce reports in a more stable currency.

When do you run translation:
Translation should be run at the end of the period, after all transactions have been processed and reconciled.

How does the system transalte balances:
 Assets and liabilities  are translated by multiplying the YTD balance by the period end

How do I check that the translation has been carried out correctly?
Reconciliation of the Cumulative Translation Adjustment (CTA) Account:
1.Take the total of your P&L (Revenue and Expense) accounts and multiply this amount by the period average rate defined.
2.Take the total of assets and liabilities and multiply this amount by the period end rate.
3.Take the total of your retained earnings and use the historical amount or multiply by historical rate (whichever way you have defined it).
4.Add 1,2 and 3 together. This should equal the amount in your translation adjustment account.
5.Make sure no other entries have been made to the account. If there has been, they would have to be reversed in order to reconcile the amount.

Translation using Historical Amounts.?
In some situations, you may want to use Historical Amounts to translate certain accounts. However, when Historical Amounts are used in the very first period ever translated, this creates a large Rate Adjustment for the same amount which distorts the Cumulative Translation Adjustment account.
The translation code cannot distinguish between how much of the Historical Amount defined is attributable to the Beginning Balance and how much is attributable to rate fluctuation in the period, so the entire amount is thrown into the Rate Adjustment bucket.
For example, in the first period ever translated where there is no period activity for the account, when you use Historical Amounts, you may see:
Beginning Translated Balance = zero.
Rate Adjustment = the Historical Amount defined.
Ending Translated Balance = the Historical Amount defined.
By definition, when translating on YTD basis, the Historical Amount defined is equal to the YTD Translated Balance. You would like to know how to correct the situation so that you do not have a large Rate Adjustment in the first period translated.
The workaround is to “back into” an Historical Rate, based on the Historical Amount that you want to achieve for the period. You should use this Historical Rate in the first period ever translated, then in the subsequent months use the appropriate Historical Amount. This eliminates the large Rate Adjustment in the first period ever translated.
Does the Translation of Owner’s Equity Accounts comply with FASB 52?
The profile option GL: Owner’s Equity Translation Rule should be set PTD to comply with FASB 52.
Set to PTD:
Ending Translated balance = Beginning Translated Balance +
(Current month activity in Functional Currency * Current Month Historical Rate)
Set to YTD:
Translated Currency YTD = Functional Currency YTD * Rate
YTD translation of Owner’s Equity Accounts calculation does not take into account the historical rates that were in effect at the time of each transaction in the account.
How to change Translation from Historical to Period Rates?
1. Delete the historical rate from the Historical Rate Form.
(Note if you have a Prior Historical Rate – this will have to be deleted. You may have a prior historical rate if you deleted the historical rate and reran translation without purging the original translations using the original historical rate).
2. Define a period-end rate in the Period Rates form.
3. Purge translated balances to get rid of the original historical rate.
The amount used depends on whether the account to which the historical rate or amount applies is a revenue/expense, asset/liability, or owners’ equity account:
Revenue/Expense: The amount is treated as translated net activity for the period.
Asset/Liability: The amount becomes the YTD translated balance for the
account.
Owners’ Equity: If the profile option GL: Owners Equity Translation Rule is set
to PTD, the amount is treated as translated net activity for the period. If the profile
option is set to YTD, the amount becomes the YTD translated balance for the
owners’ equity account.
Restating Balances Previously Translated with the Year–to–Date Rule
Older versions of General Ledger always translated owners’ equity accounts using the
Year–to–Date rule. If you subsequently switch to the Period–to–Date rule, your owners’ equity accounts will be translated using this rule for new translations only. Previously translated owners’ equity balances will not change. If you wish, you can restate your previously translated owners’ equity balances.
To restate your previously translated owners’ equity balances using the Period–to–Date rule:
1. Purge the old translated balances for each period to be restated.
2. Change the GL: Owners Equity Translation Rule profile option to PTD.
3. For each period to be restated, use the Historical Rates window to delete the rates used to translate owners’ equity accounts, as follows:
— Retained Earnings: Delete any non–historical rates.
— Other Owners’ Equity accounts: Delete any period rates.
4. Run translation. Your owners’ equity balances will be translated using the PTD rule.
Note: If you change a period rate after you’ve already run translation, you mustretranslate your account balances for the period whose rate has changed.
Prior: General Ledger uses the most recently entered historical rate or amount for
your balance sheet accounts, and assigns it the rate type Prior. If you have average
balance processing enabled, General Ledger rolls this historical rate or amount
forward using the rate type Prior.
Period: If you have never defined a historical rate or amount for an owners’
equity account, General Ledger uses:
The period– average rate if the profile option GL: Owners Equity Translation Rule is set to PTD.
The period-end rate if the profile option GL: Owners Equity Translation Rule is set to YTD.
Calculated: This rate type is only used when the profile option GL: Owners
Equity Translation Rule is set to YTD. It is only applicable to the first period of
your fiscal year. If you have never defined a historical rate or amount for your
retained earnings account, General Ledger calculates a rate and assigns it the rate
type Calculated.
Profile related to Translation:
GL: Owners Equity Translation Rule
Specify the rule General Ledger follows to translate owners’ equity accounts when you
have not entered specific historical rates or amounts.
The following values are available:
PTD: The Period-to-Date rule is used to translate owners’ equity accounts. For
each period for which you translate owners’ equity accounts, the historical rate is
set to the period-average rate.
YTD: The Year-to-Date rule is used to translate owners’ equity accounts. For
each period for which you translate owners’ equity accounts, the historical rate is
set to the period-end rate.
The default value for this profile option is PTD.
GL Transaltion : Revenue/Expense Translation Rule:
Revenue and Expenses are translated according to the GL Translation: Revenue/Expense Translation Rule Profile setting (PTD or YTD). If this is not set then Revenue and Expenses are translated by multiplying the PTD balance by the Period Average Rate
Purge, Transaltion and Retranslation:
Retranslation again will be done on the basis of the status column in the gl_translation_statuses table. If the status is current, there will be nothing that will be translated.
Translation will run in 2 phases. First phase gets the out of date records Translation Status – C.Here it translates only those records, which are out of date due to some adjustments.if it is the account adjustment all the foreign currencies need to be translated again. If it is a rate adjustment only that currency needs to be translated Second phase gets the records for periods, which have never been translated.
As an Example, if the Functional Currency is USD and translation is done into GBP, INR and CAD. If there is a change in the accounts in the functional currency, then Translation needs to be run for all the currencies. On the other hand, if there is a change in period rates or Historical Rate/ Amount for any currency, it will be sufficient if Translation is run for that particular currency.
Purge means Translation status for the period will always be Never Translated for the periods for which it is run. It will re-state the values in the gl_translation_tracking table. It essentially is translating every record whether or not that is current or out of date as the foreign currencies will not be there. In a way it can be said to be direct phase 2 of translation.
Running translation for the first time
You cannot translate in the first period in your calendar.
The first Consolidation must be performed as YTD not PTD for two reasons:
1.PTD will not generate a correct Opening Balance figure.
2.The Consolidation Journal maybe unbalanced by the amount of the CTA adjustment if there are Accounts defined with a Historic Conversion Rate.

Define recurring journal formulas for transactions that you repeat every accounting period, such as accruals, depreciation charges, and allocations. Your formulas can be simple or complex. Each formula can use fixed amounts and/or account balances, including standard, end-of-day, or average balances, actual or budget amounts, statistics, and period-to-date or year-to-date balances from the current period, prior period, or same period last year. You can quickly create new recurring formulas by copying and modifying existing formulas.
You can use recurring journals to create three types of journal entries:
Skeleton Journal Entries: Skeleton entries affect the same accounts each period, but have different posting amounts. After you generate skeleton journal entries, you can edit the unposted journal batch using the Enter Journals form and enter the journal line amounts.
Skeleton journal entries are useful with statistical information whenever you want to record journals for actual transactions based on statistical amounts, such as headcount, units sold, inflation rates, or other growth factors. For example, if you want to enter headcount for each cost center every period, you can define a skeleton entry with your headcount accounts. After you generate the skeleton entries, enter the actual headcount amounts before posting the batch. 
Standard Recurring Journal Entries: Standard recurring journal entries use the same accounts and amounts each period.
Recurring Journal Formula Entries: Formula entries use formulas to calculate journal amounts that vary from period to period.

        Important: If you use summary accounts in your recurring journals, General Ledger maintains references to those summary account templates, even if you delete then recreate the summary accounts.

        Open: In the Open status you can enter and post Journals.

        Closed: In this status Journal entry and posting not allowed until accounting period is reopened. Reporting and inquiry allowed.

        Permanently Closed: In this status Journal entry and posting not allowed. You cannot change this period status. Reporting and inquiry allowed. You can change the status.

        Never Opened: Journal entry and posting are not allowed. General Ledger assigns this status to any period preceding the first period ever opened in your
        calendar, or to any period that has been defined, but is not yet future-enterable. You cannot change this period status.

        Future-Entry: Journal entry is allowed, but posting is not. Your period is not yet open, but falls within the range of future-enterable periods you designated in the Set of Books window. You cannot change this period status without using the concurrent process to open the period.

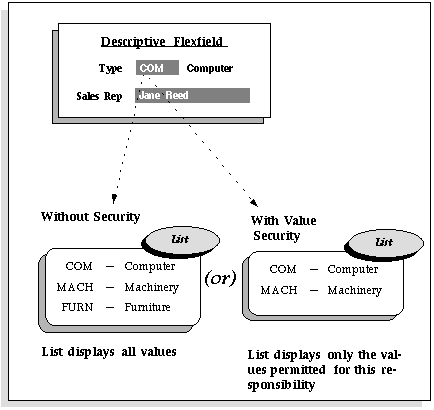
        Flexfield Value Security gives you the capability to restrict the set of values a user can use during data entry. With easy-to-define security rules and responsibility level control, you can quickly set up data entry security on your flexfield segments and
        report parameters.
        Flexfield Value Security lets you determine who can use flexfield segment values and report parameter values. Based on your responsibility and access rules that you define, Flexfield Value Security limits what values you can enter in flexfield pop-up windows and report parameters. Flexfield Value Security gives you greater control over who can use restricted data in your application. When you use Flexfield Value Security, users see only values they are allowed to use; restricted values do not appear in lists of values associated with the flexfield or report parameter.


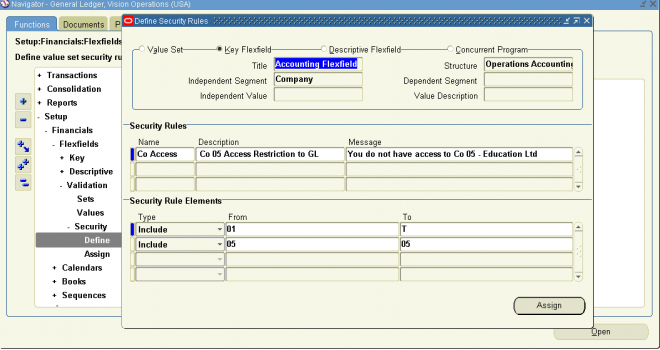
        To define security rules

        1. In the Segment Values block, identify the value set to which your values belong. You can identify your value set or by the flexfield segment or concurrent program parameter that uses the value set.
        2. In the Security Rule region, enter a name and description for your security rule.
        3. Enter a message for this security rule. This message appears automatically whenever a user enters a segment value that violates your security rule.
        4. Define the security rule elements that make up your rule.
        5. Save your changes.

        Security Rule Elements

        You define a security rule element by specifying a value range that includes both a low and high value for your segment. A security rule element applies to all segment values included in the value range you specify.
        You identify each security rule element as either Include or Exclude, where Include includes all values in the specified range, and Exclude excludes all values in the specified range. Every rule must have at least one Include rule element, since a rule automatically excludes all values unless you specifically include them. Exclude rule elements override Include rule elements.
        You should always include any default values you use in your segments or dependent value sets. If the default value is secured, the flexfield window erases it from the segment as the window opens, and the user must enter a value manually.
        If you want to specify a single value to include or exclude, enter the same value in both the Low and High fields.
        Minimum and maximum possible values
        The lowest and highest possible values in a range depend on the format type of your value set. For example, you might create a value set with format type of Number where the user can enter only the values between 0 and 100. Or, you might create a value set with format type of Standard Date where the user can enter only dates for the current year (a range of 01-JAN-2001 to 31-DEC-2001, for example). For example, if your format type is Char, then 1000 is less than 110, but if your format type is Number, 110 is less than 1000. The lowest and highest possible values in a range are also operating system dependent. When you use a Char format type for most platforms (ASCII platforms), numeric characters are “less” than alphabetic characters (that is, 9 is less than A), but for some platforms (EBCDIC platforms) numeric characters are “greater” than alphabetic characters (that is, Z is less than 0). The window gives you an error message if you specify a larger minimum value than your maximum value for your platform.
        If you leave the low segment blank, the minimum value for this range is automatically the smallest value possible for your segment’s value set. For example, if the value set maximum size is 3 and Right-justify and Zero-fill Numbers is checked, the minimum value is 000. However, if the value set has a maximum size of 3, has Numbers Only checked and Right-justify and Zero-fill Numbers unchecked, the minimum value is 0.
        If you leave the high segment blank, the maximum value for this range is automatically the largest value possible for your segment’s value set. For example, if the value set maximum size is 3 and Numbers Only is checked, the maximum value is 999. However, if the value set maximum size is 5, and Numbers Only is checked, the maximum value is 99999.
        Suggestion: Use blank segments to specify the minimum or maximum possible values for a range to avoid having operating system dependent rules.
        Note that security rules do not check or affect a blank segment value (null value).
        To define security rule elements
        1. In the Security Rule Elements block, select the type of security rule element. Valid types are:
        Include  Your user can enter any segment value that falls in the following range. 
        Exclude  Your user cannot enter any segment value that falls in the following range. 
        2. Enter the low (From) and high (To) ends of this value range. Your value does not have to be a valid segment value.
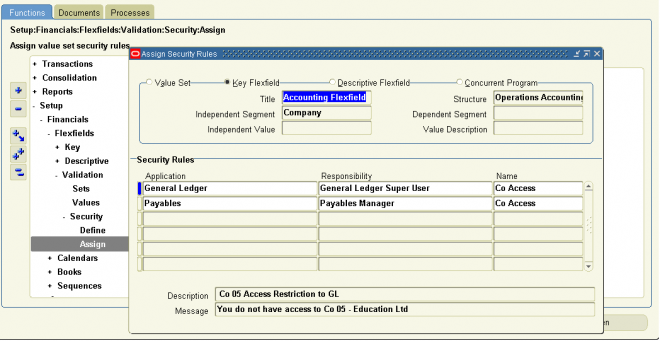
        Assign security rules

        1. Navigate to Assign Security Rules window.
        2. In the Assign Security Rules block, identify the value set to which your values belong. You can identify your value set or by the flexfield segment or concurrent program parameter that uses the value set.
        3. In the Security Rules block, enter the application and responsibility name that uniquely identifies the responsibility to which you want to assign security rules.
        4. Enter the name of a security rule you want to assign to this responsibility.
        5. Save your changes.