Similar to 11i & R12, You can create below transactions in fusion receivables
• Invoices and Debit Memos
• Credit Memos
• On-Account Credit Memos
• Chargebacks
• Adjustments
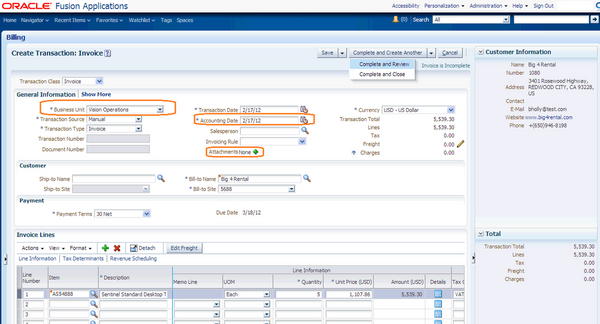
All the new fields in fusion application transaction form are outlined in the above pic.
Business unit: Similar to operating unit in 11/R12
Accounting Date: GL date in 11i
Attachment Note
Question : Where is the legal entity information ?
Click on more and navigate to miscellaneous tab to verify the other details

The RA_CUSTOMER_TRX table stores invoice, debit memo and credit memo header information. Each of these transactions is stored as a unique record, based on the primary key customer_trx_id. The transaction number, transaction date and billing customer are stored in the trx_number, trx_date and bill_to_customer_id columns respectively.
The RA_CUSTOMER_TRX_LINES table stores invoice, debit memo and credit memo line level information. Each transaction line is stored as a unique record, based on the primary key customer_trx_line_id column. The customer_trx_id column is a foreign key to the RA_CUSTOMER_TRX table.
The AR_PAYMENT_SCHEDULES table stores customer balance information at the transaction level. Each transaction balance is stored as a unique record, based on the primary key payment_schedule_id. The class column identifies the transaction type and determines which columns Receivables updates when a transaction is stored.

I tried to explain the steps involved in Procure to Pay Cycle. This is a pure functional Stuff and helps you to understand the navigation steps.
I tried to keep as simple as Possible for clear understanding. The screenshots given below are taken from R12.1.1 apps instance.
Stage 1: Choosing an Item
Let us choose an item to be procured in our example.
Go to Purchasing Responsibility and follow the below navigation to check for the suitable item.
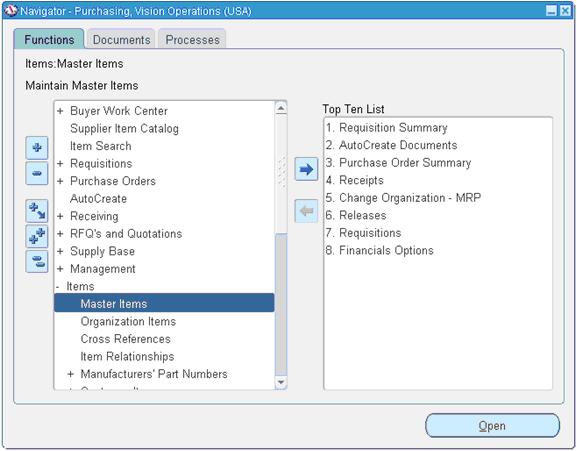
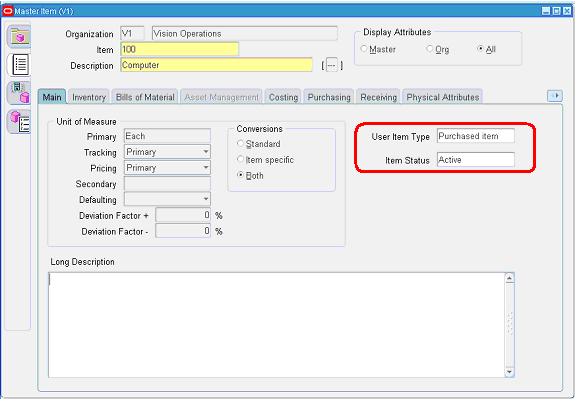
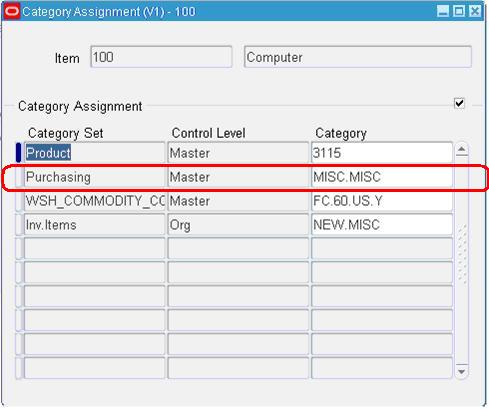
The item picked for our example should be purchasable item as above. Click on tools and choose “Categories” to view the below screen.
Stage 2: Creation of Requisition
Follow the below Navigation to reach Requisition Form.
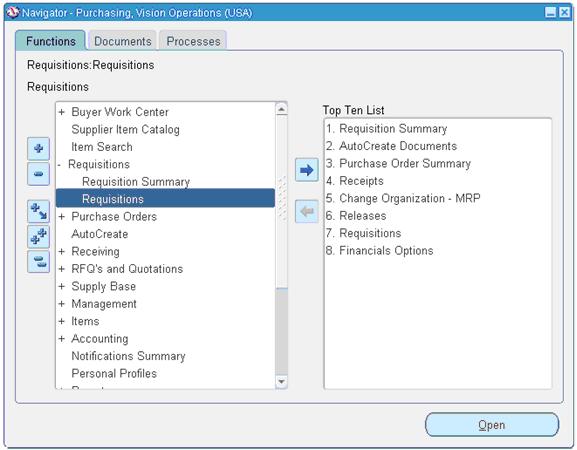
Create a new Requisition for the item viewed in Stage 1.

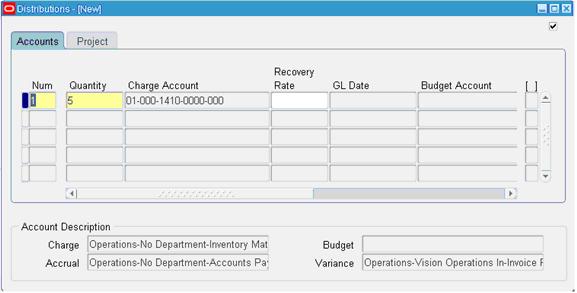
Click on Distributions to View the charge Account.
Save and Submit for Approval
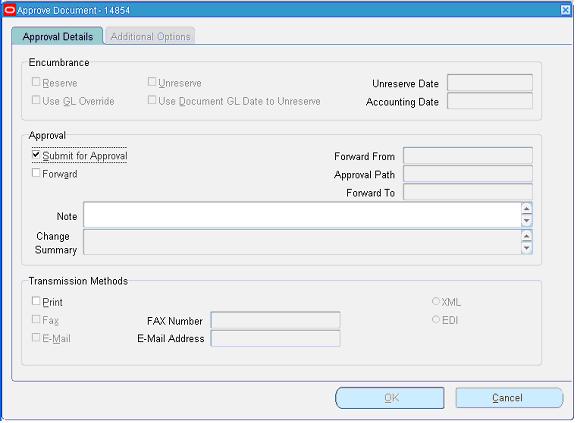
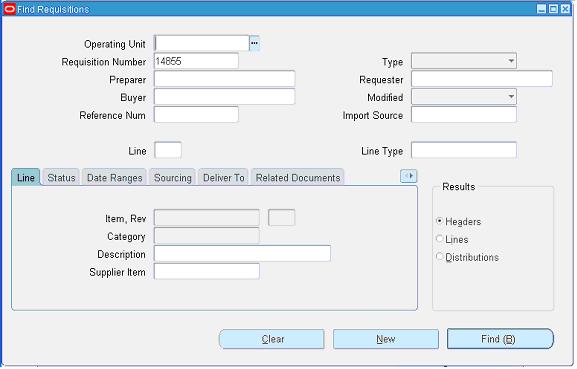
Now note down the Requisition number and open the “Requisition Summary Form” to view the status of it. For our Example, Requisition number is: 14855

Stage 3 : Checking the Status of Requisition

Query for the Requisition Number and click Find.
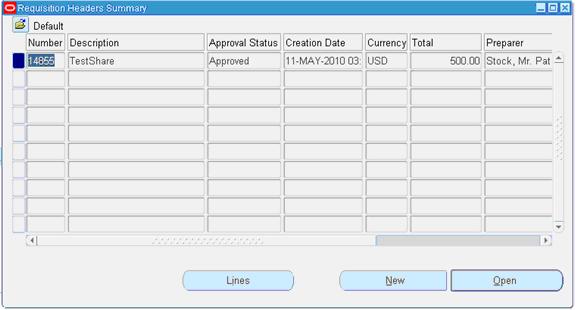
Here for our example purpose, I kept the submitted and approved person has same and hence it shows the status as approved.
To see the approval status, please follow the below navigation.
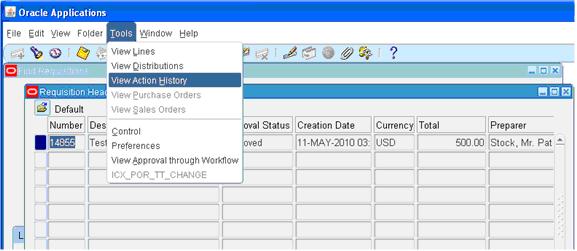
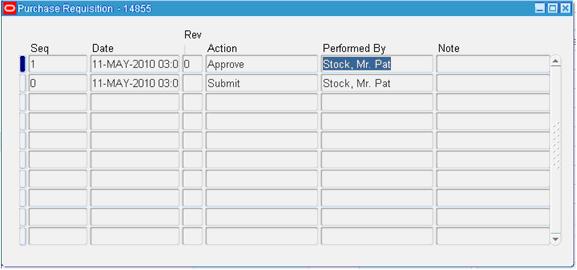
Stage 4 : Creation of Purchase Order
For creating a Purchase order, let us use the “Autocreate Documents” Form. Follow the below Navigation
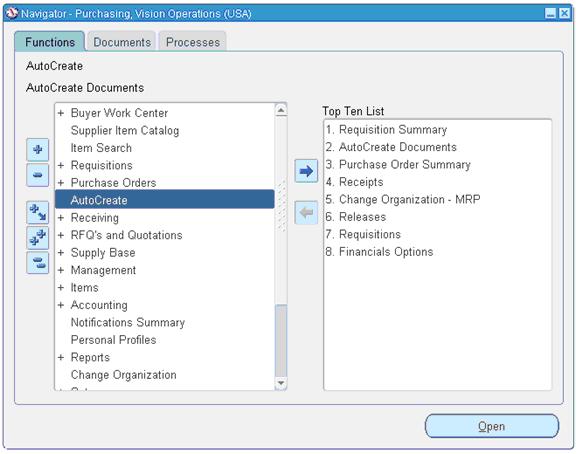

Query for the Requisition
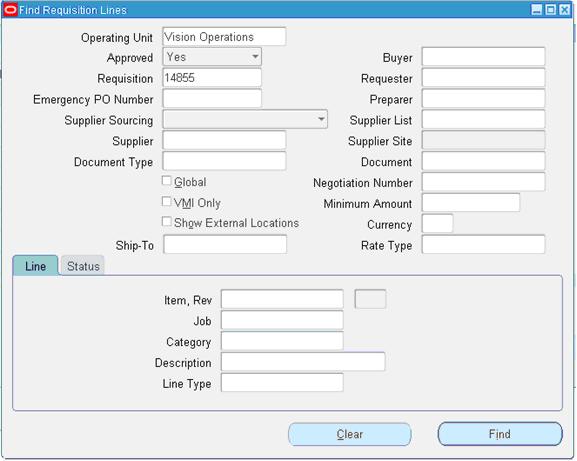
Click on Automatic as shown in the above figure to create a Purchase Order

Click on “Create” button to create a Purchase order
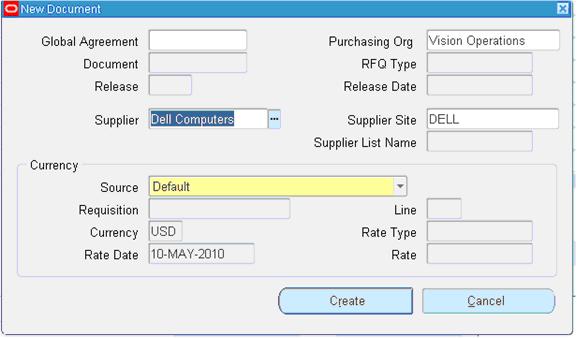
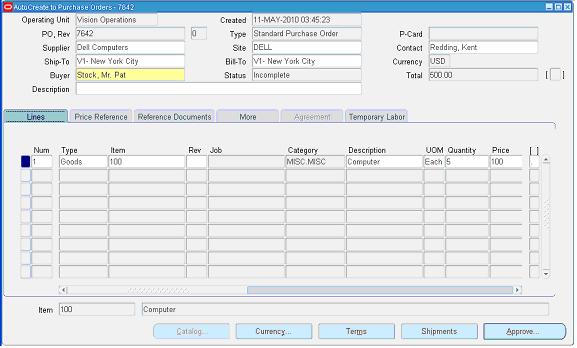
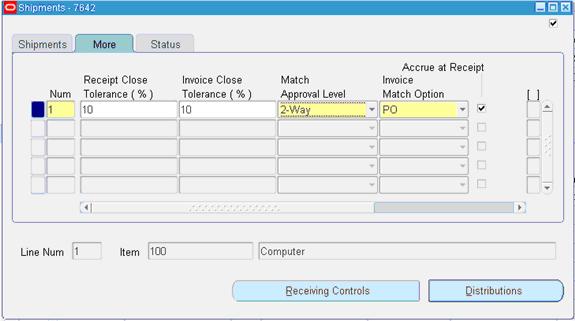
View the shipment screen to change the “Match Approval Level” to “2-Way”.
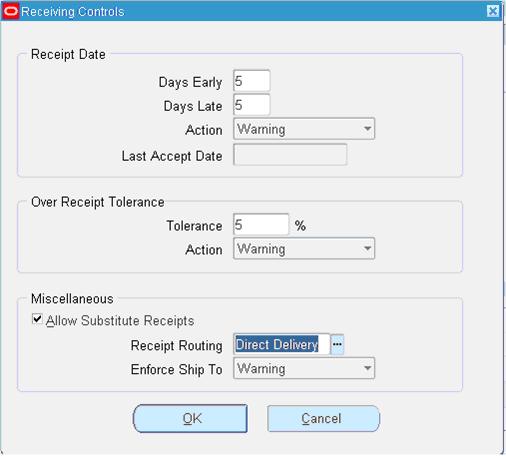
Click the “Receiving Controls” to make sure that the “Routing” is made as “Direct Routing”
Click Save and submit for Approval.
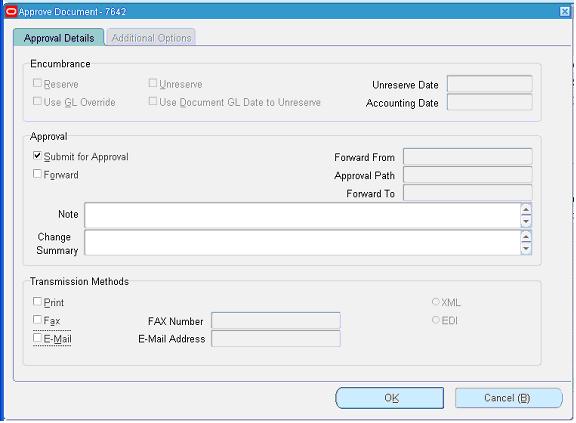
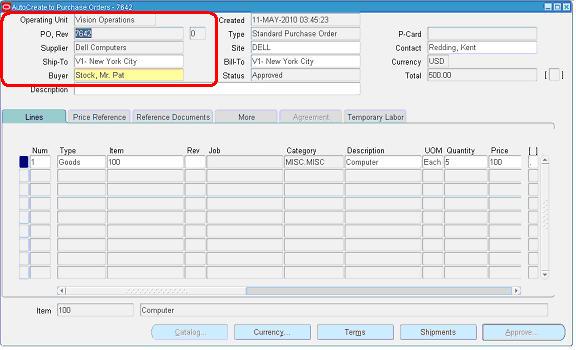
Note down the PO Number.

Stage 5: Creation of Receipts
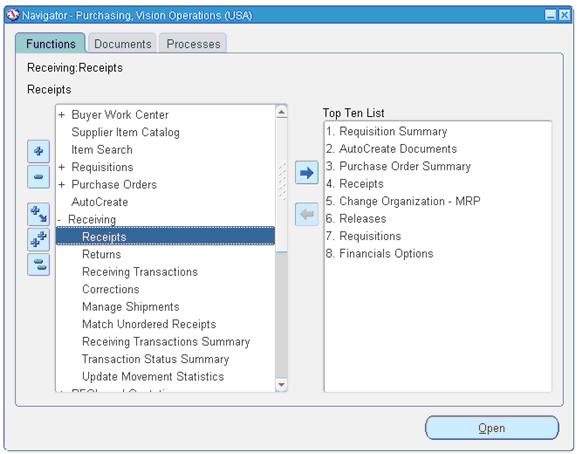

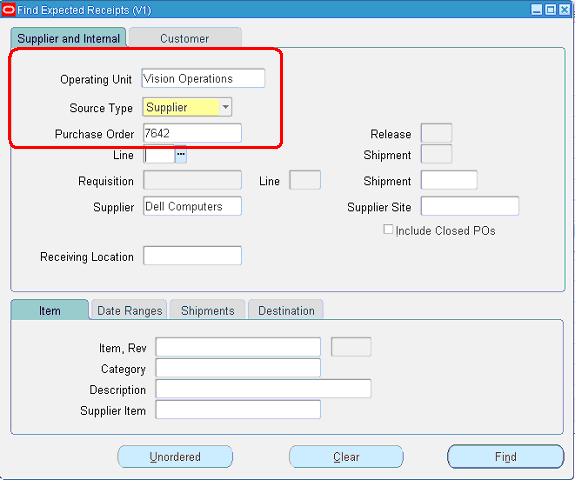
Query with the Purchase order created in the above stage.
Check the check box near to the lines that are received and click save.
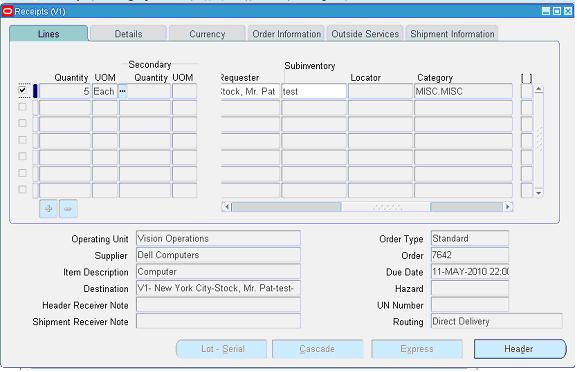
Click the “Header Button” to view the Receipt Number.

Stage 6: Checking the On Hand
Go to any Inventory Responsibility and follow the below Navigation
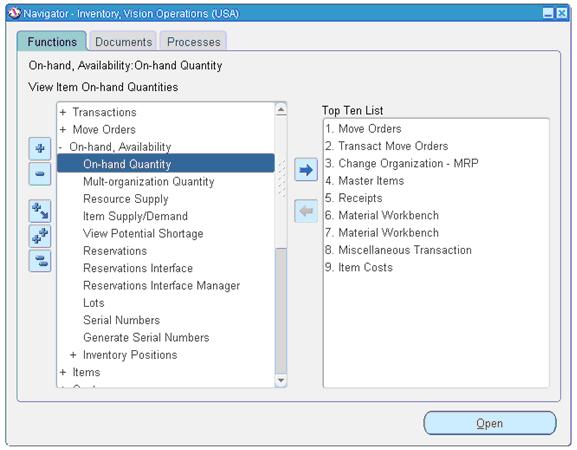
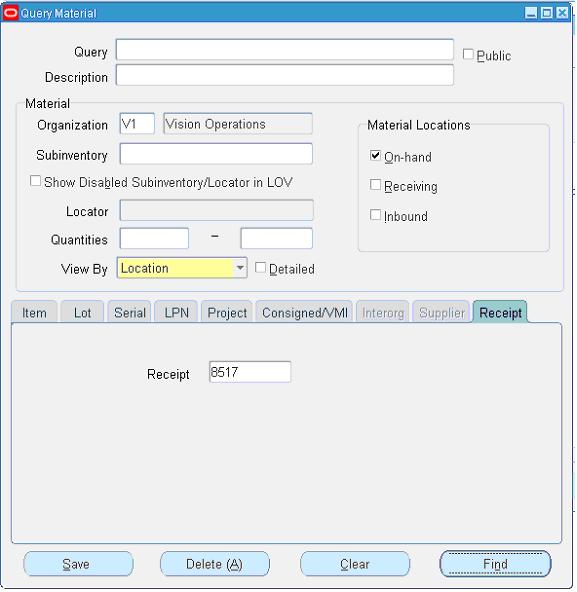
Query for our Receipt and make sure the Organization is the same as we received.
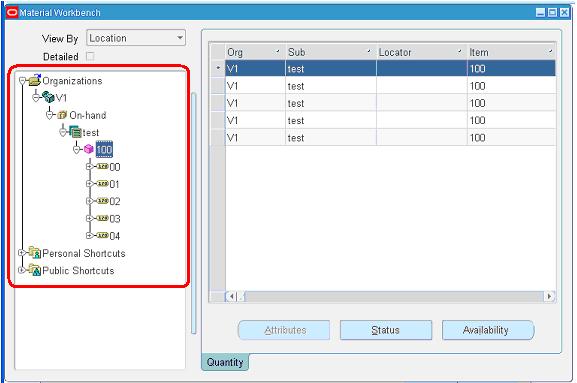
Below screen will show that our inventory has been increased by 5 quantities.
Stage 7: Check the Material Transactions
Follow the below Navigation to reach “Material Transactions” Form


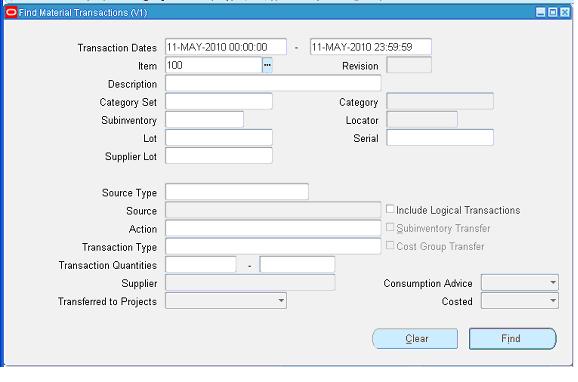
Query for the item and date as below

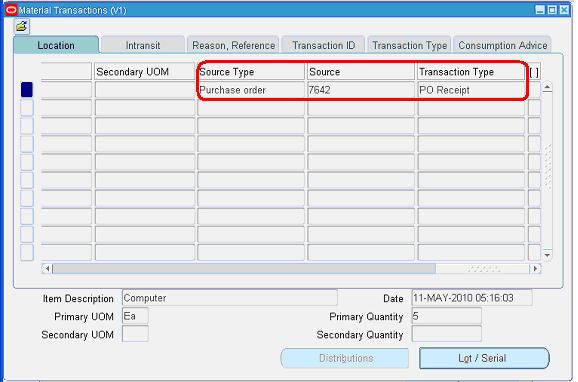
Below screen shows the source and transaction Type
Below screen shows you the Serial Numbers of the items received.

Stage 8: Creation of Invoice
Navigate to any Purchasing Responsibility and view à Requests
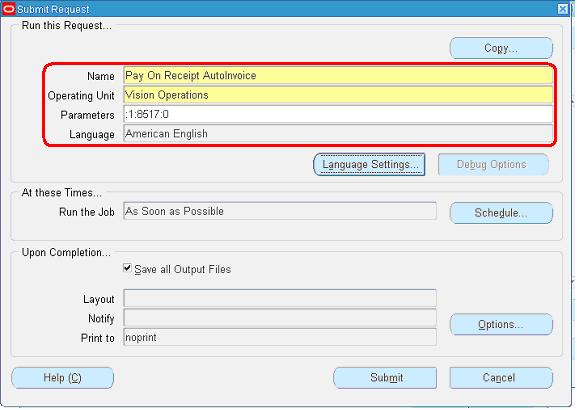
Submit the below requests by providing the Receipt number as Parameter to create an invoice.
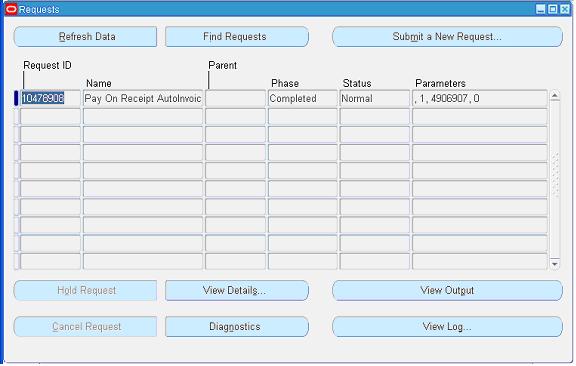
Check the status of the program.
Stage 9: Checking the Invoice
Change to any Payables Responsibility and open the invoices Form.
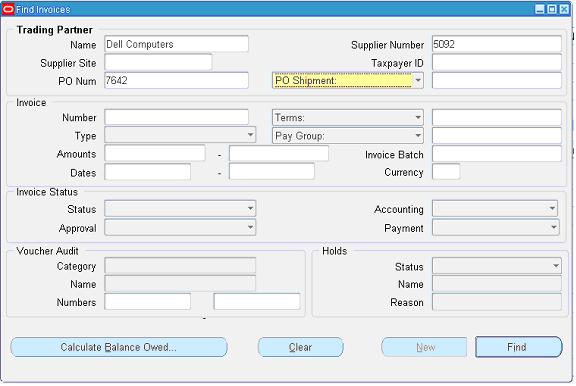
Query for the Purchase order as below,
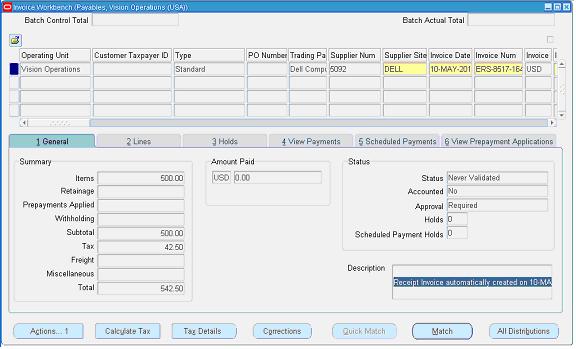
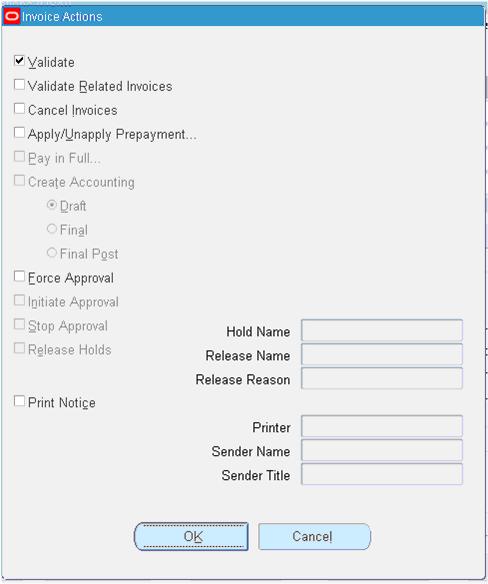
Click “Actions” Button then tick the “Validate Check Box” and press “Ok” to validate the invoice
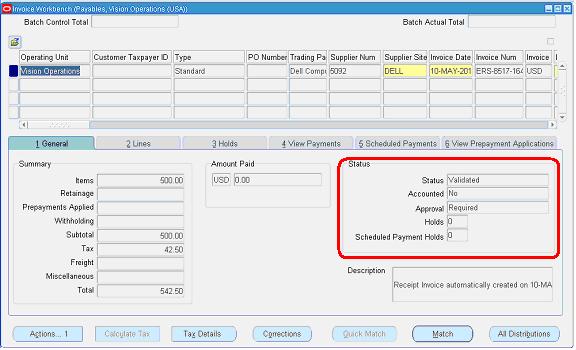
Below screenshot will give you the status of the invoice
Stage 10: Creation of Accounting and Payment
Once invoice got approved, we can “Create Accounting” and “Create Payments” via “Action” Button in the “Invoice Form” as we validated the invoice.
AP_SUPPLIERS:

  • This table replaces the old PO_VENDORS table.
  • It stores information about your supplier level attributes.
  • Each row includes the purchasing, receiving, invoice, tax, classification, and general information.
  • Oracle Purchasing uses this information to determine active suppliers.
  • The supplier name, legal identifiers of the supplier will be stored in TCA and a reference to the party created in TCA will be stored in AP_SUPPLIERS.PARTY_ID, to link the party record in TCA.

AP_SUPPLIER_SITES_ALL:

  • This table replaces the old PO_VENDOR_SITES_ALL table.
  • It stores information about your supplier site level attributes.
  • There is a row for unique combination of supplier address, operating unit and the business relationship that you have with the supplier.
  • The supplier address information is not maintained in this table and is maintained in TCA. The reference to the internal identifier of address in TCA will be stored in AP_SUPPLIER_SITES_ALL.LOCATION_ID, to link the address record in TCA.
  • Each row includes the supplier reference, purchasing, invoice, and general information.

AP_INVOICES_ALL:

  • It contains records for invoices you enter.
  • There is one row for each invoice you enter.
  • An invoice can have one or more invoice distribution lines and can have one or more scheduled payments.  

AP_INVOICE_LINES_ALL:

  • It contains records for invoice lines entered manually, generated automatically or imported from the Open Interface.
  • An invoice can have one or more invoice lines.
  • An invoice line represents goods (direct or indirect materials), service(s), and/or associated tax/freight/miscellaneous charges invoiced from a supplier.
  • An invoice line should contain all the attributes that are present on the physical or electronic invoice presented by the supplier.

AP_INVOICE_DISTRIBUTIONS_ALL:

  • It holds the distribution information that is manually entered or system-generated.
  • There is one row for each invoice distribution and a distribution must be associated with an invoice.
  • An invoice can have multiple distributions.

AP_INVOICE_PAYMENTS_ALL:

  • It contains records of invoice payments that you made to suppliers.
  • There is one row for each payment you make for each invoice and there is one payment and one invoice for each payment in this table.
  • Oracle Payables application updates this table when you confirm an automatic payment batch, enter a manual payment, or process a Quick payment.
  • When you void a payment, your Oracle Payables inserts an additional payment line that is the negative of the original payment line.

AP_PAYMENT_SCHEDULES_ALL:

  • This table stores information about scheduled payment information on invoices.

AP_PAYMENT_HISTORY_ALL:

  • It stores the clearing/unclearing history for payments.
  • It also stores the maturity history for future dated payments.
  • The table contains a row for each future dated payment, once the future dated payment matures, i.e. becomes negotiable.
  • Any time a payment is cleared or uncleared, a row is inserted into this table for the payment.

AP_BATCHES_ALL:

  • It contains summary information about invoices you enter in batches if you enable the Batch Control Payables option.
  • There is one row for each batch of invoices you enter.
  •  If you enable Batch Control, each invoice must correspond to a record in this table.
  •  Your Oracle Payables application uses this information to group together invoices that one person entered in a batch.

AP_CHECKS_ALL:

  • It stores information about payments issued to suppliers or refunds received from suppliers. 
  • There is one row for each payment you issue to a supplier or refund received from a supplier.
  • Oracle Payables application uses this information to record payments you make to suppliers or refunds you receive from suppliers.
  • Oracle Payables application stores the supplier name and bank account name for auditing purposes, in case either one is changed after you create the payment. Oracle Payables application also stores address information for all payments.

AP_HOLDS_ALL:

  • It contains information about holds that you or your Oracle Payables application place on an invoice.
  • For non-matching holds, there is one row for each hold placed on an invoice. For matching holds, there is one row for each hold placed on an invoice-shipment match.
  • An invoice may have one or more corresponding rows in this table.
  • Your Oracle Payables application does not pay invoices that have one or more unreleased holds recorded in this table.

AP_BANK_ACCOUNTS_ALL:

  • It contains information about your bank accounts.
  • There is one row for each bank account you define and each bank account must be affiliated with one bank branch.

AP_BANK_ACCOUNT_USES_ALL:

  • It stores information for the internal and external bank accounts you define in Oracle Payables and Oracle Receivables applications.

AP_CARDS_ALL:

  • It stores information about the corporate credit cards issued to your employees by your corporate credit card providers.

AP_TRIAL_BALANCE:

  • It contains denormalized information about invoices and payments posted to the accrual set of books.
This interface helps us to import vendor invoices into Oracle applications from external systems into Oracle Applications.

Interface tables: 

1] AP_INVOICES_INTERFACE
This is the open interface table for importing AP Invoices from external sources and stores header information about invoices. Invoice data comes from sources including:

  • EDI invoices from suppliers that are loaded through Oracle e-Commerce Gateway
  • Supplier invoices that are transferred through the Oracle XML Gateway
  • Invoices that are loaded using Oracle SQL*Loader
  • Lease invoices from Oracle Property Manager
  • Lease payments from Oracle Assets
  • Credit card transaction data that are loaded using the Credit Card Invoice Interface Summary
  • Expense Report invoices from Oracle Internet Expenses
  • Payment Requests from Receivables
  • Invoices that are entered through the Invoice Gateway.

There is one row for each invoice you import. Oracle Payables application uses this information to create invoice header information when Payables Open Interface program is submitted.
Data in the AP_INVOICES_INTERFACE table used in conjunction with AP_INVOICE_LINES_INTERFACE table to create Payables Invoice, Invoice lines, Distributions and Schedule payments. Data in this table can be viewed and edited using ‘Open Interface Invoices’ window. The Payables Open Interface program validates each record in this interface table selected for import, and if the record contains valid data then the program creates a Payables Invoice.

Important columns: 
INVOICE_ID (Required) : Unique identifier for this invoice within this batch. Same value should be populated in invoice’s lines in the AP_INVOICE_LINES_INTERFACE table to identify the data as belonging to the same invoice.
INVOICE_NUM (Required) :  Enter the invoice number that needs to be assigned to the invoice created in Payables from this record.
INVOICE_TYPE_LOOKUP_CODE (Optional) : Type of invoice: Credit or Standard.
INVOICE DATE (Optional) : Date of the invoice. If you do not enter a value, the system uses the date you submit Payables Open Interface Import as the invoice date.
PO_NUMBER (Optional)  : Purchase order number from PO_HEADERS.SEGMENT1. This column needs to be populated if invoice to be matched with an purchase order.
VENDOR_ID & VENDOR_SITE_ID (Required) : VENDOR_ID is unique identifier for a supplier and VENDOR_SITE_ID is Internal supplier site identifier. Supplier of the invoice to be derived by value in one of the following columns in this table: VENDOR_ID, VENDOR_NUM, VENDOR_NAME, VENDOR_SITE_ID or PO_NUMBER.
VENDOR_NUM & VENDOR_NAME (Optional) : Supplier number and name. You must identify the supplier by entering a value for one of the following columns in this table: VENDOR_ID, VENDOR_NUM, VENDOR_SITE_ID, VENDOR_SITE CODE, or PO_NUMBER.
INVOICE_AMOUNT (Required) : Amount of the invoice.
INVOICE_CURRENCY_CODE (Optional)  : Currency code for the invoice. If you want to create foreign currency invoices, enter a currency code that is different from your functional currency.
EXCHANGE_RATE (Optional) :  This column is required if you enter a foreign currency code in the INVOICE_CURRENCY_CODE column and you enter User as the EXCHANGE_RATE_TYPE.
TERMS_ID (Optional) : Internal identifier for the payment terms.
DESCRIPTION (Optional) : Enter the description that you want to assign to the invoice created from this record.
SOURCE (Required) : Source of the invoice data. If you import EDI invoices from the Oracle EDI Gateway, the source is EDI Gateway. For invoices you import using SQL*Loader, use a QuickCode with the type Source that you have defined in the QuickCodes window in Payables.
2] AP_INVOICE_LINES_INTERFACE
This is the lines interface table for the AP Invoice Open Interface and it is used in conjunction with AP_INVOICE_INTERFACE table. AP_INVOICE_LINES_INTERFACE stores information used to create one or more invoice distributions. Note that one row in this table may create, during the import process, more than one invoice distribution.
Important columns: 
INVOICE_ID (Required) :Enter the INVOICE_ID of the corresponding invoice in the AP_INVOICES_INTERFACE table. 
INVOICE_LINE_ID : This value is not required. You can enter a unique number for each invoice line of an invoice.
LINE_NUMBER (Optional) : You can enter a unique number to identify the line.
LINE_TYPE_LOOKUP_CODE (Required) : Enter the lookup code for the type of invoice distribution that you want Payables Open Interface Import to create from this record. The code you enter must be ITEM, TAX, MISCELLANEOUS, or FREIGHT. These lookup codes are stored in the AP_LOOKUP_CODES table.
AMOUNT (Required) : The invoice distribution amount. If you are matching to a purchase order, the AMOUNT = QUANTITY_INVOICED x UNIT PRICE. If the total amount of all the invoice distributions does not equal the amount of the invoice that has the same INVOICE_ID, then Payables Open Interface Import will reject the invoice.

Concurrent program:  

Payables Open Interface Import
Parameters:
Source: Choose the source of the invoices from the list of values. Use EDI Gateway, Credit Card, or a Source type QuickCode you defined in the Payables QuickCodes window.
Group: To limit the import to invoices with a particular Group ID, enter the Group ID. The Group must exactly match the GROUP_ID in the Payables Open Interface tables.
Batch Name: Payables groups the invoices created from the invoices you import and creates an invoice batch with the batch name you enter. You can enter a batch name only if you have enabled the Use Batch Control Payables option, and if you have enabled the Use Batch Control Payables option, you must enter a batch name. If you use a batch name and some invoices are rejected during the import process, you can import the corrected invoices into the same batch if you enter the exact batch name during the subsequent import.
Hold Name: If you want to place all invoices on hold at the time of import, enter an Invoice Hold Reason. You can define your own hold reasons in the Invoice Approvals window.
Hold Reason: Payables displays the Invoice Hold Reason Description.
GL Date: If you want to assign a specific GL Date to all invoices, enter a GL Date. If you do not enter a value here, the system will assign a GL Date based on the GL Date Payables option.
Purge: Enter Yes if you want Payables to delete all successfully imported invoice records that match the Source and Group ID of this import. Payables does not delete any invoice data for which it has not yet created invoices. If you want to purge later, you can use the Payables Open Interface Purge Program.
 Steps:
1] Firstly, let’s get a unique number to be used as INVOICE_ID to the invoice to be imported.  This method ensures that each invoice has a unique INVOICE_ID assignment.
 select ap_invoices_interface_s.nextval from dual;
NEXTVAL
————-
132277

 2] Then, create records in the Invoice Open Interface tables through SQL queries.

insert into AP_INVOICES_INTERFACE (
            invoice_id,
            invoice_num,
            vendor_id,
            vendor_site_id,
            invoice_amount,
            INVOICE_CURRENCY_CODE,
            invoice_date,
            DESCRIPTION,
            PAY_GROUP_LOOKUP_CODE,
            source,
            org_id
                )
values (
            132277,
            ‘INV100’,
            ‘7124’,
            ‘11792’,
            1200.00,
            ‘USD’,
            to_date(’01-31-2010′,’mm-dd-yyyy’),
            ‘This Invoice is created for test purpose’,
            ‘WUFS SUPPLIER’,
            ‘Manual Invoice Entry’,
            81
);

insert into AP_INVOICE_LINES_INTERFACE (
            invoice_id,
            line_number,
            line_type_lookup_code,
            amount
            )
values     (
            132277,
            1,
            ‘ITEM’,
            1200.00
);
3] You can go to Payables > Invoices > Entry > Open Interface Invoices to check the details of Invoice and Invoice Lines from the front end. If required you can do any modifications here. Alternatively you can use these forms to put invoice data in AP_INVOICES_INTERFACE and AP_INVOICE_LINES_INTERFACE tables.
4] Go to the front end and run the concurrent program “Payables Open Interface Import”  to submit a request for Invoice Import.

Output:

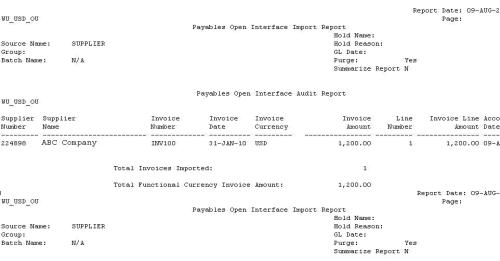
output of Payables Open Interface Import

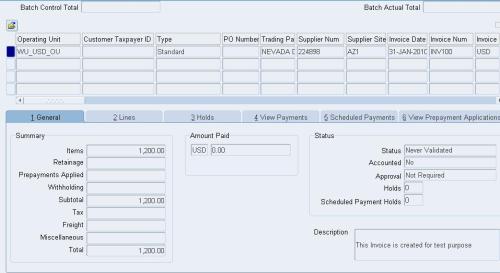
5] The imported invoice becomes available for review in Invoices Workbench.

Interface Invoice through Invoice Bench

Procure to Pay Lifecycle is one of the important Process in Oracle Applications. Procure to Pay means Procuring Raw Materials required to manufacture the final or finished Goods from a Supplier to Paying the Supplier from whom the material was purchased. But this process is not just two steps. It involves many steps. Let’s see the steps and Oracle Application involved in performing those steps.

1.Creation Of Purchase Requisition
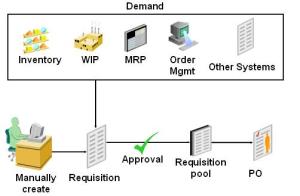
Requisition is nothing but a formal request to buy something. Requisitions represent the demand for any goods or services that an organization needs.

Requisitions for goods and services:

  • Are generated by applications including Inventory, Work in Process (WIP), Material Requirements Planning (MRP) and Order Management.
  • May be entered manually through Purchasing windows.
  • May be entered using iProcurement.
  • May be imported from external systems.

There are two types of Requisitions
1] Internal Requisition – Basically used when there is a Requirement from One Inventory Organization to the Other Inventory Organization (Inter- Organization Transfer)
2] Purchase Requisition – Basically used when there is a Requirement to be fulfilled by External Sources i.e. Suppliers, Requirement from MRP, Requirement from WIP, Requirement from Sales Order etc.
With Oracle Purchasing module, you can create, edit, and review requisition information on-line.  Then the Requisitions went for approvals from proper authorities.
2. Creation of Purchase Order
Based on the Purchase Requisition and its approval next we have to create a Purchase order to buy the item.

Purchasing supports four types of purchase orders:
1] Standard: Create standard purchase orders for one-time purchases of various items. You create standard purchase orders when you know the details of the goods or services you require, estimated costs, quantities, delivery schedules, and accounting distributions.
2] Blanket: Create blanket purchase agreements when you know the detail of the goods or services you plan to buy from a specific supplier in a period, but you do not yet know the detail of your delivery schedules.
3] Contract: Create contract purchase agreements with your suppliers to agree on specific terms and conditions without indicating the goods and services that you will be purchasing.
4] Planned: A planned purchase order is a long-term agreement committing to buy items or services from a single source. You must specify tentative delivery schedules and all details for goods or services that you want to buy, including charge account, quantities, and estimated cost.
Once purchase orders are created, they may be submitted for approval. The approval process checks to see if the submitter has sufficient authority to approve the purchase order.  Once the document is approved, it may be sent to your supplier using a variety of methods including: printed document, EDI, fax, e-mail, iSupplier Portal and XML. Once the purchase order or release is sent to your supplier, they are authorized to ship goods at the times and to the locations that have been agreed upon.
3. Receipt of Material
After receiving the PO, the supplier will send the items.

Purchasing lets you control the items you order through receiving, inspection, transfer, and internal delivery. You can use these features to control the quantity, quality, and internal delivery of the items you receive.
4. Creation of Payables Invoice
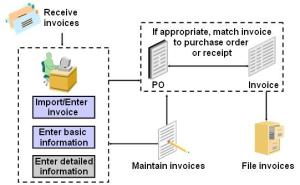
Once you’ve received goods or service from your supplier, you’ll also receive an invoice.  Using Payables you can record invoices in a number of different ways.

With Payables you can:

  • Import/Enter invoices manually, either individually or in batches.
  • Use Quick Invoices for rapid, high-volume entry of standard invoices and credit memos that are not complex and do not require extensive online validation.
  • Automate invoice creation for periodic invoices using the Recurring Invoice functionality.
  • Use iExpenses to enter employee expense reports using a web browser.
  • Import EDI invoices processed with the e-Commerce Gateway.
  • Import XML invoices.
  • Match invoices to purchase orders or receipts to ensure you only pay what you’re supposed to be paying for.

5. Payment to Supplier
Once invoices are validated, they can be paid. Payables integrates with Oracle Payments, the E-Business Suite payment engine, to handle every form of payment, including checks, manual payments, wire transfers, EDI payments, bank drafts, and electronic funds transfers.  Payables also integrates with Oracle Cash Management to support automatic or manual reconciliation of your payments with bank statements sent by the bank.
This is how the P2P Cycle occurs in Oracle Apps.