-
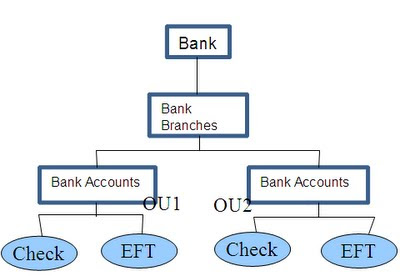
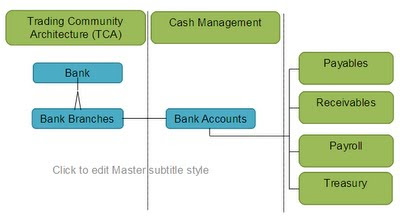
There is a central place to define internal bank accounts. So with centralized user interface, users can reduce the number of access points to manage bank accounts
-
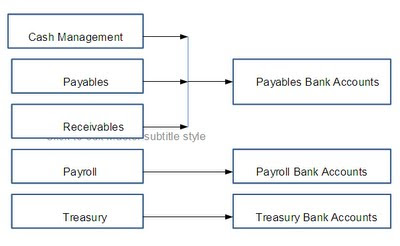
With the help of Multi-Org Access Control, we can explicitly grant account access to multiple operating units/functions and users, which improves the visibility and control of bank accounts
-
A single Legal Entity is granted ownership of each internal bank account and One or more Organizations are granted usage rights. So, a single bank statement can be reconciled across multiple Operating Units, which helps to simplify reconciliation process.
-
Reconciliation options can now be defined at the bank account level, which provides more flexibility and control to the reconciliation process.
CE_BANK_ACCOUNTS Contains Legal Entity Level bank account information. Each bank
CE_BANK_ACCT_USES_ALL Stores Operating Unit level bank account use information.
CE_PAYMENT_DOCUMENTS Stores payment Documents to be used for Printed type Payments
CE_BANK_BRANCHES_V View: Bank/Branches Info
CE_BANK_ACCT_USES_OU_V View: Internal Bank Account Uses Info
AP_BANK_BRANCHES
AP_BANK_ACCOUNTS_ALL
AP_BANK_ACCOUNTS_USES_ALL
1. Navigate to Suppliers -> Entry.
2. Query or create your supplier.
3. Click on Banking Details and then choose Create.
After creating the bank account, we can assign the bank account to the supplier site.
Benefits of Cash Pooling Techniques:
– Minimizes the idle funds by consolidating balances
– Helps to decrease external borrowing costs and increase investment returns
– Allows users to group bank accounts into pooling structures to manage funds effectively
Oracle supports following types of cash pools:
1. Self-Initiated Physical Cash Pools:
When Organizations want to monitor individual bank account balances manually and then physically move cash to or from their accounts based on their preferences, Self-Initiated Physical Cash Pools structure can be used.
We can define the rules in pool definitions, to automatically determine when bank account transfers should be made and for what amounts.
2. Bank-Initiated Physical Cash Pools, or Zero Balance Accounts(ZBA’s):
Bank-Initiated Physical Cash Pools are used When Organizations want to sweep all end-of-day balances automatically to or from the main accounts.
This kind of services will leave zero balances at the end of way. That is the reason, Bank-Initiated Physical Cash Pools are often called as Zero Balance Accounts.
3. Notional Cash Pools:
If Organizations want to track the net balances across all accounts along with individual accounts, then Notional Cash Pools will be used.
In 11i, this functionality was available to Oracle Treasury users, but now it is supported by Oracle Cash Management in R12.
1. Order Entry
This is first stage, When the order is entered in the system, it creates a record in order headers and Order Lines table.
Enter header details: Once you enter details on the order header and save it or move it to lines, record goes to one table oe_order_headers_all flow_status_code = ENTERED, booked_flag = N), Primary key=HEADER_ID
No record exist in any other table for this order till now.
Enter Line details for this order: Enter different item numbers, quantity and other details in line tab. When the record gets saved, it goes to one table. Order header details will be linked with line details by order HEADER_ID. oe_order_lines_all (flow_status_code = ENTERED, booked_flag = N, open_flag = Y) Primary key= LINE_ID
2.Order Booking
This is next stage, when Order is booked then the Flow status changed from Entered to Booked. At this stage, these below table get affected.
oe_order_headers_alL (flow_status_code as BOOKED, booked_flag updated to Y)
oe_order_lines_all (flow_status_code as AWAITING_SHIPPING, booked_flag updated Y)
wsh_delivery_details (DELIVERY_DETAIL_ID is assigned here, released_status ‘R’ ready to release, LINE_ID comes as SOURCE_LINE_ID)
wsh_delivery_assignments (DELIVERY_ASSIGNMENT_ID is assigned for DELIVERY_DETAIL_ID present in wsh_delivery_details, DELIVERY_ID remains blank till this stage)
*In shipping transaction form order status remains “Ready to Release”.
At the same time, Demand interface program runs in background And insert into inventory tables mtl_demand, here LINE_ID come as a reference in DEMAND_SOURCE_LINE
3. Reservation
This step is required for doing reservations SCHEDULE ORDER PROGRAM runs in the background and quantities are reserved. Once this program get successfully get completed, the mtl_demand and mtl_reservations table get updated. LINE_ID gets updated in DEMAND_SOURCE_LINE_ID in both the tables.
4. Pick Release
Pick Release is the process of putting reservation on on-hand quantity available in the inventory and pick them for particular sales order.
Pick release can be done from ‘Release Sales Order’ form or ‘Pick release SRS’ program can be scheduled in background. In both of these cases all lines of the order gets pick released depending on the Picking rule used. If specific line/s needs to be pick release it can be done from ‘Shipping Transaction form. For this case Pick Release is done from ‘Release Sales Order’ form with Pick Confirm=NO.
Once pick release is done these are the tables get affected:
If step 3 is not done then MTL_RESERVATIONS gets updated now.
wsh_new_deliveries (one record gets inserted with SOURCE_HEADER_ID= order header ID, status_code=OP =>open)
wsh_delivery_assignments (DELIVERY_ID gets assigned which comes from wsh_new_deliveries)
wsh_delivery_details (released_status ‘S’ ‘submitted for release’)
MTL_TXN_REQUEST_HEADERS
MTL_TXN_REQUEST_LINES (LINE_ID goes as TXN_SOURCE_LINE_ID)
(move order tables. Here request is generated to move item from Source (RM or FG) sub-inventory to staging sub-inventory)
Mtl_material_transactions_temp (link to above tables through move_order_header_id/line_id, this table holds the record temporally)
MTL_SERIAL_NUMBERS_TEMP (if item is serial controlled at receipt then record goes in this table)
MTL_SERIAL_NUMBERS (enter value in GROUP_MARK_ID )
*In shipping transaction form order status remains “Released to Warehouse” and all the material still remains in source sub-inventory. We need to do Move Order Transaction for this order. Till this no material transaction has been posted to MTL_MATERIAL_TRANSACTIONS
5.Pick Confirm/ Move Order Transaction
Items are transferred from source sub-inventory to staging Sub-inventory. Here material transaction occurs.
Order line status becomes ‘Picked’ on Sales Order and ‘Staged/Pick Confirmed’ on Shipping Transaction Form.
MTL_MATERIAL_TRANSACTIONS_TEMP (Record gets deleted from here and gets posted to MTL_MATERIAL_TRANSACTIONS)
oe_order_lines_all (flow_status_code ‘PICKED’ )
MTL_MATERIAL_TRANSACTIONS (LINE_ID goes as TRX_SOURCE_LINE_ID)
mtl_transaction_accounts
wsh_delivery_details (released_status becomes ‘Y’ => ‘Released’ )
wsh_delivery_assignments
MTL_ONHAND_QUANTITIES
MTL_SERIAL_NUMBERS_TEMP (record gets inserted after putting details for the item which are serial controlled at ‘Sales order issue’)
MTL_SERIAL_NUMBERS (record gets inserted after putting details for the item which are serial controlled at ‘Sales order issue’)
* This step can be eliminated if we set Pick Confirm=YES at the time of Pick Release
6.Ship Confirm
Here ship confirm interface program runs in background. Data removed from wsh_new_deliveries.
The items on the delivery gets shipped to customer at this stage.
oe_order_lines_all (flow_status_code ‘shipped’)
wsh_delivery_details (released_status ‘C’ ‘Shipped’, SERIAL_NUMBER if quantity is ONE)
WSH_SERIAL_NUMBERS (records gets inserted with the DELIVERY_DETAIL_ID reference, only in case of shipped quantity is two or more)
mtl_transaction_interface
mtl_material_TRANSACTIONS (linked through Transaction source header id)
mtl_transaction_accounts
Data deleted from mtl_demand, MTL_reservations
Item deducted from MTL_ONHAND_QUANTITIES
MTL_SERIAL_NUMBERS_TEMP (records gets deleted from this table)
MTL_SERIAL_NUMBERS (Serial number stauts gets updated CURRENT_STATUS=4 , ‘Issued out of store’)
7.Enter Invoice
After shipping the order the order lines gets eligible to get transfered to RA_INTERFACE_LINES_ALL. Workflow background engine picks those records and post it to RA_INTERFACE_LINES_ALL. This is also called Receivables interface, that mean information moved to accounting area for invoicing details. Invoicing workflow activity transfers shipped item information to Oracle Receivables. At the same time records also goes in the table RA_INTERFACE_SALESCREDITS_ALL which hold details of sales credit for the particular order.
ra_interface_lines_all (interface table into which the data is transferred from order management) Then Autoinvoice program imports data from this table which get affected into this stage are receivables base table. At the same time records goes in
ra_customer_trx_all (cust_trx_id is primary key to link it to trx_lines table and trx_number is the invoice number)
ra_customer_trx_lines_all (line_attribute_1 and line_attribute_6 are linked to order number and line_id of the orders)
8.Complete Line
In this stage order line level table get updated with Flow status and open flag.
oe_order_lines_all (flow_status_code ‘shipped’, open_flag “N”)
9.Close Order
This is last step of Order Processing. In this stage only oe_order_lines_all table get updated. These are the table get affected in this step.
oe_order_lines_all (flow_status_code ‘closed’, open_flag “N”)
oe_order_HEADERS_all
Latest Posts
- R12 – How to Handle NULL for :$FLEX$.VALUE_SET_NAME In Oracle ERPAugust 25, 2023 - 1:20 pm
- R12 – How to Delete Oracle AR TransactionsMarch 22, 2019 - 8:37 pm
- How to Define Custom Key Flexfield (KFF) in R12January 19, 2018 - 5:43 pm
- AutoLock Box Concepts In R12November 10, 2017 - 8:30 am
- R12 – java.sql.SQLException: Invalid column type in OAFSeptember 15, 2017 - 9:39 am
| S | M | T | W | T | F | S |
|---|---|---|---|---|---|---|
| 1 | 2 | 3 | 4 | 5 | 6 | 7 |
| 8 | 9 | 10 | 11 | 12 | 13 | 14 |
| 15 | 16 | 17 | 18 | 19 | 20 | 21 |
| 22 | 23 | 24 | 25 | 26 | 27 | 28 |










Recent Comments