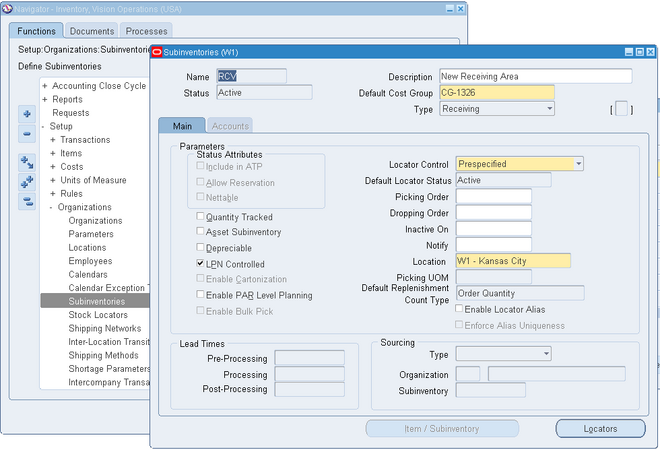
 Designates the subinventory as a receiving subinventory, and links it to a receiving location. This subinventory type is used only for receiving material. Material in this type of subinventory cannot be on-hand, or reserved.
You can not enable status attributes (Include in ATP, Allow Reservation, Nettable).
Quantity tracked, Asset Subinventory and Depreciable fields are also not applicable for receiving sub inventory.
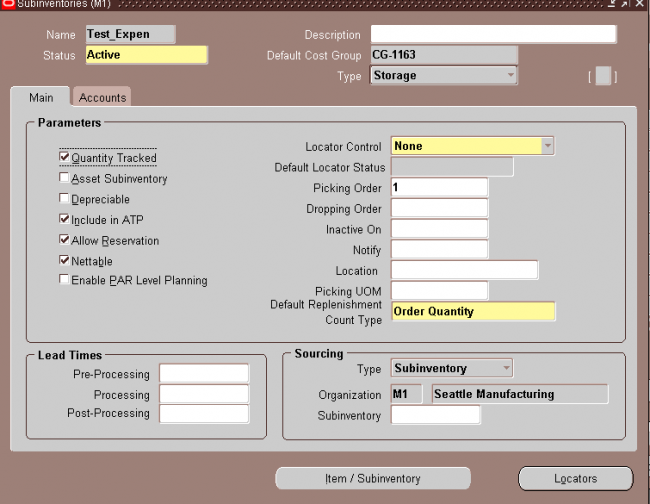
Header
1. Enter a unique alphanumeric name.
2. Indicate the material status of this subinventory, which controls the enabled transactions for all material in this subinventory. The status is not overridden by the status of any locator, lot or serial, within this subinventory. The statuses of those objects will be considered when determining transactions that are not enabled. This field is
used if you have Oracle Warehouse Management installed.
3. Indicate the default cost group for this subinventory. If the cost group assignment rules fail to identify a cost group for newly received material, this cost group will be assigned. This cost group will remain with the material, even through subinventory transfers, until you perform a cost group change transaction. This feature is available if you have Oracle Warehouse Management installed, and you are working with a WMS enabled organization.
4. Select the subinventory type from the drop down list. The available choices are as follows:
Storage: Designates the subinventory as a Storage subinventory.
Receiving: Designates the subinventory as a receiving subinventory, and links it to a receiving location. This subinventory type is used only for receiving material. Material in this type of subinventory cannot be on–hand, or reserved.
Null: No subinventory designation
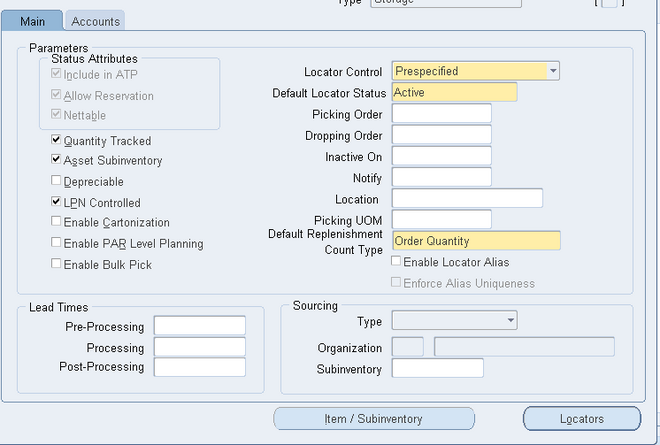
Parameters
Following are the important parameters that we must define
1. Quantity tracked Indicate whether each transaction for this subinventory updates the quantity on hand for the subinventory (Quantity Tracked).
If you leave this option unchecked, on–hand balances are not maintained and you cannot check or update the Asset Inventory, Include in ATP, Reservable, or Nettable options. You can update this value only if there is no on–hand quantity, no pending transaction, or no uncosted transaction for the subinventory.
2. Asset Subinventory: Indicate whether to maintain the value of this subinventory on the balance sheet (Asset Subinventory). You can update this value only if there is no on–hand quantity for the subinventory.
3. Include in ATP: Indicate whether to include items in this subinventory in ATP calculations.
4. Depreciable: Indicate whether to designate items in this subinventory as depreciable.
This data is needed to support depreciable and location information in the Subinventory Setup from the Oracle Network Logistics product.
5. Allow Reservation: Indicate whether to include this subinventory when you perform available–to–reserve calculations.
6 Nettable: Indicate whether the planning process uses the on–hand balance of these subinventory items as available inventory (Nettable).
7. LPN Controlled: Indicate if material may be packed into an LPN in the subinventory. If this is unchecked, all LPNs transacted into this subinventory will be automatically unpacked, and LPNs cannot be packed into this subinventory. This feature is available if you have Oracle Warehouse Management installed, and you are working with a WMS enabled organization
8. Select a type of locator control.
You can select an option only if you selected locator control as Determined at subinventory level in the Locator Control field in the Organization Parameters window. You can only update this option if there is no on–hand quantity for the subinventory.
None: Inventory transactions within this subinventory do not require locator information.
Prespecified: Inventory transactions within this subinventory require you to enter a valid predefined locator for each item.
Dynamic entry: Inventory transactions within this subinventory require you to enter a locator for each item. You may choose a valid predefined locator, or define a locator dynamically at the time of transaction.
Item level: Inventory transactions use locator control information that you define at the item level.
9. Optionally, enter an inactive date for the subinventory.
10. Enter a location for the subinventory. If the Subinventory type is Receiving, this field is mandatory.
Lead times
Optionally, enter pre–processing, processing, and post–processing lead times for items in this subinventory.
These lead times are used when you use min–max planning at the subinventory level.
Sourcing
Inventory: Replenish items internally, from another organization.
Supplier: Replenish items externally, from a supplier you specify in Oracle Purchasing.
Subinventory: Replenish items internally, from another subinventory in the same inventory organization.Navigate to the Subinventories Summary folder window. Choose New. The Subinventories window appears.
subinventory account information
Enter the general ledger accounts.The default accounts are those defined for the organization in the Organization Parameters window. If you are using average costing, you may enter the valuation accounts, but they are not used. Average costing uses only the Expense and Encumbrance accounts. If you use standard costing, and Oracle Bills of Material is installed, all asset accounts are required. If you use standard costing, and Oracle Bills of Material is not installed, you are only required to enter the Material and Material Overhead accounts.
An operator can also only specify a receiving subinventory if they are using a mobile device to receive the material.
Note: Operators cannot transfer material from a storage subinventory to a receiving subinventory.
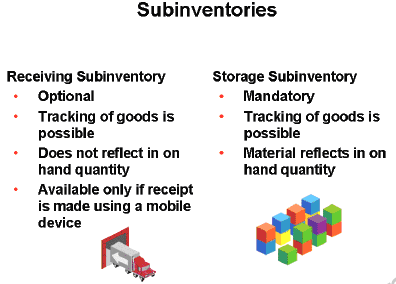
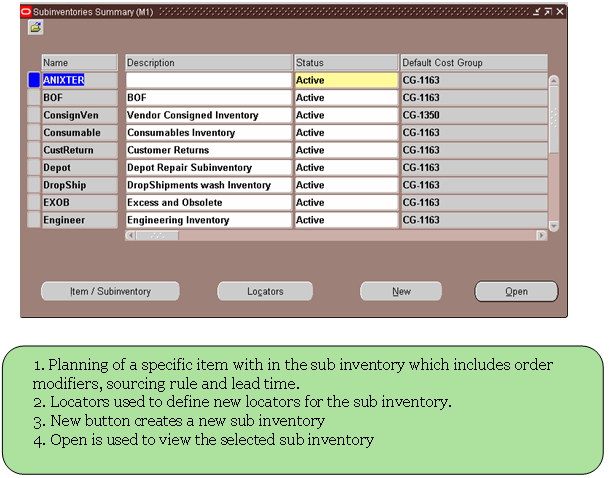
Table : MTL_SECONDARY_INVENTORIES
i. Business group
ii. Legal Entity
iii. Operating Units
iv. Organization
Internal organizations (for example, departments, sections or cost centers)
Creating an Organization
1. Enter a name for your organization in the Name field. A check is performed to see if organizations with the same name already exist.
All Oracle applications you install share the information entered in the Organization window. Therefore organization names must be unique within a business group, and business group names must be unique across your applications network.
You can create two organizations with the same name in different business groups but this can cause confusion later, if the HR: Cross business group profile option is set to Yes and you decide to share certain information across all business groups. If you decide to create two organizations with the same name, be sure that this will not cause you problems in the future.
2. Optionally, select an organization type in the Type field.
Organization types do not classify your organization, you use them for reporting purposes only. The type may identify the function an organization performs, such as Administration or Service, or the level of each organization in your enterprise, such as Division, Department or Cost Center.
3. Enter a start date in the From field. This should be early enough to include any historical information you need to enter.
Note: You cannot assign an employee to an organization before the start date of the organization.
4. Enter a location, if one exists. You can also enter an internal address to add more details such as floor or office number.
If you are using Oracle Payroll in the US, every organization to which employees can have assignments, including business groups, must have on record a location with a complete address. This is because the system uses the location of the organization of the employee’s primary assignment to determine employee work locations for tax purposes. This does not apply to GREs, because the assignment to a GRE exists in addition to the assignment to an organization.
For Dutch users only, if you are setting up external organizations for a tax office, a social insurance provider or a private health insurance provider, you must enter the postal address and contact details using the NL_POSTAL_ADDRESS Location EIT.
Note: If you are an Oracle Inventory user, then you must not assign a location to more than one organization classified as an Inventory Organization.
5. Enter internal or external in the Internal or External field. You cannot assign people to an external organization.
Examples of external organizations that may require entry are disability organizations, benefits carriers, insurance carriers, organizations that employees name as beneficiaries of certain employee benefits, and organizations that are recipients of third party payments from employees’ pay.
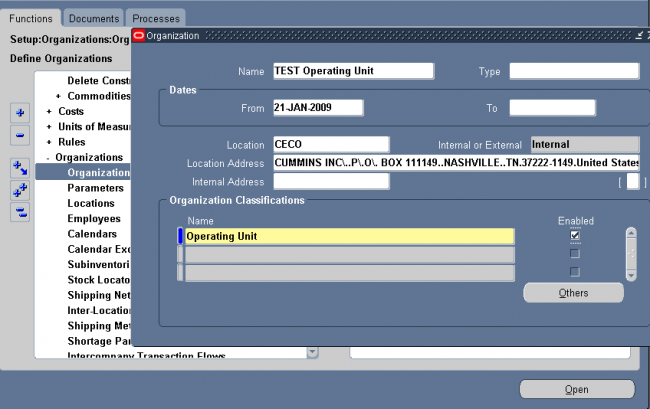
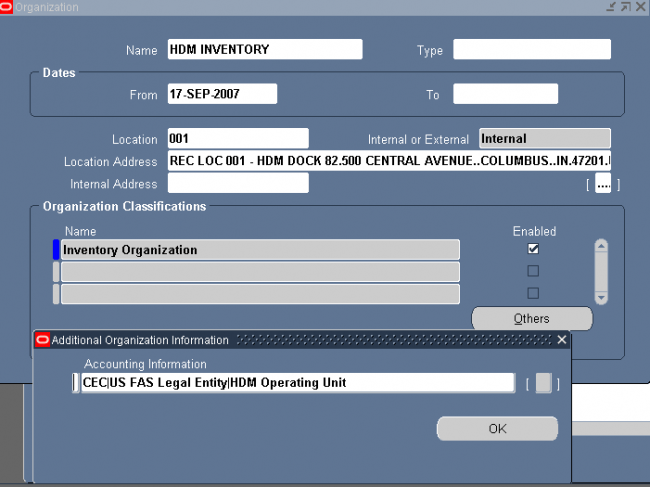
Enter Organization Classifications & Additional Information
1. Business Group
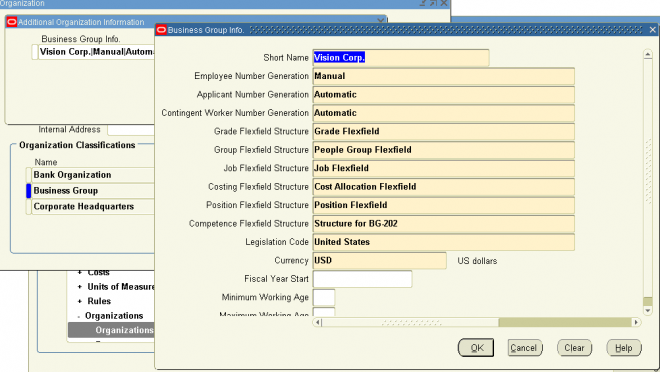
Business Group Information.
Budget Value Defaults.
Work Day Information.
Benefits Defaults.
PTO Balance Type.
Recruitment Information.
Payslip Information.
Self Service Preference Information.
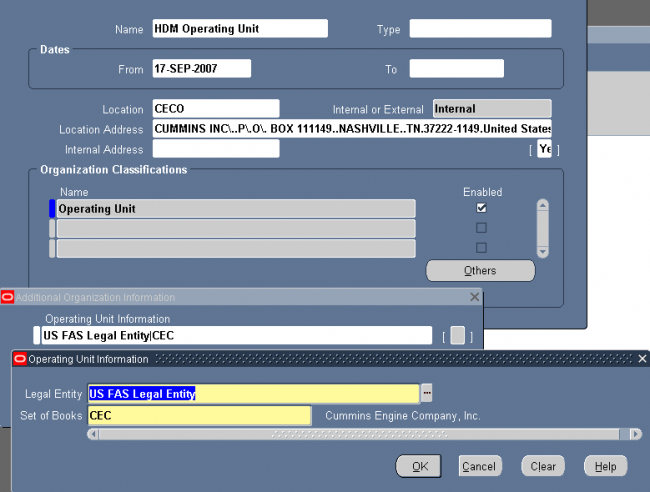
2. Attaching Set of Books to Legal Entity
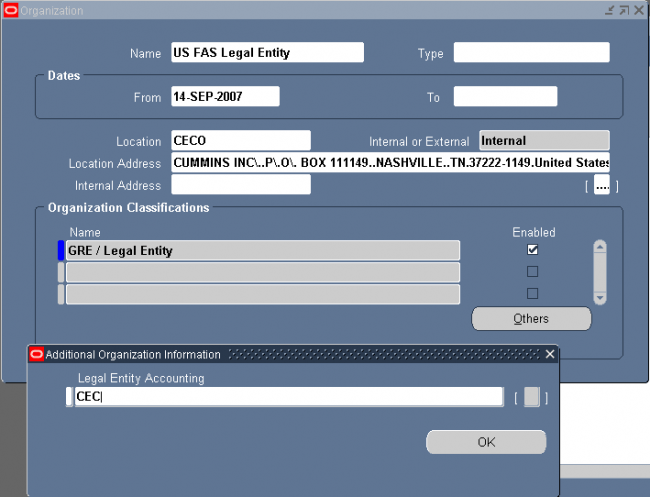
3. Attaching Set of Books & Legal Entity to Operating Unit
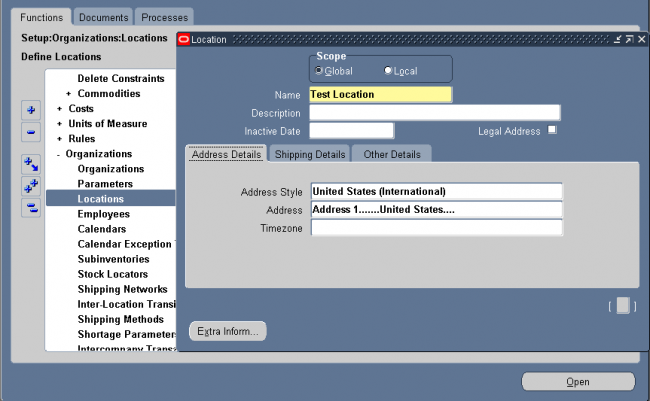
Locations are shared across Business Groups in HRMS and with two other Oracle applications: Inventory and Purchasing. HRMS does not use some of the fields in the Location window. These fields are disabled for HRMS users. For example, the Legal Address check box is read-only and supports future functionality in Oracle Financials.
Header
Uncheck the Global check box if you want the location to only be available within the default Business Group of your current responsibility. Accept the default if you want the location to be a global location and therefore available to all Business Groups. If you are setting up a global location, the location name must be unique across all Business Groups. If you are setting up a location for one Business Group, the location name must be unique within that Business Group and all global locations, but does not have to be unique across all Business Groups.
Note: You cannot amend the Global check box once you have set up your location.
Address Details Tab
Select a national address style from the list. If a local address style exists for your country, it is displayed as the default. Otherwise, the international style is displayed.
Shipping Details
Selecting the check boxes means that you are making the location Name a valid location in the list of values on a Purchasing
document. For example, selecting Ship–To Site makes the location Name a valid choice in the list of values for the Ship–To field on a purchase order header. Note that if you define a default Ship–To or Bill–To Location in the Supplier–Purchasing region of the Financials Options window for your organization, that is the location that defaults onto your purchase orders. But if you wanted to change that default, the location Name that you define here and enable as a Ship–To or Bill–To site is available in the list of values for you to choose from in the Ship–To or Bill–To fields.
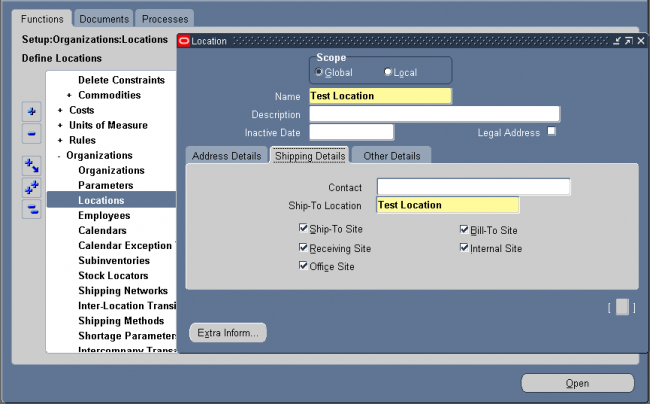
Contact: Optional contact name for the location Name.
Ship–To Location : Its the receving dock. Usually the same as the location Name. You could select a separate, previously defined Ship–To Location—for example, if you wanted to create a location Name, Office A, and specify Receiving Dock A as its Ship–To Location. Note, however, that once you specify a separate Ship–To Location, you can no longer enable the location Name as a Ship–To Site. In this example, Receiving Dock A is the ship–to site for Office A; therefore, Office A itself cannot also be the ship–to site.
Ship–To Site: Is this location is a receving dock. Select this option to make the location Name a valid ship–to organization on a purchase order or requisition.
Bill–To Site: Select this option to make the location Name a valid bill–to site. The Bill–To Site, which is used by Payables, is specified on a purchase order header.
Receiving Site: Select this option to make the location a valid receiving Location when creating a receipt or receiving transaction.
Office Site: Select this option to indicate that this location Name is an office site, such as a field office.
Internal Site: Select this option to make the location a valid internal ship–to location when creating an internal requisition.
Other Details
Inventory Organization: Select an inventory organization within which this location will be available in the list of values on a Purchasing document. By selecting no inventory organization, this location becomes available on Purchasing documents
in all organizations.
EDI Location: If you use Electronic Data Interchange (EDI) to receive Advance Shipment Notices (ASNs) or ASNs with billing information (ASBNs), enter a defined location. This location should match the ship-to location specified on an ASN or ASBN
Latest Posts
- R12 – How to Handle NULL for :$FLEX$.VALUE_SET_NAME In Oracle ERPAugust 25, 2023 - 1:20 pm
- R12 – How to Delete Oracle AR TransactionsMarch 22, 2019 - 8:37 pm
- How to Define Custom Key Flexfield (KFF) in R12January 19, 2018 - 5:43 pm
- AutoLock Box Concepts In R12November 10, 2017 - 8:30 am
- R12 – java.sql.SQLException: Invalid column type in OAFSeptember 15, 2017 - 9:39 am
| S | M | T | W | T | F | S |
|---|---|---|---|---|---|---|
| 1 | 2 | 3 | 4 | 5 | 6 | 7 |
| 8 | 9 | 10 | 11 | 12 | 13 | 14 |
| 15 | 16 | 17 | 18 | 19 | 20 | 21 |
| 22 | 23 | 24 | 25 | 26 | 27 | 28 |

Recent Comments