Optional step before defining inventory organization
Define Location.
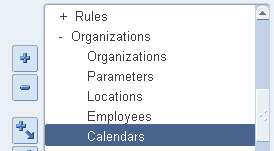
1. Now In Inventory responsibility navigate to
    Setup -> Organizations -> Organizations

Enter organization name and type from pre defined list.
In this case this organization is defined as Master Org.
2. To define a location navigate to
     Setup -> Organizations -> locations


There are two options for scope Global and Local
Global: If global selected then this location will be available for all modules.
After entering name and description move to address details tab.


3. Choose your address style as address styles are defined according to your country.
    Enter remaining details and save you work. 

4. Now select location ORK Locations in organization definition form.

    Save your work as it is required before proceeding to next step.
    In classification tab select inventory organization from list of values and check it.

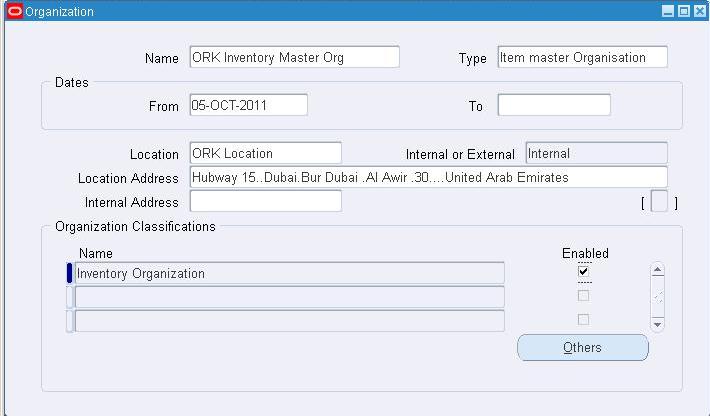
5. Now click on others to add additional organizational information.
1.EGO_ITEM_PUB.Assign_Item_To_Org

This API provide functionality to assign one/more items to an organization(s)
How to Assign Item Using Assign_item_to_org 


2. Item Creation and Updation Public API.
This API used to create items.
EGO_ITEM_PUB.Process_item(s)

 3. Category Code Creation Public API.
This API provides functionality to create a category.
INV_ITEM_CATEGORY_PUB.Create_Category

4. Item Category Assignment Public API
EGO_ITEM_PUB.Process_Item_Cat_Assignment

5. Item Catalog Descriptive Element Public API.

EGO_ITEM_PUB.Process_item_descr_elements

6. Item Revision Creation and Updation Public API.

EGO_ITEM_PUB.Process_Item_Revision
7. Implement Item Pending Changes Public API.

This API provides functionality to implement pending changes (phase and/or status) for an item/item revision.

EGO_ITEM_PUB.Implement_Item_Pending_Changes
8. Item Lifecycle Public API.

EGO_ITEM_PUB.Process_item_phase_and_status
9. Item Grant public API

EGO_ITEM_PUB.Process_item_role
10. Item User-Defined Attributes Data Public API.

EGO_ITEM_PUB.Process_User_Attrs_For_Item
11. Item Assignment to an Organization Public API.
1.    First define value set for item flexfield segments.
Go to inventory responsibility and navigate to value set.
Setup -> Flexfield->Validation->Sets
2.       Define Value Set for Item Section.
Choices: List Type, Enter format validation of your own choice, validation type.

3.       Define Value Set for Sub Section.
Sub Section Value Set is dependent on item section.
To configure select dependent validation type and click on Edit Information.
4.       Define Value Set For Serial No.
Serial No is also dependent on item section.
5.       Now value set for Condition Code and future segment.
Ok we are done with first part of creating value set. Now for second step .

6.       Navigate to Key Flexfield Segments Definition Form.
         Setup -> Flexfield->Key->Segments
7.       Now search with flexfield title “System Items”.
8.       Click on Segments and navigate to  Segment Summary Window.
Now enter your desired item segments name and their corresponding value sets.
Column indicates the database fields that will hold entered value for specific segment.
9.       After entering segments summary navigate back to KFF segments window. Save form and check freeze flex field definition option.
10.       Now compile your KFF.
      It is configured now.
If you want to predict needs of your material or to plan material requirement then you can configure workday calendar for this.
Work day calendar(Oracle Inventory Calendar) provide lot of flexibility in terms of shifts, pattern for working days also you can configure exceptions.
Following are Configuration Steps.
1.       Go to work day calendar.
Setup>Organizations>Calendars

On Workday Calendar Window.

You can choose weekly calendar, monthly or periodic calendar type.
Like 4/4/5 is two four-week periods followed by one five week period and 5/4/4 is vice versa.
For twelve months in a year use calendar months.
 13 Periods is thirteen for week period’s year wise.
Start date and end date are very important in configuring work day calendar.
As your organization standard on and off days will be calculated on the base of start date along with week day.
i.e.  For standard five day week your start date must fall on Monday.
Ok it’s all done on work day calendar window.
Workday Patterns

Now navigate to Workday pattern window.
Like 5 days on 2 day off or 7 day on 0 day off. Whatever is your requirement?
Configuring Shifts

Multiple no of shifts can be configured for single calendar.

Enter shift start time and end time.
Likewise you can separately define different shifts and their specific time lines.

Now navigate back to Inventory Calendar window and save you work.
Saving your work will generate complete calendar from start date to end date given in calendar window.

Handling Exception
Click on any date and then navigate to exceptions window. Do this by choosing the exception list button.
Here you can define exception related to this date.
Like in following picture we create an exception by declaring and off day as on.

Save your work.

Cost type is required while we define any new organization.

Some cost types which are already defined are Average and Frozen.
Steps to Define.
Choose inventory responsibility and navigate to form.
Setup -> Costs -> Cost Types
On Cost Type Window

Default cost type is basically used for items where any specific type is not defined.
Date to inactivate cost is used to inactive your cost at specific date except for average and frozen cost type because frozen and average cost cannot by inactivate.
If multi org is checked then this type is available for all organization but not its costs.
If unchecked then this type is only available for organization which created it.
If allow update is checked then this cost type can be updated by available average cost update processes.

If for this type you want component yield effect in rollup then check this box.

Once Cost Type is defined let’s Move forward to Defining and configuring Inventory Organization