If you want to predict needs of your material or to plan material requirement then you can configure workday calendar for this.
Work day calendar(Oracle Inventory Calendar) provide lot of flexibility in terms of shifts, pattern for working days also you can configure exceptions.
Following are Configuration Steps.
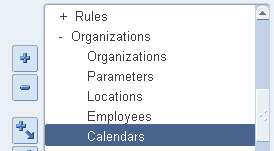
1.       Go to work day calendar.
Setup>Organizations>Calendars

On Workday Calendar Window.

You can choose weekly calendar, monthly or periodic calendar type.
Like 4/4/5 is two four-week periods followed by one five week period and 5/4/4 is vice versa.
For twelve months in a year use calendar months.
 13 Periods is thirteen for week period’s year wise.
Start date and end date are very important in configuring work day calendar.
As your organization standard on and off days will be calculated on the base of start date along with week day.
i.e.  For standard five day week your start date must fall on Monday.
Ok it’s all done on work day calendar window.
Workday Patterns

Now navigate to Workday pattern window.
Like 5 days on 2 day off or 7 day on 0 day off. Whatever is your requirement?
Configuring Shifts

Multiple no of shifts can be configured for single calendar.

Enter shift start time and end time.
Likewise you can separately define different shifts and their specific time lines.

Now navigate back to Inventory Calendar window and save you work.
Saving your work will generate complete calendar from start date to end date given in calendar window.

Handling Exception
Click on any date and then navigate to exceptions window. Do this by choosing the exception list button.
Here you can define exception related to this date.
Like in following picture we create an exception by declaring and off day as on.

Save your work.

Cost type is required while we define any new organization.

Some cost types which are already defined are Average and Frozen.
Steps to Define.
Choose inventory responsibility and navigate to form.
Setup -> Costs -> Cost Types
On Cost Type Window

Default cost type is basically used for items where any specific type is not defined.
Date to inactivate cost is used to inactive your cost at specific date except for average and frozen cost type because frozen and average cost cannot by inactivate.
If multi org is checked then this type is available for all organization but not its costs.
If unchecked then this type is only available for organization which created it.
If allow update is checked then this cost type can be updated by available average cost update processes.

If for this type you want component yield effect in rollup then check this box.

Once Cost Type is defined let’s Move forward to Defining and configuring Inventory Organization

This post will cover API ego_item_pub.assign_item_to_org used to assign item to an organization.
Step by step demonstration of code.
Please download attached file to use as sample code. This sample code assign single item at a time to single organization you can modify it for multiple items or multiple organizations at a time.
This API assigns a specific item to any inventory organization. The item to be assigned must already assigned to parent organization before running this API.

Input parameters.
P_param1                   pass inventory item id.
P_organization_id      organization id to which you want to assign item
P_organization_code organization code of specific organization


Variables need to be assign values by you.
l_user_id                     your used id
l_resp_id                     your responsibility id
l_application_id          application id

Get this information from fnd_responsibility table.

Running attached code I recommend to run it initially for some items and verify that these items are assigned to specific organizations.

Download.
To register your custom table under FND.

1. Input is your custom table name. Execute these  4 queries
2. Spool the records
3. Execute the spooled records in apps
4. Commit;

select ‘EXEC ‘||’AD_DD.REGISTER_TABLE(”XXCUST”, ”’||TABLE_NAME||”’,”T”,8,10,90);’ from all_tables
where table_name = :TABLE_NAME
/
select ‘EXEC ‘||’AD_DD.REGISTER_COLUMN(”XXCUST”, ”’||TABLE_NAME||”’,”’||COLUMN_NAME||”’,’||COLUMN_ID||’,”’||DATA_TYPE||”’,’||DATA_LENGTH||’,”’||NULLABLE||”’,”N”);’ from all_tab_columns
where table_name = :TABLE_NAME
ORDER BY COLUMN_ID
/
select ‘EXEC ‘||’AD_DD.REGISTER_PRIMARY_KEY(”XXCUST”,”’||INDEX_NAME||”’,”’||TABLE_NAME||”’,”’||ITYP_NAME||”’,”S”,”Y”,”Y”);’
FROM ALL_INDEXES
WHERE table_name = :TABLE_NAME
and uniqueness = ‘UNIQUE’
/
select ‘EXEC ‘||’AD_DD.REGISTER_PRIMARY_KEY_COLUMN(”XXCUST”,”’||A.INDEX_NAME||”’,”’||A.TABLE_NAME||”’,”’||A.COLUMN_NAME||”’,’||A.COLUMN_POSITION||’);’
FROM ALL_IND_COLUMNS A, ALL_INDEXES B
WHERE A.TABLE_NAME = :TABLE_NAME
AND A.INDEX_NAME = B.INDEX_NAME
AND B.UNIQUENESS = ‘UNIQUE’
/

To delete the registered Tables, columns
select ‘EXEC ‘||’AD_DD.DELETE_TABLE(”XXCUST”, ”’||TABLE_NAME);’ from all_tables
where table_name = :TABLE_NAME
/
select ‘EXEC ‘||’AD_DD.REGISTER_COLUMN(”XXCUST”, ”’||TABLE_NAME||”’,”’||COLUMN_NAME);’ from all_tab_columns
where table_name = :TABLE_NAME
ORDER BY COLUMN_ID
/

Create this function:

CREATE OR REPLACE FUNCTION totworkdays (fromdate DATE, todate DATE)
   RETURN NUMBER IS
   totalsundays     NUMBER;
   totalsaturdays   NUMBER;
begin
   totalsundays
        := NEXT_DAY (todate – 7, ‘sunday’)
           – NEXT_DAY (fromdate – 1, ‘sunday’);
   totalsaturdays
      :=   NEXT_DAY (todate – 7, ‘saturday’)
         – NEXT_DAY (fromdate – 1, ‘saturday’);

   RETURN (todate – fromdate – (totalsundays + totalsaturdays) / 7 – 1);
END totworkdays;

Call this function as follows:

declare
lv_tot_work_days number;
begin
lv_tot_work_days := totworkdays (’01-jan-2009′, ’31-jan-2009′);
dbms_output.put_line(‘Total Work Days: ‘||lv_tot_work_days);
end;