Bar Code Local Setup:

1) Copy Barcode font in C:WindowsFonts directory.
2) Copy xdo.cfg in C:Program FilesOracleXML Publisher DesktopTemplate Builder for Wordconfig directory. The sample file is already available when BI Publisher desktop is installed.
3) Right click the font file and go to properties. Copy the .ttf file name. Double click the font file to get the family name.
4) Open the xdo.cfg file and paste as follows (My filename is w39elc.ttf and font family is WASP 39 ELC)

<font family=”WASP 39 ELC” style=”normal” weight=”normal”>  <truetype path=”C:WINDOWSFontsw39elc.ttf” /> </font>

Bar Code Application Setup:
Basically this post refers to any font that you want to embed into you output but I was working specifically on demand to insert the barcode.
So start with something simple. Obtain the font file. In my case I posses “WASP 39 ELC” font. Font file name is w39elc.ttf. Install the font into Windows by double clicking on it and choosing “install”
Open your RTF template and place the bar code in the location you want.


So far so good and if you run this template locally on your workstation you will see the bar code. But not in EBS.
  This is what you need to do in order to make it work in EBS
Open “XML Publisher Administrator” responsibility
Go to “Administration”-> “Font Files”


Click on “Create Font File”


In “Font Name” put the name of the font as it appears in Word. Choose the font file and click “Apply”


Go to “Administrator”-> “Font Mapping”
image
Click on “Create Font Mapping Set”


Put into “Mapping Name” – Bar Code Fonts, into “Mapping Code” – BAR_CODE_FONTS, into “Type” –FO To PDF and click “Apply”


Click on the Bar Code Fonts link


Click on “Create Font Mapping”


Define Font Mapping as appears in the print screen bellow and click “Continue”


Ok, now you need  template to “know” the bar code font we just created.


Open template definition and go to “Edit Configuration”
Expand “FO Processing” and put into “Font Mapping Set” – Bar Code Fonts and click “Apply”.


Now you can run your template and it will display the bar code properly.

Developing XML Publisher Report – Using Data Template as Data Source

Background: 
Developing XML Publisher Report – Using Data Template(.xml) as Data Source and Template(.rtf) as Layout.
Note that, we can use .rdf file as data source. But for this demo we are using Date XML Template.
Prerequisite for the below Example:

1. Create a table
CREATE TABLE demo_products
(  product_code   NUMBER,
   product_name   VARCHAR2 (100));

2. Insert Values
INSERT INTO demo_products
     VALUES (569, ‘Oracle Cost Management’);
3. Issue Commit

Step1: Define Data Template:

The data template is the method by which you communicate your request for data to the data engine.
The data template is an XML document that consists of four basic sections:  

  • Define parameters: In which parameters are declared in child <parameter> elements
  • Define triggers:
  • Define data query: In which the SQL queries are defined in child <sqlStatement> elements
  • Define data structure: In which the output XML structure is defined
 Create Data Template: (Save this file as XXDPDT.xml)
<?xml version=”1.0″ encoding=”UTF-8″?>
<dataTemplate name=”demoProductsDT” description=”Demo Products Details” version=”1.0″>
   <parameters>
     <parameter name=”p_product_id” datatype=”number”/>
   </parameters>
  <dataQuery>
    <sqlStatement name=”DQ”>
         <![CDATA[ SELECT product_code, product_name FROM demo_products 
                            WHERE product_code = NVL(:p_product_id,product_code) ]]>
    </sqlStatement>
  </dataQuery>
  <dataStructure>
    <group name=”G_DP” source=”DQ”>
      <element name=”PRODUCT_CODE” value=”product_code”/>
      <element name=”PRODUCT_NAME” value=”product_name”/>
    </group>
  </dataStructure>
</dataTemplate>
  • This Data Template selects the product details from the demo_products table. It uses a bind parameter to find the product name against the product code.
  • For each bind parameter in the query , we need to define a Parameter in the Concurrent Program

Step 2: Create Data Definition & Associate with Data Template
Navigation: XML Publisher Administrator -> Data Definitions -> Create Data Definition
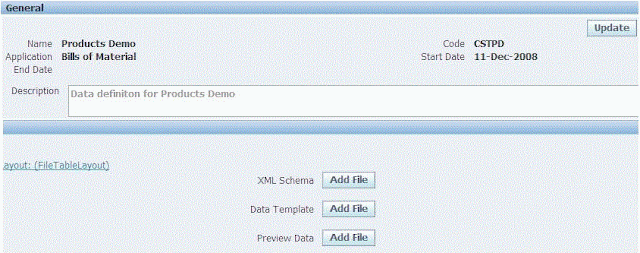
Screen 1 : Create Data Definition
       Enter the data definition Details and click on Apply. Note down the Code. 
       The code should be used as the short name of the concurrent program.

Screen 2: Associate Data Template
       View Data Definition
Click on ‘Add File’ button to upload Data Template file that was created through step 1
Screen 3: Data Definiton
       Data Template is associated with Data Definition

Step 3: Define a Concurrent Program to generate the Data XML output. 
Note:
1. Output format should be XML
2. Short Name in the concurrent program and Code in the data definition should be same.
Screen 2: Concurrent Program – Parameters
For each parameter in the Data Template, define a parameter in the concurrent program.
The Data Template parameter name should match the concurrent program parameter token
Note:
Token is p_product_id. This is the bind parameter we have used in date template. For every bind parameter used in the data template, we have to define parameter in the concurrent program.
Screen 3: Associate the Concurrent Program to a request group.
Screen 4: Execute the concurrent program “Product Demo Report”and click on the output button get the Data XML. Save the XML file. We will use it to generate the RTF Template.
Screen 5: Concurrent Program Output
Note:
We are getting the output in xml because we didn’t define template & associated yet.

Step 4: Define the RTF Template using the Generated Data XML

Pre-requisite : Install XML Publisher Desktop
After installation following Menus & Toolbars gets added to the MS Word.

Load XML Data generated by Concurrent Program
Data -> Load XML Data
Message after loading the data
Using the Table Wizard as below to create the ‘Table Report Format’ with the columns of demo_products.

Final Output layout look like this.

Save this file with .rtf extension
Step 5: Registering the Template with BI Publisher
Navigation: XML Publisher Administrator -> Templates -> Create Template

Step 6: Run the concurrent program to see the output

Note:

As already mentioned output format can be anything. Here it is pdf. We can select format that we want at the runtime.

References:
http://www.oracle.com/technology/products/xml-publisher/index.htm
http://www.oracle.com/technetwork/middleware/bi-publisher/overview/index.html
http://xdo.us.oracle.com
Oracle® XML Publisher Administration and Developer’s Guide

FAQ:
What is XDODTEXE used in the Executable section of Concurrent Program?

XDODTEXE is a BI Publisher Data Template Executable. The purpose of this executable is to identify data template file (.xml) and execute the data template to generate the raw xml data, that later can be used by BI Publisher formatting engine to format as as per the layout (RTF, PDF etc).
This executable will be used by all the BI Publisher reports (Concurrent Program) which are using Data Template to generate the xml data. 

Pre-requisites :
Step1: Data Definition and Template to be created
Step2: Concurrent program needs to be created

Steps To Create the PL/SQL package:

1. Initialize the  Session Specific variable using fnd_global.APPS_INITIALIZE
2. Set The BI publisher report layout Before submitting the concurrent program
3. Submit the Concurrent Program

Code: (Tested in R12.1.1 )

DECLARE
l_user_id              fnd_user.user_id%TYPE;
l_resp_id              fnd_responsibility.responsibility_id%TYPE;
l_resp_appl_id         fnd_application.application_id%TYPE;
l_set_layout           boolean;
l_request_id           NUMBER;
l_phase                VARCHAR2 (100);
l_status               VARCHAR2 (100);
l_dev_phase            VARCHAR2 (100);
l_dev_status           VARCHAR2 (100);
l_wait_for_request     boolean := FALSE;
l_get_request_status   boolean := FALSE;
Output_layout_failed EXCEPTION;
request_submission_failed EXCEPTION;
request_completion_abnormal EXCEPTION;
BEGIN
l_request_id := NULL;


— Get the Apps Intilization Variables

SELECT   fnd.user_id, fresp.responsibility_id, fresp.application_id
INTO   l_user_id, l_resp_id, l_resp_appl_id
FROM   fnd_user fnd, fnd_responsibility_tl fresp
WHERE   fnd.user_name = ‘OEAG’
AND fresp.responsibility_name = ‘Custom XML Reports’;


–Initialize the Apps Variables

fnd_global.APPS_INITIALIZE (user_id        => l_user_id,
resp_id        => l_resp_id,
resp_appl_id   => l_resp_appl_id);

COMMIT;


— Set the Layout  for BI Publisher Report

l_set_layout :=
fnd_request.add_layout (template_appl_name   => ‘XXERP’,
template_code        => ‘XXORACLEERPAPPSGUIDE’,
–Data Template Code
template_language    => ‘en’,
template_territory   => ‘US’,
output_format        => ‘PDF’);

IF l_set_layout
THEN
— Submit the Request

l_request_id :=
fnd_request.submit_request (application   => ‘XXERP’,
program       => ‘XXOEAG_PG’,
description   => ”,
start_time    => SYSDATE,
sub_request   => FALSE,
argument1     => l_person_id);

COMMIT;

IF l_request_id > 0
THEN

–waits for the request completion

l_wait_for_request :=
fnd_concurrent.wait_for_request (request_id   => l_request_id,
interval     => 60,
max_wait     => 0,
phase        => l_phase,
status       => l_status,
dev_phase    => l_dev_phase,
dev_status   => l_dev_status,
MESSAGE      => l_messase);

COMMIT;


— Get the Request Completion Status.

l_get_request_status :=
fnd_concurrent.get_request_status (
request_id       => l_request_id,
appl_shortname   => NULL,
program          => NULL,
phase            => l_phase,
status           => l_status,
dev_phase        => l_dev_phase,
dev_status       => l_dev_status,
MESSAGE          => l_messase
);


–Check the status if It IS completed Normal Or Not

IF UPPER (l_dev_phase) != ‘COMPLETED’
AND UPPER (l_dev_status) != ‘NORMAL’
THEN
RAISE request_completion_abnormal;
END IF;
ELSE
RAISE request_submission_failed;
END IF;
ELSE
RAISE Output_layout_failed;
END IF;

p_request_id := l_request_id;
EXCEPTION
WHEN Output_layout_failed
THEN
DBMS_OUTPUT.put_line (‘Out put Layout failed’);
WHEN request_submission_failed
THEN
DBMS_OUTPUT.put_line (‘Concurrent request submission failed’);
WHEN request_completion_abnormal
THEN
DBMS_OUTPUT.put_line (
‘Submitted request completed with error’ || l_request_id
);
WHEN OTHERS
THEN
DBMS_OUTPUT.put_line (‘ERROR:’ || SUBSTR (SQLERRM, 0, 240));
END;

/

You can Create this as PL/SQL Procedure and register into Concurrent Program also.

Setting the Password for PDF File sent through XML Publisher

Open the rtf for which you want to set password and do the following things

1) Open the .rtf
2) Go to File – > Properties
Create a new custom property
a) Name : xdo-pdf-open-password
Type : text
Value : Either Hard Code the value / or get the value for xml data
b) Name : xdo-pdf-security
Type : text
Value : true

Note : property name should always start with xdo- .

Training  of XML Publisher Report (XMLP) or BI Publisher Reports:

How to Develop XML Publisher Report (XMLP) or BI Publisher Reports?

hey Guys Now adays BI Publisher is in Boom technology formally it know as XMLP means XML Publisher.
We can develop this by using following steps:

1)Develop the Report(.rdf) Only DataModel

2)Save the report and Compoile and Generate the data in .xml
           Format File=>Generate to File => XML

3)Open the Ms-Word document Design the Layout include the follwing Tool Bar options called Form and Templete builder

4)Define the Table and Specify the Titles and Labels whatever we would like to print

5)Include ‘Text Form Field’ Double CLick => Add Help Text button enter the following syntax : Here G_USER_ID is Group name from .rdf Data Model Note: It means Indirectley Repeating Frame starting

6)Define the Fields which we would like to display Include ‘Text Form Field’ Double CLick => Add Help Text button enter the following syntax ?
Note: Define all the fields like this

7)We have to close the Repeating Frame (For each Loop) Include ‘Text Form Field’ Double CLick => Add Help Text button enter the following syntax

8)Save the document in .rtf(Rich Text File format)

9)Load the .xml file data and generate the Output in pdf Format Data=>Load XMl Data=>Load the .xml File=>Once Data is Loaded succesfully

10)Generate the Preview as per this Preview=>PDF

Registering in Apps

1)Develop the .rdf file and .rtf file

2)Register both .rdf and .rtf file

.rdf File Registration

1)Move the .rdf file into CUS_TOP11.5.0ReportsUS

2)Create Execuiteable

Concurrent Program Output = XML

Request Group

Responsibility

User

SRS

3)Copy the Concurrent Program Short name .rtf File

RTF Registration:

1)Goto the XML Publisher Administrator Responsibility

2) Creation of Data Defination
Select Data Definations form Enter Data Defination

Name = Enter Any Name

Code = Concurrent Program Short Name

Application = Any application

startdate = Current Date

3)Copy the DataDefination name we have to add this to the Templete

4)Creation of Template form

Open the Templete Form

Enter Templete Name : Any Name

DataDefination : enter data defination whatever we have created

Code : Concurrent Program Short Name

Type : rtf

application : any Application

File : Upload the .rtf file

Laguage : English

Territory : United States

5)Select Apply button

After register the .rtf file submit concurrent Program from SRS window system will automatically pick the .rtf file and generates the Output.

If we want to customze the .rtf file we have to download by using templete , Customize thenupload the .rtf templeteme, a.sal, b.sal, b.empno, b.ename from emp a, emp b where a.mgr=b.empno and a.sal>b.sal